Moses Ludel
-
Posts
4,447 -
Joined
-
Last visited
Content Type
Profiles
Forums
Blogs
Store
Articles
Gallery
Everything posted by Moses Ludel
-

1955 Jeep CJ5 Tub, Frame, Axles and Gear Train Rescue!
Moses Ludel replied to JohnF's topic in Vintage Jeep® Vehicles 1941-71
Wow, JohnF, what a find! For your neck of the woods, this first year model CJ-5 is in good shape. Rust is the main issue for Midwest and East Coast vehicles. You have a tremendous value here, some prized parts for rebuilding or restoration work. Great find! When I found my '55 CJ-5 (featured in the Jeep CJ Rebuilder's Manual: 1946-71), it had been setting idle for decades with a minor amount of bare metal exposure—at Carson City, Nevada in the high, dry desert country. The Jeep had only minor surface rust, no exfoliation or rust perforation anywhere. I know this is nearly impossible for Eastern or even Midwest vehicles. My Jeep friends at Chrysler all come West to find rust-free vehicles for projects. They have sent me requests to look for vehicles in our region... If the frame on your "new" '55 is intact, and it looks like a late '55-'56 frame or newer with the front spring anchors at the rear of the springs, would you consider a tub replacement and restoration or a "buildup" with this Jeep? Surely, you can sell the parts described, though intact the Jeep CJ does have cache and potential for either a restoration or a buildup. Would you attempt to restore this tub, addressing the rust perforation? If not, there are new steel tubs available. In my experience with the F-head four, though a delight to restore and look at, the engine design is ancient technology and very poorly suited for highway use. For off-road use, however, the F-134 is a viable option. Frankly, for drivability, I'd be inclined to do a V-6 (3.8L Buick or 4.3L Vortec Chevy) swap, plenty of power for the light weight and short 81" wheelbase. I would upgrade to Saginaw power steering with a slow-ratio (4:1 or slower) gear, big (stock diameter) steering wheel and one-piece tie rod in place of the bell crank and twin tie-rods. A front spring shackle reverse is a major gain, I got lucky with my '55, it came factory-built with the M38A1 frame—they had the anchors at the front end of the front springs. The earliest CJ-5s were built on this frame. Interesting how these vehicles conjure up such "plans"! Always fun to find a Jeep like this one, JohnF—congratulations, and let us know where this goes! At the very least you have prime parts for trading or selling... Moses -
Well, Belvedere, you are among the 1,560,000 owners who could be eligible for a free hitch! Here's the NHTSA statement about the issue and repair: http://www-odi.nhtsa.dot.gov/owners/SearchResults?searchType=ID&targetCategory=R&searchCriteria.nhtsa_ids=13V252000. You'll like the Mopar hitch, these parts fit well and enhance the appearance and function of your vehicle. They add value, too! Moses
-
The IAC is the idle air control. Disconnecting it should affect the engine idle speed. A defective IAC shows up as an unstable idle speed, with the idle hunting up-and-down, unable to maintain a stable engine rpm. The IAC in good operating order will maintain a steady idle speed, even as engine load changes. This is why EFI engines are so well suited for rock crawling: They don't stumble and stall as engine load increases unexpectedly, which occurs with a conventional carburetor. With EFI/MPI, the idle air control needs to function properly. The device in the picture looks like your IAT. This is the idle air temperature sensor, which is part of the air-fuel and spark management system. Idle air temp tells the computer (PCM) the actual temperature of incoming air. This helps determine the fuel injector pulse width. Pulse width determines the volume of fuel that flows through the injector. Cold air during warm-up is an important signal, as is the coolant temperate (CTS). Warmed up, the incoming air requires a different injector pulse width. The IAT (intake air temperature) sensor is important. Both the IAC and the IAT play important roles with engine fuel and air mixture settings. The IAC adds just the right amount of air to a given fuel supply in order to maintain a specific idle rpm. The IAT is a sensor that sends intake air temp signals to the PCM. IAT signals give the PCM "information" required for properly regulating the injector pulse width and fuel flow. The oxygen sensor (O2) reads actual oxygen content in the exhaust, after the combustion process. This information is also very important for setting air-fuel ratios. Moses
-
Need Some Help Restoring a Jeep CJ-7 4x4
Moses Ludel replied to forman's topic in 1972-86 AMC/Jeep® CJ and Jeepster Models
Forman, thanks for the comments on 4WD Mechanix Magazine and the forums...You'll be pleased to know that my first role as a professional mechanic, which quickly led to journey level, was a light- and medium-duty truck fleet mechanic—at that time, my spare time was spent restoring a Willys/Jeep CJ-3A 4x4. There's nothing like 4x4 trucks for learning! Answering your questions from above: 1) The hose clamp (not original equipment) likely held a shredding or improvised tower boot in place. Here is the factory image for the boot, you'll need to get one... CJ-7 Transmission Tower and Boot.bmp 2) That black hose is the vent for the transfer case and can be followed up to the tub or firewall. You should find the one-way plastic check valve that keeps water from entering the transfer case. 4x4 transmissions have similar vents, intended to protect when fording water. 3) The broken skid plate bolt is on par as described in my book. This is the result of OE self-tapping bolts that corrode and seize in the frame over time. If you have the right equipment, follow my solution in the book. That's the permanent fix. 4) The rubber grommets (on the transmission mount extension arm) cushion the torque arm at the skid plate. This arm keeps the powertrain from rocking too far under load, like when driving in 4WD off-road! Clean up the hardware thoroughly, then check these grommets for excess wear. (These grommets are common replacement parts.) There is also the conventional transmission/transfer case rubber-and-steel mount, which should be inspected closely for wear. 5) If you're okay with struggling to reach the six transfer case to adapter fasteners, or you have no need to remove the transmission, you can remove the transfer case from the transmission. You can leave the transmission in place and remove the transfer case from the "adapter" by loosening the six fasteners. The transfer case by itself will be lighter and more manageable. Note: Use a transmission jack to remove the transfer case, it's iron and heavy to juggle with the Jeep on stands! 6) Separate at your blue tape mark between the adapter and the transfer case. Note there are bolts and nuts in this arrangement. Once all these bolts and nuts are out, the transfer case should slide rearward without a lot of effort. Make sure all hardware is removed. Have your transmission jack tied to the transfer case before removing the last fasteners! 7) You're thinking right...This is a T176/T177. Here is an image of all transmissions available in the 1980-86 CJ era. Note that the only transfer case used in Jeep CJs from 1980-86 was the Dana 300: CJ-7 Transmissions and Transfer Case 1980-86.bmp You're well underway, Forman. Let us know when you have the transfer case removed safely. Your work is cut out on the cleaning and descaling/de-rusting of the cases, levers and externally exposed parts...Glad you're invested in the project, keep up the good work! Moses -
If you can find a very original (in premium shape) 2nd gear used, that could be helpful. Good gears are out there, this is a constant mesh gear, so the wear points would be the endplay thrust face and the synchro hub engagement teeth on the gear. Unless the synchronizer was severely worn or abused, the 2nd speed gear will be intact. A new second speed gear could be costly, hunt for a used one first... Keep us posted, TTippetts, we're here to help with your AX15 transmission! Moses
-
RareCJ8...Read the account of "Comanche", it's moving. Horses, like canines, bond and act instinctively on behalf of the pack or band's survival. I'm due for a video update on the local horse band. Will take grandson Camden, he's walking actively now and thrives outdoors... Moses
-
Sound assessment, RareCJ8! The last place you want a feral horse is as a hood ornament, one more issue. Many horses and motorists have met that fate on Highway 95A between Fernley and Silver Springs, Silver Springs to Dayton, the Virginia City Area, all over NW Nevada. Horses have totaled cars and pickups in these encounters, resulting in fatalities all around. The hooves and a horse's weight can make issues with springs and watering holes. There are instances, too, where horses actually open up subsurface water and other animals benefit. Worth noting, we live in an imbalanced ecology, and there are no wolves or cats to cull out weak or sick horses. Horses are prey and flight animals. Considering the suspected cause for the disappearance of Equus across North America (click for a quick history of Equus), the most significant "predator" to horses may well have been human beings. One accounting is that human beings drove the true native horse to extinction in North America by killing and eating them. Horse populations and the size of bands can balloon where there is enough forage and water. Horses are very tough, as my video account illustrates, so the climate in itself does not reduce these bands; however, drought and no grazing grasses can, as you note, RareCJ8. The Wild Horse and Burro Act of 1971 has always been a controversial subject at northern Nevada. The Act's intent was to round up animals humanely for impound, with interested parties adopting the horses and pledging to train and properly care for the adopted animals. When huge numbers of horses get rounded up and contained in BLM impound areas, kicking and severe injury results from fights between dominant stallions and even mares. What started out as an alternative to rounding horses up for "glue factory" slaughter house extermination has backlashed into a huge population of roundup animals. As for adoption, older horses may get passed over, less desirable horses may get passed over, injured or lame horses get a pass as well. Many supporters of the Wild Horse and Burro Act are themselves incapable of quartering and training a horse. Add to that a national economy where many otherwise sympathetic parties are preoccupied with keeping a roof over their own heads. The result is a huge number of horses that remain impounded. Most ranchers and others whose livelihoods are tied to Forest Service or BLM livestock grazing rights have highly resented the wild horse preservation approach. As you note, there is large competition between livestock and feral horses on the public range. Frankly, propaganda on both sides of this issue has not helped the controversy. Like your view, I think it very inappropriate for animals to suffer, and that's a good position to take when trying to find a sensible, or at least acceptable, longer term solution. The argument that all feral horses are ill and starving does not hold up in many cases. I've personally watched wild horses, in reasonable band numbers, thrive in the most harsh and frigid environments, not looking in the least bit emaciated but rather making me wonder where our own species' Ice Age genetics got lost. One recollection is four-wheeling through snow to camp at a remote spot in the general vicinity of Sunrise Pass and lower Mt. Como. This would have been mid- to late-January of 1976, sub-zero weather at well over 6000 feet elevation. I knew that feral horses roamed this area in the spring, summer and fall months. In the middle of the night, I was awakened by horses running past my Chevy K10 4x4 pickup! At dawn, the same band was breaking through ice to drink from the trickle of the nearby creek. Before I packed up, this band was "browsing" on last summer's slim grasses, buried within snow. These horses could easily have moved down into the Carson or Dayton Valley areas and remained undisturbed. They chose to stay up in these high canyons. Regardless of where you line up on this issue, there are some clear facts. Facts like these horses are overcrowded into huge compounds where adoption is not the result for many. Facts like the Wild Horse and Burro Act was supposed to lead to adoption of these horses. Adoption has always been fickle, and the impounded horse numbers kept creeping upward over the years. During the economic recession/housing debacle, many domestic horse owners, financially strapped and unable to feed their "hay burner" horses, turned these animals loose around our area and places like this. At least some of the horses and their offspring are running around Dayton, Fernley and Silver Springs, Nevada, turned loose by irresponsible owners. As for adoption, self-proclaimed "horse lovers" who have the wherewithal and space to adopt, care for and properly train an impounded horse might consider doing so. For those skeptical of whether these horses can be trained, I highly recommend watching the documentary "Wild Horse, Wild Ride". You can stream this documentary from Netflix if you have an account. Some of the trainers are extraordinary, others quite ordinary. Judge for yourself, this is a very well done documentary that does not get into politics, ideology or the controversy surrounding the Wild Horse and Burro Act. The documentary also avoids depictions of the BLM impound facilities. Instead, the focus is about these horses, trainers and what the right care and training can actually yield. Regarding the over-ranging and over-population of feral horses, the mistreatment of horses during aerial/helicopter roundups, life at a BLM impound facility and the politics of grazing rights in the Far West, each of these issues deserves public attention. The cost of beef and lamb is high enough now. Without inexpensive public grazing access, ranchers at Nevada and other Western States would have much higher overhead. The price for beef and lamb would go even higher... Note: For anyone who thinks ranching is an easy, lucrative business, guess again. Yes, there is "industrial farming", the profitable hay and grain fed large cattle operations, but many rural ranches in the Far West are still family owned and hard working with dicey returns. You've got to love hard outdoor work and 24/7 weather challenges to sign up for this lifestyle. I grew up at Carson Valley, Nevada and knew many folks from that lifestyle. So, enjoy my wild horse footage from the local area. These are tough, "real" animals on the range, and there are many more out there. If you really like wild horses, do your homework. Are you or anyone you know in a position to adopt an impound horse or burro? Consider saving an animal from the impound life and help reduce the crowding at these facilities. Otherwise, we do need to reach consensus on a sensible and better way to address this issue. Footnote: We have always been an outdoor oriented family and enjoy the natural world. Four-wheeling for four generations now, some of us also ride single track on dirt motorcycles. Hiking and filming these feral horses on foot for a day was very gratifying. Wife Donna and I were pleased to share the wild horses and their habitat with our youngest grandson Camden, just a year old at the time. Separating politics and controversy from this engaging, visceral experience, it was a privilege to observe these animals in a natural setting, behaving much as they did eons ago at North America. We enjoyed watching the horses "do their thing", on their own terms. They brought us closer to our roots...We're grateful! Moses
-
I, too, like the 50/50 premix anti-freeze/coolant, it assures a chemically pure solution with pure, distilled water. Fortunately, and this must be true for your climate, the -34 degrees F protection is adequate. I do recall starting vehicles in the early '70s at -27 degrees F, that is extreme for Western Nevada, common for Eastern Nevada at places like the Ruby Valley SE of Elko...I recall a report of -54 degrees F at the Ruby Valley. I ran heavy equipment for S.J. Groves (Local 3 of the Operating Engineers) on the I-80 bypass of Winnemucca in 1975. The temp dipped to -12 degrees F on the 12th of December, with the wind blowing 30 mph. (That was a good one, we had no cab protection, no reverse fans on the Cat equipment, and the swing/graveyard shift was 10 hours.) The Nevada Highway Department shut the job down when frost plunged 18-inches into freshly spread, non-compacted damp soil. "Rip it all up or come back in the Spring!" was the call. Three months before, there were boxcars parked on the siding, packed with Chevron Delo 400 engine oil and boxes of anti-freeze. Funny the things you remember, those boxcars and the 134 or so gallons per shift of diesel fuel that a working 1693 Cat engine would burn through: an 893 cubic inch inline six, 1090 ft. lbs. peak torque at 1000 rpm in heavy equipment tune—try that for a quick torque rise. You get a hint why I like the Cummins ISB engines! It's perfectly fine to get distilled water and pure anti-freeze and do your own brew for freezing temps to the lower registry of the manufacturer's recommendation. (As I've shared, there's a limit to how far down the protection and concentration of anti-freeze/coolant can go.) Mixing yourself is a bit more work, but for places like Fairbanks, Alaska, you get no choice...and use a block heater religiously! Moses P.S.: Anyone need to know how to dress for cold weather work? I'd be very pleased to share or compare notes.
-
Hi, Megatron! Glad to see your post... I'm okay with additives that do not react with or impact anti-freeze/coolant and will not corrode the cooling system or cause it to leak. Any additive needs to stay in the cooling system and not create seepage. Electrolysis has been a big issue and there were record numbers of heater cores and radiators a decade ago that had issues with metal problems and chemicals. On that note, make sure you use factory recommended coolant with the right chemistry!!! I would make note that the manufacturer of Water Wetter has a lot to lose if the product does not meet its claims. I have not personally tested Water Wetter and would welcome more information and comments from other members or data from the manufacturer. That's what a "forum" is truly about! I do have a product at the shop that I want to test: Motor Max. It's from the same folks who developed the Cold Fire extinguishing systems, an effect and non-toxic approach to fire suppression and the only affordable extinguishers capable of putting out a burning butyl rubber tire fire. I have several Cold Fire extinguishers at the studio/shop. For those interested, here is my commentary in an HD video about the Cold Fire extinguishers: http://www.4wdmechanix.com/Video-Review-Cold-Fire-Extinguishers.html. Once again for Fire Freeze, Motor Max is non-toxic, biodegradable and non-corrosive. I'm liking that! Tested in professional racing, including NASCAR, the product is considered a major cooling system enhancement. Claims include: *Eliminates Overheating *Supercharges Air Conditioning Output *Enhances Engine Performance *Prolongs Engine Life Without detracting from Water Wetter in any way, I'm focusing on Motor Max for the moment and will update forum members and the magazine viewers shortly. I will thoroughly test this product at the high desert this summer. If you have any experience with Water Wetter, please share. I'd be particularly interested with positive results like engine or automatic transmission cooling improvements from this product tested on its own, without simultaneous additional upgrades. Towing, heavy loading, trail or rock crawling? Anyone have experience here? I'd like to see a broad discussion on the cooling subject from other members. Cooling is essential and heat kills engines and transmissions. If we can keep engines and transmissions cooler, like our 5.9L Cummins diesels and the 48RE transmissions, it's money in the bank! Powertrain life expectancy can soar when heat is kept at bay... Any testimonials on Water Wetter or Motor Max out there? Moses


-
How to Post Videos at These Forums
Moses Ludel replied to forman's topic in Off-Topic and General Discussion
Member Forman caught onto this and immediately posted a short tech video at the CJ Jeep forum: http://forums.4wdmechanix.com/topic/244-need-some-help-restoring-a-jeep-cj-7-4x4/. Feel free to use this approach with videos if it's helpful! Moses -
Need Some Help Restoring a Jeep CJ-7 4x4
Moses Ludel replied to forman's topic in 1972-86 AMC/Jeep® CJ and Jeepster Models
You've opened up whole new vistas with the video posting idea, Forman! Thanks for lighting us all up...This is helpful. For others interested in posting videos at these forums, here are instructions how: http://forums.4wdmechanix.com/topic/251-how-to-post-videos-at-these-forums/. As for the noise, sounds like transfer case without pinpointing. A stethoscope would help, held near the transmission/transfer case tunnel on the floorboard. Try that...Actually, from your description of the shifting issue, it's an educated guess that the transfer case has backlash. The "surging" also points to the transfer case... Moses -
One sight that most folks enjoy is horses running free on their natural habitat. In the Far West, this has become more common since the Wild Free-Roaming Horse and Burro Act, which originated at Nevada with the efforts of Wild Horse Annie and others. When I was high school age at rural Nevada, we four-wheeled in the Pine Nut Range east of Carson Valley, at Smith Valley and across northern Nevada. This feral horse country has been a big part of my outdoor life. The article that accompanies this HD video is available at the playlist for the magazine's 4WD Travel and Adventure Channel. We're fortunate with our ready access to wild horses. The 4WD Mechanix Magazine base at Fernley, Nevada places us within ten minutes of wild horse country. Some folks within the city limits see feral horses within their neighborhoods. Our family at Virginia City and Silver City avoid planting flowers—local feral horses will eat them! When we drive the local secondary highways at night, we're vigilant about watching out for wild horses crossing the road. Horses mixing with cars can be deadly. In a world of 24-hour news and "reality TV", there's something liberating about watching and filming wild horses in their habitat. Access to these animals has an affordable price of admission: some fuel, a reliable 4x4 or quieter dirt OHV and some decent hiking boots for a trek in the backcountry... Moses
-
How to Post Videos at These Forums
Moses Ludel replied to forman's topic in Off-Topic and General Discussion
Forman, I like your use of either photos or a techy video. If we're talking about YouTube, this is very simple to do with this forum software. (Of course, links are easy to insert as well.) So, here's the scoop: Go to the YouTube video at the actual YouTube channel. (Don't copy share code at a third party website.) Simply click on the player's "Share" symbol at the top right, and copy the share code. Paste the share code into your forum post where you want it. (Don't get "creative" and try to center the code in the post, leave it set at the left margin.) You should get something like this: As a footnote, by doing this copy-and-paste and providing the YouTube player, there is no limit to the video's length or MB size. The post player is simply the conduit to YouTube's server for playing the video right here at the forum! Try it... Moses -
We all know the value of anti-freeze/coolant. Anti-freeze is essential for preventing casting cracks when you park the vehicle in freezing weather. By contrast, the coolant properties raise the boiling point of the solution, making our modern engines tolerate higher operating temperatures, which can provide more complete combustion of fuel and cleaner tailpipe emissions. Higher pressure radiator caps also help raise the boiling point. Every liquid cooled engine parked at below freezing temperatures requires anti-freeze. Specifications call for anti-freeze/coolant that is compatible with engine and cooling system metals. We follow these requirements to extend engine life and preserve the engine's castings, seals and gaskets, heater core and other vital cooling system components. In addition to the type of anti-freeze/coolant, there is the manufacturers' recommendation about the concentration or "specific gravity" of the anti-freeze mixture. For cooling in summer and reasonable anti-freeze protection in the winter, most manufacturers settle for the traditional minus-34 degrees F anti-freeze protection as a year-round mixture. A 50/50 mix of pure (straight) anti-freeze and distilled water will usually provide this degree of anti-freeze protection. (See the label on the container.) Some environments require even more antifreeze protection. However, most products limit the maximum anti-freeze protection to something like minus-60 degrees F or a maximum percentage like 70% antifreeze and 30% distilled water. A closed thermostat (new Cummins thermostat shown at left) and too much anti-freeze/coolant are a recipe for excessive pressure in the cooling system. The right amount of anti-freeze/coolant will raise the boiling point of the coolant. Too much anti-freeze/coolant can actually cause boil over and coolant loss, damage to the radiator or heater core, and a reduction in anti-freeze protection...You wouldn't want to overheat—or freeze and crack—this Cummins 5.9L inline six cylinder diesel's head or cylinder block by running either too little or too much anti-freeze/coolant! Warning: Do not attempt to increase the concentration of antifreeze for a temperature lower than advised on the label. Running a stronger concentration of anti-freeze than this will not provide better anti-freeze protection. In fact, with too much anti-freeze/coolant, the freezing protection decreases. Overly high concentrations or pure anti-freeze may lead to cracking a casting in freezing temperatures. As for boil over, the boiling point actually drops with too much anti-freeze concentration. The system may boil over—either during normal warm-up phase of the engine or at normal engine operating conditions! Anti-freeze is designed to mix with distilled water. If you run straight anti-freeze, there is a likelihood of high cooling system pressure during warm-up with the thermostat closed. The engine may also boil over within normal operating temperatures. In freezing weather, you can crack the block, a head or other castings by running either too much anti-freeze in solution or pure anti-freeze! Pure anti-freeze is not to be confused with "pre-mixed" anti-freeze coolant. "Pre-mix" is typically distilled water and anti-freeze mixed before packaging at a 50/50 ratio. This "pre-mixed" anti-freeze coolant is usually good for minus-34 degrees F protection in the winter and a boiling point of 260-plus degrees F in the summer—with the right pressure cap on the radiator or system. Boiling point increases with the use of a specific radiator cap pressure, usually 17 PSI or so for most modern engines. If the cap pressure is lower than the recommended OEM cap, the boiling point will drop accordingly. For this reason, it is important that your radiator cap is in top condition and holding proper pressure. Understand that a vintage vehicle with a much lower pressure radiator/cooling system cap will have a lower boiling point than 260 degrees F, even with 50/50 mix of anti-freeze/coolant. So, make sure your engine's cooling system is protected against both boil over and freezing. But don't use more anti-freeze than the mixture for the lowest recommended temperature protection on the anti-freeze/coolant container. (Typically, this mixture limit is indicated on the container's label.) Know whether the anti-freeze is pre-mix or pure anti-freeze. Make sure you allow the coolant to mix thoroughly before reading the protection level with an anti-freeze hydrometer or specific gravity tester. Too little anti-freeze/coolant is dangerous and leaves the engine unprotected against cold freezing. Too much anti-freeze/coolant can also lower protection against both overheating (boil over) and cold freezing. Anti-freeze requires the right amount of water to work properly. Read labels carefully. As a footnote, we're talking about the anti-freeze/coolant in the radiator and overflow tank. Always check the anti-freeze at the radiator after the engine has circulated coolant thoroughly, including through the heater core; to avoid severe skin and eye burns, remove the radiator cap only after the engine has cooled down completely! Loosen the cap slowly, stop at the first notch, and release all pressure before removing the cap. Prestone or equivalent tester like the one at left can be purchased for $5 or so at any auto supply. If you follow directions, this hydrometer can be accurate and a quick test for anti-freeze protection. At right is a Stant cooling system pressure tester for the radiator/cooling system and also for testing cap pressure. A Stant diagnostic tool kit like this has been in my tool set since 1981, and it still works great. The cooling system pressure tester has a variety of uses and is an excellent troubleshooting tool. Mix the anti-freeze solution in the overflow bottle to the same mixture you have in the radiator. After several complete heat-up and cool down cycles, the anti-freeze/coolant in the engine, radiator and overflow bottle should reach a uniform mixture. At that point, measure specific gravity with the anti-freeze hydrometer to get an accurate read on the protection level. Test the radiator cap's holding pressure with a pressure tester if available. If in doubt, install a new radiator cap. Periodically, test anti-freeze/coolant protection at both the radiator filler neck (engine completely cooled down first!) and at the overflow bottle. If the cooling system has been transferring coolant back and forth—cycling from cold to hot and back to cold over a long time—a quick hydrometer test at the overflow tank can be accurate. Moses
-
At these forums, there are no dumb questions, Bamafan1! On a four-stroke engine like your Jeep 4.0L, the distributor shaft and rotor turn at 1/2 the speed of the crankshaft. When the distributor shaft and rotor are set in position properly, the #1 piston will be at top-dead-center (the firing position) when the rotor points toward the #1 spark wire in the distributor cap. As the crankshaft turns, so does the rotor. The rotor, turning at 1/2 the speed of the crankshaft, will point to each cylinder's spark wire position only when that cylinder's piston is up to fire. The timing mark on the crankshaft pulley damper helps us set the rotor position for #1 cylinder's piston up to fire. Important to note, the cylinder opposite #1 in the firing order (#6 cylinder for your 4.0L inline six, will also align to fire with the damper mark at TDC. If you have the cylinder head off, you will see that when #1 piston (cylinder at the front of the engine) is at the top of its cylinder, so is #6 piston (cylinder closest to firewall). Your engine's firing order is 1-5-3-6-2-4 with #1 and #6 pistons moving up and down in sync. The rotor is driven by the distributor shaft; the distributor shaft drive gear is driven by teeth on the camshaft; the camshaft sprocket is driven by the timing chain; and the timing chain is driven by the keyed crankshaft sprocket. When you shut off the engine, the rotor will be aimed in relationship to the position of the crankshaft and camshaft. This could place the rotor in any of its 360-degrees of rotation. The engine's crankshaft coasts to a stop somewhat randomly. If you want to know where the rotor should point for timing purposes, this position is always in relationship to #1 piston at top-dead-center ("0" degrees or TDC mark on the crankshaft pulley/damper) on its compression stroke. A common error when timing a four-stroke engine is to set the crankshaft at TDC mark with #1 cylinder's piston at TDC on its exhaust stroke. This would have #1 cylinder firing 180-degrees out of time at the distributor. The engine will not run and usually backfires badly while cranking. Keep in mind, on a 4-stroke engine, the crankshaft turns two full revolutions for each one revolution of the distributor's rotor. Trust this helps, Bamafan1... Moses
-
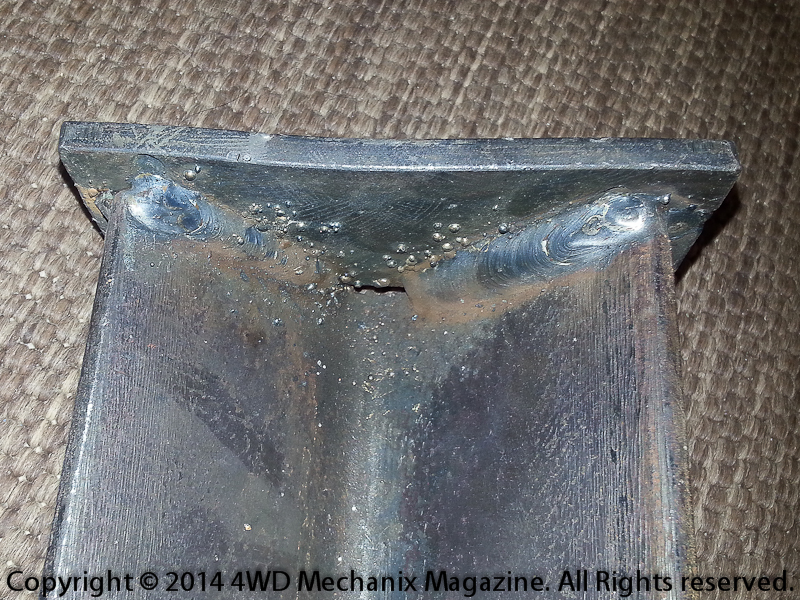
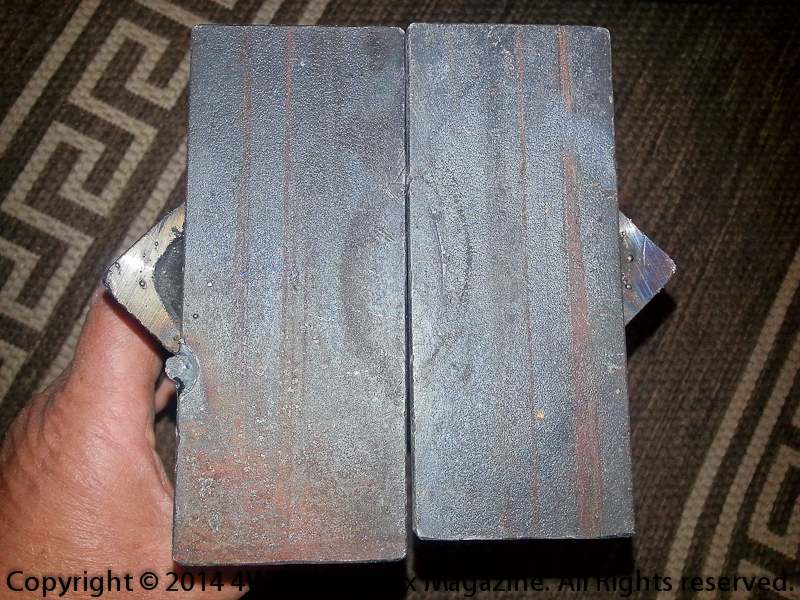
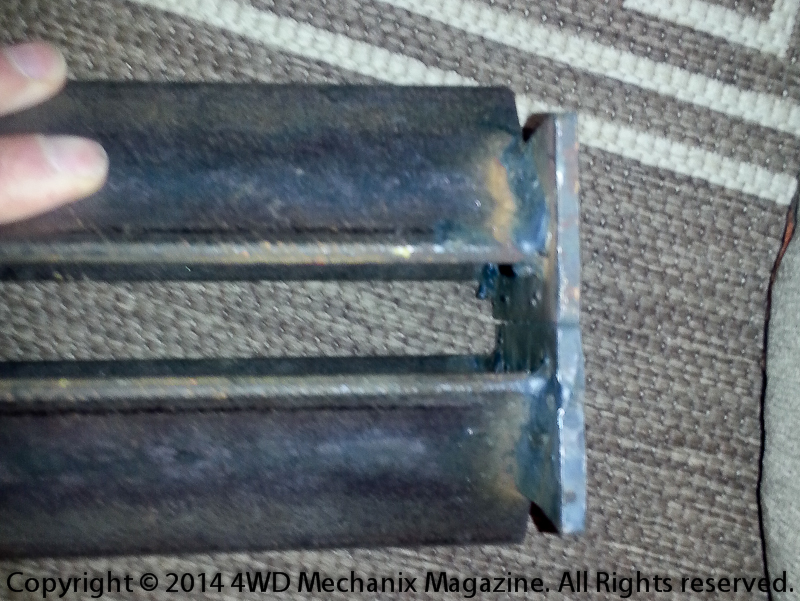
Bru...On my "universal" stands, which happen to work well for these Aisin gear removals, the build started with a vintage Jeep transmission project "on the fly". Turns out that these stands have since served a wide range of transmission gear and bearing jobs. Works for me! Keep in mind my suggestion about use of safety straps if you suspect lateral movement, sliding, tilting or whatever. In my personal use, I've never had these stands tip over or tilt under load. You can see where the force goes, and I use the heavy press plates as a base...Note in the photos that there is no damage and only minimal distortion at the top plates. (I would emphasize that some stout pressing has been carefully done with these plates.) Withstanding this use has to do with the amount of exposed metal under force. Key to strength and versatility is, as you hint, the positioning and weld placements at the top plate straps. For your benefit and others, I just took a series of close-up photos to illustrate the dimensions and relationship of the top straps (simply cold rolled common 2" steel, cut or sheered to desired length) to the hefty 3" angle iron. You can see how thick the radiuses are on angle section, which is common for better quality angle iron. Here are the photos, Bru: Nothing fancy about these ER-70 0.035" wire MIG strength welds, they were intended to hold the 1/4" x 2" cold rolled strap in place at the top of the 3" angle iron under load. This "tool" set took less than half an hour to build and has served for over fifteen years since—though not used day-in-day-out. I've likely built over 40 transmissions, axles and transfer cases that involved the use of these stands on the hydraulic press bed plates in one way or another. They've worked well for me... This should help clarify your questions and concerns around building hydraulic press service stands for the Aisin R150/R154 and similar Jeep AX15 transmissions. I'm here if you have further questions... Moses


-
Need Some Help Restoring a Jeep CJ-7 4x4
Moses Ludel replied to forman's topic in 1972-86 AMC/Jeep® CJ and Jeepster Models
You'll like the book. True to my aims, you can make an "informed decision" about what you want to tackle. You'll find suggestions on tool improvising and other tips geared toward the home or smaller 4x4 shop on a budget. Thanks for ordering a copy. I'll be happy to embellish, Forman! Looking forward to your posts at the forums, we're all here to assist each other! Moses -
Jeep CJ 'Dauntless' Buick 225 V-6 Rebuild
Moses Ludel replied to JohnF's topic in Vintage Jeep® Vehicles 1941-71
John, this engine is in remarkably good condition for the vintage. Considering the use of paraffin motor oil and popular additives like STP during that period, this V-6 shows very little sludge or signs of "death" by the alchemy of heat and high volatility hydrocarbon molecules in the motor oil. You can have these pistons and pins measured and assessed by the automotive machine shop. If there is no skirt wear or ring groove/land wear, and if the pins still fit correctly, you could even consider using these pistons again if the cylinders do not require a re-bore. Take a well lit close-up photo(s) of the piston skirts, I'll provide my opinion. The head work will include a magnaflux check for cracks, magnaflux the block, too. I would install hard steel exhaust valve seats to prevent valve seat recession with unleaded fuel. Stainless or hard steel exhaust valves are recommended, too. (We can check on the stock/OEM exhaust valve material. Truck engines of this vintage had hard steel exhaust valves and hard seat inserts in stock form. Not sure now Jeep/GM addressed this engine, it was Buick Special passenger car derived.) The shop will want to deck the heads, remove just enough material to square up. This is all insurance. Even if the cylinders are still true without a ridge at the top (can't tell from the dark photos), have the block power honed by the machine shop without increasing piston-to-wall clearance beyond tolerance. If the block requires boring, this will dictate new oversized pistons and rings. We can talk about my piston and ring set recommendation. Hot tanking the block and new cam bearings are in order here, regardless of the bore size. Connecting rods should be "reconditioned" if you change the pistons. The crankshaft will at minimum require light polishing of the journals if still round and undamaged. If worn, you can likely get by with the optimal 0.010"/0.010" undersize regrind with polishing for the rod and main journals. You will want to do the Melling high-volume oil pump that I illustrate in the Jeep CJ Rebuilder's Manual: 1941-71. This extends the pump cavity depth and spaces for the longer pump gears. (You must center the spacer plate carefully as I demonstrate in the book.) Make sure the pump cavity is undamaged. A new camshaft, new hydraulic lifters, and a new timing chain and sprocket set are standard fare. Like your idea of a master rebuild kit, it should include all of this. I prefer Felpro head gaskets (included in a complete Felpro overhaul gasket set) to eliminate the need for a re-torque on head bolts after the engine is in service. Given that this engine is odd-firing and inherently "rough as a cob" (Jeep engineer remark from the period), be sure to balance the crankshaft, damper, flywheel (resurface, too) during this work. It pays to balance all reciprocating mass parts and weight-match these parts as well. A quality machine shop should have balancing equipment, and this cost is well worth the expense, especially for this engine design. Install a new crankshaft pilot bearing. Likely you'll be installing a new clutch disk, clutch cover and throw-out bearing. You have the Delco distributor, a real plus, the Prestolite was terrible. The carburetor is a 2GC Rochester. Tuning and clean-up here is straightforward. The fuel pump needs replacing, especially with the apparent drag and over-tension that caused the cam lobe wear. Use of modern oil and proper break-in should eliminate risk of premature wear like this. I'd be happy to make oil recommendations for break-in and afterward. We can discuss that later. Given the overall good condition of this engine, I would try to reuse all core parts and not "exchange" the crankshaft or other parts for rebuilt or reconditioned parts that have an unknown history. If your current parts are still standard size, you have pristine core pieces that should be kept and reconditioned. This is a start...I'm opening with an overview, there are more details to share. I am pleased to discuss the Buick V-6 engine, in odd-firing 225 nail head form or the later 231 and 252 design. I have the Buick Power Source book, four period shop manuals and period parts catalogs for backup reference material...We're covered! Thanks for sharing your project, John! Moses -
Jeep CJ V-6 T86 Transmission Rebuild and Restoration
Moses Ludel replied to JohnF's topic in Vintage Jeep® Vehicles 1941-71
Oh, my gosh, there's a copy at Amazon! Not cheap ($47 used), but what a read...You likely can find a less expensive copy: http://www.amazon.com/s/ref=nb_sb_noss?url=search-alias%3Dstripbooks&field-keywords=Buick%20Power%20Source As a footnote, I bought my new copy in the late 'eighties, apparently dealer overstock or slow moving at the Bowtie dealership—$7. I remember sprinting to the cashier's booth... Moses -
Jeep CJ V-6 T86 Transmission Rebuild and Restoration
Moses Ludel replied to JohnF's topic in Vintage Jeep® Vehicles 1941-71
Thorough work, John! Love that elbow pipe for oiling, actually quite original, I've seen many on V-6 applications...I recall the first Dauntless V-6 models that hit the showroom floors, too! Do you have any "before" and "after" photos of your Jeep in progress that you'd like to post at the gallery? Members and guests would really enjoy seeing the attention to detail and progress with your Jeep CJ V-6! I'd like a glimpse of that nail head 225 V-6—or have you gone even-fire with a '77-up 231? In the late 'eighties, at the peak of my magazine writing from the San Diego Area, immersed in everything "Jeep", I stumbled onto a grand book at the local Chevrolet dealership's parts department: Buick Power Source, 1985 first edition, a Buick Division publication popular enough to make it into other GM stores. For anyone with a fascination for the Buick V-6, this is the book! I highly respected Buick before reading the book and revered Buick after the read. The book is still prominent in my library! See if you can find a used copy, John. It's easy to post at the forums gallery...Take a peek: http://forums.4wdmechanix.com/garage/vehicle/3-members-can-share-photos/. Review some of the entries, you'll like Megatron's handiwork! Moses -
Need Some Help Restoring a Jeep CJ-7 4x4
Moses Ludel replied to forman's topic in 1972-86 AMC/Jeep® CJ and Jeepster Models
I'd like to first say, "Welcome to the forums!" We're a friendly bunch and value your participation... Yes, you have a Dana 300 transfer case, and once clean and free of all that debris, rebuilding this unit can be a very fruitful project. I cover the step-by-step rebuild of the Dana 300 in my Jeep CJ Rebuilder's Manual: 1972-86 edition (Bentley Publishers). Many have found the book valuable for restorative work on these year models. Importantly in your case, I personally took a CJ-7 to the bare frame, with the tub and fenders still mounted, and rebuilt each powertrain, gear and axle component. The Jeep had the AMC Model 20 rear axle and a 2.5L four banger that I replaced with a 4.2L inline six and Mopar retrofit EFI. There were other upgrades that I included, too. If you have either a factory shop manual or my book, I can fill in the repair or restoration blanks for any and everything related to your Jeep. Other members have an intimate sense for these models as well...I've rebuilt the front and rear axles, can address the steering gear (manual or power) and linkage, the engine, the cooling, the brakes, wiring, whatever! Happy to provide details that you might need. Additionally, if you do post photos and follow the steps in either my book or an AMC/Jeep factory manual, others will benefit greatly. In my view, this is not the kind of transfer case, or vehicle as a whole, that can be "restored" without a guidebook. My step-by-step procedures in the CJ Rebuilder's Manual are far better illustrated than the factory manual. However, I have a wall full of factory workshop manuals that have served me well, both as a professional mechanic and author. Having instructed automotive technology and welding, writing curriculum in the process at the adult education level, I would safely describe my books as helping readers "think like a mechanic". That's always been my goal, from the first edition of the Jeep Owner's Bible forward. Advance Adapters, one of the magazine's valued sponsors, sells my books, as do other sources in the aftermarket. (Of course, Bentley Publishers offers the books.) The AMC/Jeep factory workshop manuals turn up at eBay, and I found the 'reprint' of the 1984-86 AMC/Jeep factory manual at Amazon: http://www.amazon.com/1984-1986-Scrambler-Repair-Reprint-M-R-252/sim/B00435LDZ4/2/ref=pd_cp_b_sexpl. I actually have an original of this M.R. 252 AMC/Jeep manual in my library. It has been a great resource over many years of work on 1980-86 Jeep CJ-5s (up to '83), Jeep CJ-7s and the Jeep CJ-8 Scrambler. From my experience, shop manuals are essential for the kind of work you anticipate doing here. The cost of these books will pay for themselves many times over as you perform the work "by the book" and wind up with a reliable and safe, "as new" Dana 300 transfer case, Dana 30 front axle, AMC Model 20 or Dana 44 rear axle, Saginaw steering gear or whatever you tackle. Trust this is helpful, Forman...Happy to assist whether you decide to "wing it" or follow prescribed shop manual guidelines...Other forum members will join this discussion, I'm sure... Moses -
With the growing interest in aftermarket radiators, performance and "aluminum" appear to be interchangeable terms. The Griffin radiator in our 1999 Jeep XJ Cherokee is just one example, there are many. Even OEMs have turned to aluminum when high performance efficiency is necessary. The 1999 Jeep XJ Cherokee with aftermarket performance radiator. Note the stiffer aluminum necks on these radiators. Gear type hose clamps work much better with these radiators. Aluminum radiators have aluminum necks. These necks can be stiffer and thicker walled than the traditional brass and copper radiator necks. While OEMs often use spring clamps (faster on the assembly line!) to secure hoses to the brass/copper radiator necks, this kind of sealing may not be suitable for these rigid aluminum necks! We discussed OE clamps during the Griffin aluminum radiator installation. In the time this vehicle has been in service, every OEM spring type clamp has been replaced with a high quality gear-type, adjustable hose clamp! Weeping and seepage occurred with the OEM spring clamps—especially with the range of temperatures experienced during the winter at our area...Overnight temps can drop to the 'teens or even lower, while a thermostat temp of 195-degree F occurs each time the engine warms up! At left is a quality worm gear hose clamp that works better with aluminum radiator necks...Middle is a custom T-bolt clamp that has a self-locking nut and can be readjusted as necessary. At right is the most primitive of OEM type clamps that do not work well over time. Tension of clamp at right is preset and often loosens with heat cycling over long periods of time or from recession into the aging hose. Always re-torque the worm gear clamp after heat cycling for a short time. You can also re-torque the clamp in the middle, a high performance Mishimoto stainless steel offering from Summit Racing. The more rigid aluminum radiator necks call for secure clamp loads. Tension constants are limited on spring type hose clamps. They can only hold to the preset tension at a given diameter. Making matters worse, heat cycling affects any metal, and this includes spring clamps. Spring clamps tend to tension less after higher mileage use. So, if you're switching to an aluminum radiator, or if your OE radiator or other hose necks are stiffer aluminum, consider using gear type or quality adjustable hose clamps. Make certain that you recheck the tension on these clamps after the hoses have heated and cooled for a number of cycles. Once these clamps are at the proper torque setting for a conformed hose, they will hold that setting for a very long time. Moses


-
Jeep CJ V-6 T86 Transmission Rebuild and Restoration
Moses Ludel replied to JohnF's topic in Vintage Jeep® Vehicles 1941-71
Fun is right, I always enjoy this point. Looks like you were very thorough with the parts order. This should be a quality rebuild. Seal up carefully, use the right sealants and torque figures. Tighten in cross, double check torque settings after the torqued parts set for a few minutes, there's usually a slight shift and take-up. The factory service details and my book will provide the proper assembly sequences... I am very pleased that you're restoring the V-6 CJ Jeep properly, John...These vehicles deserve this kind of attention. Next? How's the Ross cam-and-lever steering gear holding up? Should we start another topic here? Moses -
This is very cool, Bru! Gearhead minds work in similar ways, I also have a shelf lined with various diameter black pipe pieces, each cut for different transmission bearing sizes. I have numbered "dummy shafts", too, for loading needle rollers on domestic, vintage transmissions. These dummy shafts are made from oak dowel stock... Thanks much for sharing our 4WD truck world, where the Toyota A150, Aisin AX15 and the AX4 and AX5 transmissions have been very popular. Aisin gets around, and rightfully so, they build world class transmissions. It comes as no surprise that a Supra with a turbocharger would benefit from this basic architecture. Advance Adapters has stories of 300 horsepower V-8 transplants into Jeep 4x4s with the AX15 (alias A150) stock transmission. We value your posts at the forums, members will benefit from your contributions and inventive solutions! Jacks Transmissions is very thorough in its approach to these transmissions, too... See the AX15 discussion at our Jeep TJ Wrangler forum. Sounds like you have insights into the synchronizers on the AX15. (Late 'nineties applications of the AX15 in Jeep vehicles have a synchro design change.) You may want to add comments at that AX15 thread! I was impressed with the upgrade parts illustrated at the Jacks Transmissions photos, thanks for sharing. Those that work with the AX15 or A150 would be popular with the 1990-99 Jeep 4x4 and Toyota 4x4 owners/members. See the Jeep YJ/TJ Wrangler forum posts for a number of AX15 topics and threads: http://forums.4wdmechanix.com/forum/7-jeep®-yj-wrangler-tj-wrangler-and-lj-wrangler/. Moses
-
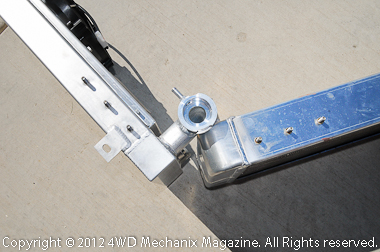
Thanks for joining the forums, Bru, we value Toyota owner/members and their input! What is the application for your R154 Aisin transmission? The AX15 transmission rebuilding how-to article has been popular, and for those interested in seeing my easy-to-make stands at work, view steps #67 and #70 on the Part 1 page: http://www.4wdmechanix.com/Moses-Ludel-Rebuilds-the-Jeep-AX-15-Transmission,-Part-1-Disassembly-Inspection.html. At left is the pair of stands in action. At right is a drawing of the Miller 8227 cage tool. I took my tape measure to the stand “tool", and these angle stands are approximately 10-3/8” to the platform top. The angle is 3” by a minimum of 1/4" thickness. (They are considerably thicker at the actual angle portions.) I match cut the angle pieces to 10” length, the top plates are common ¼-inch thick cold rolled strap stock, welded with my MIG using 0.035” ER-70 wire. I’m never sparing with welds, inside and out in the case of these top plates. This is a structural tool and takes a lot of pressure on the stand. On that note, the Miller caged tool adds a safety feature that you could improvise with strapping between the legs: Consider metal straps either welded or securely bolted to keep the legs from skittering apart. Even ratchet straps around the two stands (like 1500# rated motorcycle tie-downs) would be advisable if you suspect that the stands could kick outward under force with a particular job. I've personally not had an issue, always making sure the force goes downward. Judge the load by the flex at the top platforms. Caution: Any time you use a press, the force is a risk. Be especially careful when pressing off bearings. Make sure the plates make contact with the inner bearing collars; do not apply pressure strictly to the outer race of a caged bearing! The force could break the bearing apart and cause parts to fly out with extreme force. Use goggles or eye protection when pressing. I tossed this stand set together in a half hour for some long ago transmission project, and the combination of the press deck plates with through holes and the height of the stands has worked very well for me. You’re compressing stout 3” angle for the most part, the ¼” plate stock has offered enough support for these kinds of bearing and gear diameters—the 1/4" top plates are still straight after years of use! You can always modify this design/approach for a specific or repetitive task. On this note, there's only one feature I'd like to add to my hydraulic press: a pressure gauge. I'm using air-over-hydraulic pressure and am very good at "guess-timating" pressure applied. (Over 45 years of this work helps here.) However, it would be very useful to narrow down actual apply pressures. Years ago, in my early years at the mechanic's trade, we were given specific press pressures for given tasks, like pressing on an axle shaft bearing or lock ring. Today, even factory manuals seldom provide this insight and use brusque instructions like, "Use a suitable press." Really? You’ll become very attached to the New Britain snap ring pliers…a good find! When spreading snap rings, control is everything. You can help prevent the time-honored risk of distorting or over stretching a ring by using a quality pliers. Looking forward to your posts, Bru. Welcome to the forums! Moses