Moses Ludel
-
Posts
4,447 -
Joined
-
Last visited
Content Type
Profiles
Forums
Blogs
Store
Articles
Gallery
Everything posted by Moses Ludel
-
 This looks like a fun project, John! You'll have a very dependable, classic CJ when you finish, the V-6 is a winner. I have a good deal of information on the Buick V-6, both odd and even firing types, your nail head 225 plus the later 231 (3.8L) and 252. Buick took this design to the limit, and it was a G.M. mainstay powerplant for decades. The Simple Green approach is new to me, although it sounds much healthier than a petroleum distillate/solvent parts washer—I know firsthand and can still identify the scent of the original Safety-Kleen solvent from a block away! My aqueous-based parts washing cabinet can run industrial strength citrus derivative soaps. I'm currently using Goodson Tools' PJS-50 detergent and running the water/soap solution at about 145-150 degrees F for optimal results. A washing cabinet changed my work life dramatically, I've had the machine since the mid-'nineties, it's paid for itself ten times over. Your project reminds me of the CJ-5 I built for the Jeep CJ Rebuilder's Manual: 1946-71. I'd still be scraping down that frame, powertrain and axles if it hadn't been for this washing cabinet. For those interested, my washer is a Walker (very well built though they are no longer in business) with a 2-hp/single phase 230V pump, two 4500W heating elements, a 1000 pound capacity turntable and 45 psi nozzles. The heated solution is approximately 53 gallons. Bought mine new, made sense at the time. If you stumble across a similar design, a used machine in good shape, consider buying it, especially if you do any volume of automotive work on older rolling stock like 4x4s! Goodson also makes PD-50 and a PD-10 (small quantity) multipurpose degreaser (not for heated jet washing!). You'll like the cool automotive machine shop tools at the Goodson website, click on the image for a glimpse! As for the Simple Green turning the gears and such black, that's likely the chemical reaction between the citrus concentrates, water and the impregnated, ancient gear oil chemistry...Shouldn't cause a big issue, all of the shafts, gears and such are case hardened and resistant to corrosion and etching. The beauty of the nozzle/jet washing cabinet, preheated to 145-plus F before placing parts inside, is that critical components like iron castings will "flash dry" after washing by simply cracking open the cabinet door and waiting a few minutes before removing the pieces. No oxidation/rust issues...I need to demonstrate the Walker in a video, it's really a time saver...I'm very grateful! Moses
 -
Here's a tidbit...I followed Gutthans suggestion and did a quick check at Quadratec. (They've sold my Jeep books over the years and deserve a worthy plug!) I pulled the Quadratec part number for the '72-'86 CJ model Dana 30 front axle ring-and-pinion with 4.10 gear ratio: Quadratec #52440.1012. When I put this number in the site's search bar, the only reference that came up was the '72-'86 CJ application. This could just be the parts numbering system at Quadratec, or it could indicate that '72-'86 is the only year range of Dana 30s that we can say with certainty will fit your front axle. I would suggest taking a sampling of Quadratec's R&P gear set part numbers from the years and applications you inquired about. See if there is any other part/set for a 4.10 ring-and-pinion that matches the '72-'86 application. I'll compare Mopar factory part numbers for Dana 30 R&P gear sets from the CJ-7 era and up. We'll start with the ring gear and pinion shaft, as these parts are machined for correct pinion length and depth, bearing locations, pinion spline type, ring gear fit to the carrier, pinion bearing preload method (crush sleeve or shims, which determines the machining on the pinion shaft) and the yoke flange seal design. I emphasize each of these issues, as they would be on the check list when examining parts other than specific '72-'86 Jeep CJ Dana 30 replacement parts. Any attempt to use parts from another application would need to take these machining issues into account. Standard versus reverse rotation gear cuts remain important, too. On a lesser note, axle shaft spline count plays a role with the differential carrier flange design and axle shaft bore sizing. That's a carrier concern. Overall, though, the best place to start is simply with the ring-and-pinion gear set interchangeability. Moses
-
Ah, I see an issue when looking at the photos again...Did you remove the brake drum assembly with its companion flange and also the front output yoke first? This may allow the lower shaft and gear set to move laterally slightly, which sounds like what you needed. While the case looks like the casting has a bulky radius, this is not the problem. (If it were, you could remove a slight amount of material with a die grinder and carbide bit; however, this should not be necessary.) I believe you needed to remove the companion flange (U-joint) yokes and E-brake drum before the intermediate gear. On assembly, the output flanges and brake drum get fitted last, after installing the intermediate gear and other gear sets with end caps, reversing the recommended disassembly sequence. This should provide the space for the normal assembly procedure. When setting the intermediate gear inside the case, needle bearings loaded, use a dummy shaft slightly smaller in diameter than the intermediate shaft and slightly shorter than the gear's width (just within the thrust washers). You can partially assemble other parts before pulling the gear into position if you prefer. When installing the intermediate shaft, the trick is to keep needle rollers in position (if not using caged bearings on the intermediate gear) when you install the shaft. I load and coat the stacked needle rollers with a viscous chassis or wheel bearing grease to help hold them in place. On your T86 cluster gear and this intermediate gear (or any other assembly using needle rollers), the rollers stay in place by "keystone effect". If the bore is concentric and close to tolerance, needle rollers in good condition (not worn in diameter) should stay in place one you insert the last needle roller in the set. The grease also helps prevent the bearings from dragging and falling inward as you carefully align and insert the shaft. If you load the bearings with a light film of viscous grease, you'll find it much easier to assemble. To help you and other members and visitors, I pulled a first-generation Jeep factory shop manual from my library shelf and copied the transfer case section for the Model 18 transfer cases, including your CJ V-6 era model (both twin- and single-stick shifter types). Between this and my Jeep CJ Rebuilder's Manual: 1946-71 (Bentley Publishers), you should have all the backup needed: Jeep Model 18 Transfer Case OEM Rebuild Steps.pdf Trust this helps all 1941-71 Jeep and Willys 4x4 owners... Moses
-
Here's one supplier's quick overview...I'll look into this further, there are shim and crush-sleeve distinctions that require explanation, high and low pinion and so forth. Many years of Jeep models left out. This looks very generalized, a partial list at best...Maybe a place to start? Expect my update...Moses Jeep Dana 30 Diff Applications Include: [presumed to be "standard rotation"] Jeep CJ Front - (72-86) Jeep TJ Front - (97-Present) Jeep Liberty Front - (01-Present) Jeep ZJ - (96.5-Pres.) Jeep WJ - (96.5-Present) Jeep Jeepster Front - (72-73) Jeep Wagoneer Front - (72-73) Please call for all other Jeep Dana 30 applications. Also Fits: Eagle Front (80-87.5) Aerostar Front (85-89) Jeep Bronco Front (67-71) International Scout Front (68-75) Jeep Dana 30 Reverse Diff Applications Include: Jeep XJ - (87-99) Jeep YJ - (87-96)
-
Aside from outer wheel hub designs, the primary difference between Dana 30 axles is "high pinion" versus "low pinion". The CJ is a standard rotation ring-and-pinion with a low pinion. Other Dana 30s can be standard or the "reverse rotation" gear sets. Another concern is the differential carrier, which you hinted about. The carriers will only work for certain ratios. On the CJ-7 Dana 30 front axle, the ratio break is between 3.54:1 and 3.73:1. From what you share (2.73 gears, wow that is tall!), you currently have the carrier for up to 3.54:1. If you go to 4.10 gears, you will need the 3.73 and up carrier. I found a new Spicer bare carrier listed for $65 at one site, a genuine part, sounded like a reasonable price. I'll provide a link if useful. There are also aftermarket locking differentials like the ARB, taking care of the diff case at the same time. I prefer a manual locker, if any locker at all, in the front axle. I'll research this further, there's a tremendous amount of misinformation floating around in aftermarket parts catalogs. I thought a quick answer was available by supplying parts outlet links, only to find three vendors with completely different breakouts for the CJ, XJ, YJ and TJ models! Expect more details... Moses
-
The intermediate gear is often supported on needle (loose) bearings with hard spacer washers. (Check this link for a list of these parts, the 99-cents must be per roller!) Typically there are 48 rollers. Sometimes you'll find a pair of caged needle bearings instead of free needle rollers. With the needle rollers, the spacer washers can wedge against worn thrusts, causing a bind. In this instance, the gear could get stuck in the case. Look at the case, thrusts, bearings and the intermediate spacer. If there's wear, was that your bind issue? Worn thrusts are usually the culprit. By the way, I like your work style—well organized and great parts layout! Moses
-
1997 XJ Wiring Issues?
Moses Ludel replied to WMCCALL's topic in Jeep® XJ Cherokee, MJ Comanche Pickup and Grand Cherokee
1996 was even worse...XJ Cherokee made the plunge into OBD-II in a hurry, with a plethora of wiring issues that model year. It is allegedly a botched effort to quickly meet Federal requirements on a model that needed to launch, as XJ Cherokee sales were high. By contrast, the Jeep YJ Wrangler simply opted out of a 1996 model year altogether, and the "all new" 1997 Jeep TJ Wrangler launched early with OBD-II built into the initial wiring system...Likely you're very right about the 1997 Jeep XJ Cherokee, as this would have been a transition year. Moses -
1997 XJ Wiring Issues?
Moses Ludel replied to WMCCALL's topic in Jeep® XJ Cherokee, MJ Comanche Pickup and Grand Cherokee
Yep, the 302 V-8 is the smaller engine, and for a distributor ignition, it's a great choice with the distributor at the front! Slight in weight, especially H.O. aluminum head versions, with plenty of performance, this is a good swap for a unitized body 4x4. 302s in Ford Broncos have a legendary record... As for starter circuit issues, there are a variety of possibilities, as you know. The starter motor itself or the solenoid could have an issue. The wiring to the solenoid could be faulty or have resistance, or the ignition switch to the starter circuit could be iffy. Even the key switch can be at fault. I would do a quick and useful test here: Check the continuity through the key switch circuit, from the starter fuse or relay at the power box all the way to the starter solenoid. I like to use a volt-ohmmeter with ohms resistance on the minute 1/1000ths scale. With the battery negative cable disconnected, you can run this check with the key in the start position of the key switch. Check for any degree of resistance in this circuit and chase down the resistance point...Also check grounds for ohms resistance, the body to engine in particular. Check for any relay or power box/socket issues, in fact this would be a good place to start. See what comes up! Moses -
Hi, JJ_Jeep, and Happy New Year! I'll defer to TTippetts on your clock spring questions...If you need safe practices for removing the steering wheel, let me know. Beware of the airbag issues, we'll stick to the factory procedure here...Let's make sure you don't get knocked silly by a deployed air bag! Moses
-
Great question, Kazu...Parts quality is important, and safety is our number one concern with front suspension and steering linkage. Parts like these steering knuckle ball joints on your beam axle 1997 Jeep ZJ Grand Cherokee are often difficult to access. Here are the MOOG part numbers for the correct ball joints on your Grand Cherokee, they fit a variety of Jeep beam axle applications: Product ID: MOOG-K3161T Manufacturer: MOOG Front Lower Ball Joint Fits Left or Right Side ********* Product ID: MOOG-K7403 Manufacturer: MOOG Front Lower Ball Joint - Adjustable Fits Left or Right Side. Allows 1-3/4 Degree Camber and Caster Adjustment. ************* Product ID: MOOG-K3134T Manufacturer: MOOG Front Upper Ball Joint Fits Left or Right Side ********** Note that the lower ball joints are available as "non-adjustable" and "adjustable". The adjustable type is for setting caster and camber when the beam axle or C-knuckles are out of alignment. If caster or camber (during wheel alignment) needs adjustment, adjustable ball joints are a sensible option. The factory (OEM) ball joints are non-adjustable. If your front axle has been true enough to keep the tires from wearing erratically and the steering is safe, you can use the non-adjustable replacement joints. A caster, camber and toe-in wheel alignment is the test. Aftermarket ball joint and steering linkage quality varies widely. The major brands like MOOG, Raybestos, TRW, McQuay-Norris, TRW, AC/Delco, NAPA and so forth each have "premium" parts lines. When it comes to steering linkage and ball joint parts, "premium" does mean a lot. The contrast in quality can be extreme between "service grade"/"standard" parts and premium grade. Brands like Raybestos offer superior engineering and upgrading in their premium grade parts. If you plan to keep the Jeep ZJ Grand Cherokee for a couple hundred thousand miles, then buy only premium grade. If 80,000 to 100,000 miles of mixed highway and very light dirt road use is acceptable, or if the vehicle is approaching the end of its duty cycle, then the standard parts from a major brand would be acceptable. I emphasize a "major brand" like I have listed. There are many "knock-off" or unlabeled products available off-shore, and some of them are of terrible quality or very old engineering and design. To answer your question directly, Kazu, the MOOG parts are likely equal to the OEM Mopar joints. This would certainly be true or even an upgrade if these parts are "premium grade". Verify the part numbers involved and check the MOOG official catalog for details. The link is to Federal-Mogul/MOOG site directly. As for price, I would shop quality first. If necessary, go to the manufacturer's website and see how they represent the various quality lines. If the parts you have can be identified by a specific MOOG part number, go to the official MOOG website and see how MOOG describes the quality for your parts. The part numbers on these parts will help determine the quality grade. It's worth noting that the adjustable lower ball joints can be valuable for Jeep beam axle vehicles and wheel alignment. These joints can compensate for factory beam axle errors or sagging that takes place over time or on trails like the Rubicon Trail! Factory specifications are on the margins in many cases with these beam axles. Oversized tires also take a toll. For our '99 XJ Cherokee, I would likely step up for adjustable lower ball joints when replacing the joints, which I will do as an HD video how-to at some point. These joints require alignment gauges to set them up properly since they can be adjusted for a range of both caster and camber compensation. See my article at the magazine on Jeep beam axle alignment. I use the XJ Cherokee as my subject. (There is also an HD video on a Jeep TJ Wrangler alignment that I did as a how-to, which you can access with this link.) Once you select the parts and quality that you want, price shopping at Rock Auto, Amazon, NAPA, eBay, or wherever, can follow. Always begin with the parts quality first. Check which MOOG parts you now have by their part numbers. Thanks, again, Kazu, for bringing up the chassis parts quality issue. Members will be very helpful in assisting when you have questions...We look forward to your posts. Moses
-
Grand Cherokee ball joints
Moses Ludel replied to Kazu's topic in Jeep® XJ Cherokee, MJ Comanche Pickup and Grand Cherokee
Hi, Kazu...Thanks for your question, we welcome your participation...I moved the discussion to the Jeep Grand Cherokee forum so Jeep ZJ Grand Cherokee owners will find the information quicker... You can click here to that post and thread: http://forums.4wdmechanix.com/topic/239-choosing-quality-ball-joints-for-a-jeep-zj-grand-cherokee/. We can pick up the discussion there! Looking forward to your posts, Kazu... Thanks! Moses -
TTippetts, welcome to the forums! Thanks for outlining this clock spring solution. The clock spring has turned up for a variety of issues, and these comments are very helpful. Looking forward to your participation... Moses
-
TTippetts, you're very welcome, glad the forums work for your projects...Members have been very helpful, and I'm pleased to chime into the discussion. 2014 should be a great year for the groups! The later synchro change is ahead of the parts suppliers in many cases. You now know what to look for and how to determine the parts differences. What began as news to many at the forums has eventually helped Jeep TJ Wrangler owners with the late AX15 transmission design. Let's trust the parts suppliers will catch up here! Thanks, looking forward to your input... Moses
-
Jeep CJ V-6 T86 Transmission Rebuild and Restoration
Moses Ludel replied to JohnF's topic in Vintage Jeep® Vehicles 1941-71
John, you're doing a very nice job here, great work...Your new slider was a find, true NOS like I was able to find for the T86E. The brass blocking rings on the synchros are generally the weak link. If the steel engagement synchro teeth on the input gear (3rd) and 2nd gear look good, you can usually get by with new brass rings. The other wear point, of course, is the sliding synchro sleeve, but they, too, generally hold up. Check for wear, free movement and mesh between the internal teeth of the sliding synchro sleeve and the synchro hub teeth. I would replace the brass synchro rings, they're not that expensive, and also get a "small parts kit", which should include detent balls, springs, mainshaft (nose end) pilot rollers, thrusts and other pieces that can wear and cause jumping out of gear. You don't want to do a great assembly job only to find the transmission jumps out of 2nd or 3rd gear! On that note, replace the crankshaft pilot bearing if there's any doubt about the alignment or centering of the input shaft's nose end. A loose crankshaft pilot bearing and input shaft misalignment is another cause for jumping out of 3rd gear. The other gears hold up well unless the cluster teeth chips feed through them! You can usually get lucky here, the case hardening is substantial, and debris tends to drop into the lower case and stay there with 90-wt. oil. The input gear, 2nd speed gear and main/output shaft can be reused if they look good, the splines are okay, and there is no obvious wear or damage. Moses -
Jeep CJ V-6 T86 Transmission Rebuild and Restoration
Moses Ludel replied to JohnF's topic in Vintage Jeep® Vehicles 1941-71
John, I was referring to used gears (a used cluster gear from a donor transmission mated to existing used 2nd and 3rd gears). It is common and acceptable practice to take a new cluster with no wear and mate it to a run-in 2nd and 3rd speed gear as long as the 2nd and 3rd speed gears "look good", meaning no excessive surface or other wear. As a point of clarification, 3rd speed is 1:1 on your T-86 and simply the lockup between the synchro hub and the input shaft, so the concern would be any input gear wear and wear at the 2nd speed gear. In addition to tooth contact wear, look for wear at the synchro teeth on the input shaft gear and 2nd speed gear. We haven't talked about the reverse idler gear, you can make a call there based upon its condition. John, you should recognize much of this column (side) shift T86E transmission rebuild that I did in 2009. The unit is similar to Jeep/Willys applications but fits a beautiful '55 Hudson Hornet passenger car (shown lower right; like many modern drivers, the owner was unaware that first gear did not have synchromesh, which shows in the cluster and slider damage). This is the unit that has a badly damaged cluster gear and slider plus a broken extension housing flange, all of which were addressed in the rebuild. I was able to find a genuine NOS American-built cluster gear for this build, along with a slider, 2nd gear and other new parts. Would question the likelihood of finding an NOS cluster by now, this new cluster took days of phone calls to find, eventually turning up through a known NOS source (Northwest Transmission Parts). They did not expect to see another one on the shelf. The Crown price is obviously good. They have been importing off-shore pieces for a long time and likely have a quality source. The issue with off-shore is measurements, though I don't want to be judgmental about a gear that is not available NOS any longer. NOS is extremely rare if you mean Borg-Warner or American built, and I frankly would be suspect that such a gear still exists. (Nothing is outside the realm of possibility, though the market has been so combed for true NOS that finding an NOS gear is extremely unlikely.) As a curiosity on the so-called NOS gear, is there an OE box or packaging that indicates Warner or at least an on-shore American maker of the gear? To sum it up, Crown's gear would be a good value if made properly. It might pay to contact Crown and ask about the source and track record for these gears. They do import a lot of Jeep replacement parts and have a reputation to uphold. From a simplicity standpoint, and even in terms of cost, if you can get the new cluster, a slider, a rebuild "small parts kit", synchro rings, bearings, gaskets and seals for under $400, you're likely cost effective with this approach. My other ideas, like the T18 swap or a T14A would be much more costly, especially with transmission rebuilding likely. None of these transmissions are available as "good used" items any more. Once you saw your T-86 apart, that became apparent. Final note would be the obvious: Once you build that pristine "blueprinted" T-86 three-speed (my Jeep CJ Rebuilder's Manual: 1946-71 would be helpful with the build if you need step-by-step instructional, the book is available from a variety of 4WD parts sources), use discretion when downshifting to first gear! Stop the vehicle first. You now know what the previous owner(s) of your Jeep did, and the resulting damage made dramatic photos! Available for more questions if you need my input...Enjoyed your appreciation for the CJ-3B! Moses


-
Jeep CJ V-6 T86 Transmission Rebuild and Restoration
Moses Ludel replied to JohnF's topic in Vintage Jeep® Vehicles 1941-71
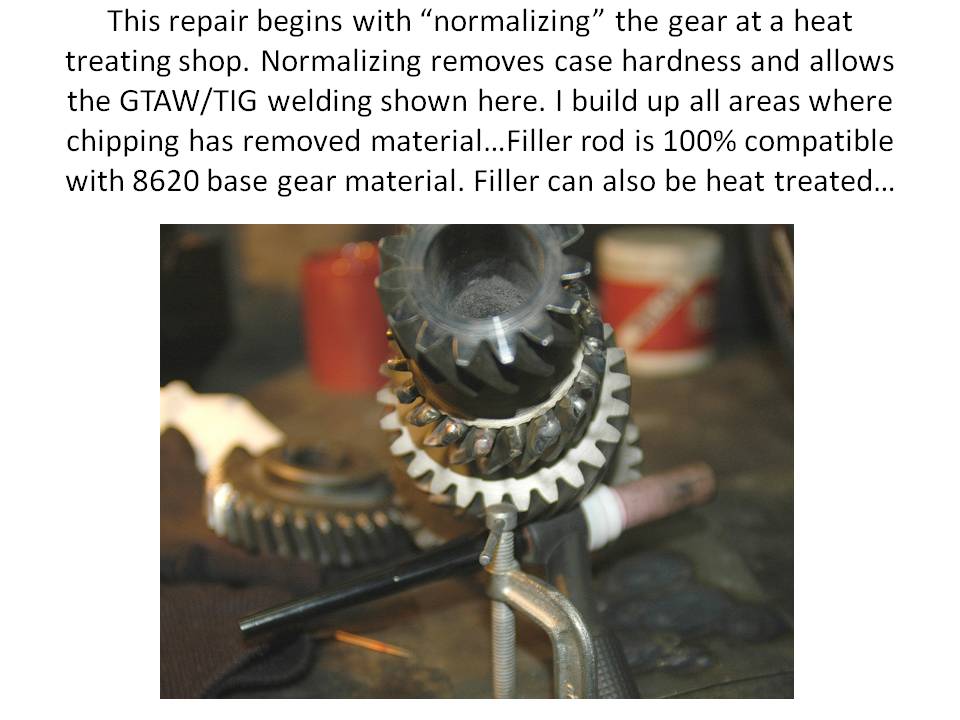
JohnF...Welcome to the forums and thanks for posting this question with clear photos! The two pictures bring back a flood of memories. I faced your dilemma as far back as 1969 with my 1950 CJ3A's Warner T-90 restoration, when parts were still readily available and cheap. Much more recently, I covered the rebuild of a T-90/T-86 in my Jeep CJ Rebuilder's Manual: 1946-71 edition. I rebuilt a number of Warner T-85, T-86 and T-87 units between 2005 and 2008, including a 'fifties Hudson T-86 (see broken housing repair in slideshow) plus Jeep and Ford applications. I knew every NOS and replica parts source in the U.S. at the time, and parts were difficult to source. That can only be worse now. The use of the T-86 has to do with ratios and the V-6. As you discovered, any cluster gear with limited demand or unusual ratios can drive up the cost of replacement parts. The cluster gear is a common failure part on manual 3-speeds like yours without synchromesh on first gear. The first and reverse slider is the other half of the equation, clashing into first gear on downshifts when the vehicle is not fully stopped. My time-honored conversion to a true truck-grade T98A (Jeep version) or T18 four-speed (also covered in the CJ book, using adapter parts available through Advance Adapters) is an option. You mention a budget, and that may rule out the T98 or T18, since you would need adapters and at least a used transmission in good condition. I feel obliged, however, to mention this option; the addition of a low 6.32:1 first gear ratio (if you use the more common Ford truck T18 unit described in Advance Adapters' catalogs) with synchromesh on 2nd through 4th gears is a real off-road and overall drivability gain. With a compound first gear, you start out in a synchromesh second gear most of the time... Back to your current dilemma, I see no advantage with the T-90 over a T-86 transmission. Their stamina is similar despite ratio differences. (The V6 use of the T-86 is more to do with ratios than any advantage over the T-90.) I quick-priced a quality T-90 cluster gear at the Advance Adapters site, and the full retail suggested price is $250 for the cluster gear only. I've seen few bargains on T-90 parts in recent years. Also, installing used gears and mixing the 2nd/3rd speed gears with a used cluster is not a good idea. Tooth contact patterns are well-established on used gears, and the case determines the alignment of the gears. This mixing gears from a donor transmission could lead to trouble. A T14A transmission swap might be a prospect, these were all-synchromesh (on the three forward speeds) transmissions used behind the V6 beginning in 1968; in the CJs with a V6, they were mated to the Spicer Model 18 transfer case through 1971. Here is a description, note that the CJ V6 models use a different length input shaft than the '72-up AMC/Jeep CJs. You would need a T14A from a Jeep CJ V6, with all parts that make up the installation. (Compare from the bellhousing back to the transfer case, make note of any distinctions.) There may be a slight length difference over the T-86, likely not enough to cause any driveline length issues or mount problems. Now, let's get on to your idea of grinding off the chipped teeth ends and reshaping the damaged cluster gear's engagement teeth. Simply put, you cannot do this, and the reason is clear. These gears are machined from annealed metal (likely 8620 or a similar base material), then they are case-hardened. Case hardening penetrates the shell of the machined gear between 0.030" and 0.060", depending upon the gear application and original engineering specifications... The case hardening is already missing at the chipped teeth you illustrate in your photos. If you grind off the damaged tooth ends evenly (which may not allow enough gear width for proper tooth engagement with the sliding gear), the cluster will have soft gear teeth—at least at the first gear engagement points. This would result in rapid failure of the remaining material at the engagement end of the 1st gear cluster teeth. I have restored a cluster gear. At the magazine, you can explore the article and slideshow I did on welding and heat treating an extremely rare Ford T85N cluster gear (click here to view the article and slideshow presentation). This Warner 3-speed with overdrive gearbox, only used for a few years, was a rare option. These non-synchromesh on first gear transmissions nearly always need a 1st/reverse slider and a new cluster gear during a rebuild! The cluster gear is cut helically and creates the need for a virtual full stop of the vehicle to engage 1st gear without clash. I searched the U.S. and had excellent parts sources at the time: None had this cluster gear, though I was fortunate enough to locate an NOS 1st gear slider. In the slideshow, you will discover that the first step in fixing gear teeth is to have the gear "normalized" at a heat treating shop. This takes the hardness out of the case hardening (not a full annealing) and permits welding on the teeth in a normalized state. I carefully TIG welded the damaged teeth, using a Weld Mold Company filler rod that has the same properties as 8620, the most likely metal type used to make the original gears. After building up weld material, I very carefully hand-ground and shaped the teeth, constantly using the opposing gear as the guide for tooth shape and angle. (Note: Cutting teeth could have been done with machine tools at greater expense. Shops like Advance Adapters can cut gear teeth of this design.) Final shape done, the gears were aligned in the case, and I used tooth contact paste to confirm the engagement pattern as you would with a ring-and-pinion gear check. Once certain the teeth were shaped properly, I sent the cluster gear back to the heat treating shop for case hardening to proper Rockwell C hardness and case depth. (For those interested, this is a carburizing process to case harden these gears.) At last, I assembled the gearbox with new bearings, small parts and new synchronizer blocking rings, bringing the unit and overdrive to original factory specifications. Caution: Welding without the normalizing process is impossible, even with high-tensile "as welded" filler rod. The welding heat will soften the case hardening adjacent to the welds! If you should ever have to reconstruct a gear or other case hardened part, the method begins with normalizing, then welding with a filler metal that matches the normalized base, then machining, then re-heat treating. John, I trust this is helpful. The new cluster and slider gear pricing sounds "normal" for these parts today. Be clear about the quality, though, as most vintage parts are off-shore sourced, some match up well and are built to standard. Know your source and compare parts carefully with the OEM pieces. Would be pleased to continue this discussion, hear more about your Kaiser-era Jeep CJ V6 4x4, and know that you're headed toward a street and trail worthy rig! Moses


-
Great to hear your update, JJ_Jeep! Sounds like high mileage does play a role with the #1 Cylinder Misfire DTC. We're back to basics, and I'm glad the discussion went full circle to addressing underlying engine condition and wear factors...DTCs are obviously more precise when equipment is newer. Pleased that your Jeep starts at -15 F and your heater works! I use a block heater below 40-degrees F as a means for keeping the engine bearings in good condition. 95% of engine bearing wear is at startup. Keeping the crankcase warm helps offset startup wear—and the heater is functional within a few blocks of driving! You know, we're talking about vehicles with real use, and given the cost of a new replacement Jeep, or even a thorough engine rebuild or crate motor, every day we can drive these vehicles safely is money in our pocket—they can only depreciate so much and are most likely at or near their lowest price point by 150K or more miles. Our 1999 XJ Cherokee 4.0L 4WD has 145K miles and still runs very well and quite reliably. (We bought it stone stock and in "good used condition" at 94K miles.) It would be ridiculous to dump the XJ now, as these vehicles, maintained properly, can often reach 250K miles, like your TJ Wrangler, without a whimper. I'm grateful for my background as a professional mechanic and grateful for good mentors and broad based learning opportunities along the way. Over the decades, it's saved our household a small fortune in vehicle expenses—and lost dollars in new vehicle depreciation, which can be substantial. Happy to help keep the high-milers running safely and reliably...We'll focus on "reality checks" for openers and start our troubleshooting with a solid assessment of the engine's basic condition... Thanks for sharing! Moses
-
Thanks for joining us, Wayne! You're right, there's an obvious void here...Have a Bronco? Would enjoy hearing about it or seeing pics of the vehicle at the Garage Photo Gallery! Pleased to get this forum going...Your post is a start! Moses
-
Just clarifying, bamafan1, there's always the "throwing good money after bad syndrome", and we don't want to waste money on tune parts when the engine is worn significantly. If we begin with the four engine basics, we can determine whether the engine is in "tune-able" condition. This #1 Cylinder Misfire code could border between a tuning issue and engine wear. Lower compression and compression variation between the highest and lowest cylinders might trigger this DTC code. Engine wear needs to be considered. As for the #3 and #4 (valve timing and valve lift) basic engine needs, there are simpler rough tests for these two concerns. First, if you have an engine with timing chain wear, the valve timing is retarded. So, assuming that the timing is not bad enough to have the chain jump a tooth, we can make a rough determination of whether the valve timing is retarded much. Here's the quickest check possible: 1) Battery negative cable disconnected to disable the starter and ignition, note the #1 plug wire position on the distributor cap and remove the distributor cap. 2) Rotate the crankshaft in the normal direction of rotation and slowly approach the TDC mark on the compression/firing stroke. The rotor will be pointing toward #1 plug wire position when you stop at the TDC mark on the crankshaft damper. 3) Now, very carefully watch the rotor as you slowly rotate the crankshaft in the opposite direction of rotation. Note the exact point where the rotor begins to move. 4) At the outside diameter of the damper, measure how far you have rotated the crankshaft pulley/damper. (Try to estimate the number of degrees based upon the degree marks on the damper.) If you measure 3/4" or more of outer pulley movement before the rotor begins to move, on a pulley of this diameter, there's a lot of play in the timing chain and sprockets. Note: This is not a pinpoint test for chain and sprocket wear, but without removing the timing cover, this will provide a rough idea of whether the chain is too loose. If so, the valve timing is retarded. On an OBD-II system with both a crankshaft and a camshaft position sensor, there is a built-in check for the sync between these two readings. Theoretically, if the valve timing is too lagging, the camshaft position will be out of sync with the crankshaft position. A DTC should appear...if so, a loose timing chain could be at fault. As for the valve lift, this is a bit more involved, as you need to remove the valve cover, and you need a dial indicator with magnetic stand: 1) Remove the valve cover and rotate the crankshaft with a socket and ratchet as you did for valve timing, with the battery negative cable disconnected to prevent starter engagement. 2) Bring #1 piston to TDC on the firing stroke (easy to determine as the valves will both be closed as the piston rises). 3) Set up the dial indicator plunger above the #1 exhaust valve's pushrod and rotate the crankshaft slowly to reach the highest valve opening point. If you have measured directly above the pushrod, you are measuring the lifter or camshaft lobe lift. 4) This measurement indicates how much the camshaft lobe has raised the pushrod. Actual valve lift is similar, you measure at the rocker arm directly above the valve stem. Valve lift takes into account the rocker arm pivot ratio. If you want the valve lift test to be more accurate, measure the actual valve opening in 1000ths of an inch of valve lift. Compare this with the camshaft and rocker arm lift specified for a stock Jeep camshaft. (I can provide a figure if you do this test.) You can check and compare the lift at each of the twelve valves, measuring from a closed position to a fully opened valve. The concern here is whether a valve lifter is badly worn (you'd likely hear it as valve clatter) or a camshaft lobe(s) are flat. Jeep 4.0L camshafts and lifters do not have a bad record in terms of lobe and lifter wear. Many engines do, though, including a large number of small- and big-block Chevrolet V-8 engines "in the day" that had OE camshaft lobes go flat from poor billet material. Typically, a Jeep camshaft and lifters get replaced on a higher mileage engine during a rebuild. The chain and sprockets always get replaced. I would not be as concerned about the valve lift, though it could create the misfire issue if lobes and lifters have significant wear. The timing chain is another story, though. Any Jeep 2.5L four or 4.0L and 4.2L inline six with higher mileage can use a new timing chain and sprockets. Again, unless this will make a significant change in overall engine performance or prevent a catastrophic event like an extremely loose timing chain jumping teeth and slamming the valves into the piston heads, wait until the engine rebuild to address a worn chain, sprockets or lifter/camshaft wear. My first move at this point would be the cylinder leak down test performed on #1 cylinder with the piston at precisely TDC (highest ring and cylinder wall wear point in the cylinder) and the valves both closed (on the compression/firing stroke). Pinpoint the leakage, with 120-125 PSI cranking compression, there will be cylinder leakage. Also, I would check the manifold vacuum at an idle. Retarded valve timing, like retarded spark timing, will show up as low manifold vacuum readings at an idle. Moses
-
I would rule out the head gasket, too, Bamafan1. If the gasket were leaking between cylinders, you'd have very low compression in both #1 and #2. If leaking from #1 into a cooling port, you'd have both a loss of coolant and an over-pressurized cooling system. 120-125 cranking PSI is not exceptional for a 4.0L. Before borrowing trouble here, and to save you every expense we can, you might try my inexpensive tests, offered in the last few exchanges. In particular, if you do have an air compressor, even a home garage variety for airing tires, try the cylinder leakage test, at #1 cylinder/TDC compression stroke, with the $5 adapter. A manifold vacuum test with a simple vacuum gauge might also prove revealing. What you generally want in any engine is no more than 10% variation between the highest and lowest cylinders' cranking compression. Following this logic, if #2 were 135 PSI and #1 is 120 PSI cranking compression, that in itself could be a difference tottering near 10%. If your higher cylinders were, say, 140-145, with #1 at 120-125 PSI, that would be enough for the engine to run roughly, maybe even send a #1 Cylinder Misfire DTC. A 25 PSI variance has always been considered a problem for both tuning and delivering good performance. We may be looking at that kind of cause here, in which case, I have a simpler suggestion. If the engine has decent oil pressure, does not burn excessive oil, has reasonable power, and is maintaining sufficient fuel efficiency, let this go for now. To troubleshoot a tuning or fuel-and-spark issue on any engine presumes that the engine is in good condition at the onset. I have four criteria that work for me before looking for tuning problems: 1) Normal oil pressure (good bearing clearances, oil pump, etc.) 2) Normal compression and cylinder seal (piston rings, valves, head gasket, etc.) 3) Normal valve timing (good timing chain and sprockets, etc.) 4) Normal valve lift (camshaft lobes normal, lifters holding and not bleeding down, etc.) If any of these factors are not right, then tuning or cancelling a DTC like the #1 Cylinder Misfire will be a tail chase. Your engine in stock form approaches 9:1 compression (8.7:1 on paper, without carbon buildup). To put that into cranking compression terms, an engine with 8.7:1 to 9:1 compression and a stock camshaft profile would have a cranking pressure in the neighborhood of 155-160 PSI. According to Mopar, you should pick this pressure up within "three revolutions" of the crankshaft, not after cranking each cylinder for 10 seconds or more! (Either remove all the spark plugs or disconnect the coil lead from the distributor cap to prevent the engine from starting!) Make sure the throttle is open to admit a full air charge as you crank. Be aware that the listed cranking compression in shop manuals generally follows the engine's OEM standards. The Mopar manuals typically reflect "acceptable compression" for engine warranty purposes. This also applies to "normal" oil consumption, where most engines of a given type might use little or no oil between 5,000 mile change intervals, but for warranty claim reasons, it's "acceptable" to use a quart of oil in 2000 miles or whatever. It is always assumed that a difference of 25 PSI between the highest and lowest cylinder is an engine running unevenly. This could easily translate through the PCM as, like Belvedere suggests, a "misfire" at the weak cylinder. I wouldn't lose sleep over this redundant P0301 DTC in your case. As long as your Jeep 4.0L engine is running okay, it's money in the bank. I would not rush off to remedy the problem until you are ready to rebuild the engine, if you ever do. We can continue to kick the P0301 DTC around, I'm pleased to do so, but if the cranking compression is 120 PSI on #1 cylinder, I'm suspect that we'll not make a lot of headway. And as long as the Jeep is reliable, let's be happy that you're not spending needless money on it. If my hunch is correct, you will likely find a high percentage of cylinder leakage at #1 cylinder. This can seem alarming, even justification for rebuilding the engine—and it often is. If the cause is "just" carbon buildup, the Seafoam fix or a similar remedy can sometimes be a "cure", at least short term. Carbon buildup is seldom an isolated event, though. There is generally valve, ring and cylinder wear, too. Actual mechanical wear or damage cannot be remedied by de-carbonizing the combustion chambers and valves with a cleaning agent or method. It's also worth noting that some engines maintain functional cranking compression and run reasonably well despite showing a high percentage of cylinder leak down. These engines can go many miles without creating a problem, and they cost no more to rebuild later than now. Again, it goes back to the four basic engine needs and whether each need is sufficiently met—at least enough to postpone a costly engine rebuild. Note: My approach with these posts is to not spend others' money needlessly. Sometimes, we're postponing the inevitable. This Jeep 4.0L #1 Cylinder Misfire P0301 DTC is a case where we need to confirm the engine's basic condition before attempting to "tune out" the problem. Our troubleshooting, in any case, needs to begin with confirming the four basics. Once we know the engine's basic "long block" condition, the rest is either chasing vacuum leaks, tuning or replacing defective parts that the PCM or an OBD-II scan tool might—or might not—turn up. Moses
-
I wrote a lot for OFF-ROAD Magazine during the '80s and '90s, the pre-SIM era when Argus was the publisher. In 1987, a spanking new 4.0L EFI XJ Cherokee became available to participate in the Jeep Cup Rally regional competition near Placerville, California. A 4.2L advocate for years with a light truck (fleet mechanic) background, I was excited to test the new, high output Renix EFI 4.0L. Chuck Williams and I were assigned the vehicle, and we round tripped from the San Diego Area to the Sierra foothills to compete. Despite the 4.0L's substantially higher horsepower rating than the emission constrained and carbureted 4.2L inline six that powered the new YJ Wrangler, the 4.0L six immediately struck me as lacking low-end torque. In fact, while the 4.2L had a torque rise like a diesel, peaking at or below 2000 rpm depending upon model year, the inline six 4.0L multi-point EFI's torque seemed nowhere to be found! Overdrive in the wonderfully reliable AW4 felt ridiculously sluggish. Also apparent with that new '87 model was AMC's inability to isolate the upper radiator hose from engine accessories and rough edges. The three lasting memories for most owners were 1) the maze of cooling hoses and appearance of an "engine transplant", with the 4.0L shoehorned into the engine bay, 2) the "burping technique" required for bleeding air out of that early cooling system and its reservoir and 3) the engine's weird power curve and the need to keep rpm up to realize any torque. That said, the XJ Cherokee has more than proven itself. This remarkable, utilitarian platform lasted from 1984-2001 in the same basic configuration, delivering extraordinary reliability, longevity and offering respectable power from 1987-up with the 4.0L AMC seven-main bearing six. The XJ was the right combination of parts, squarely pieced together from a traditional Jeep powertrain layout, with the added link-and-coil front end that revolutionized Jeep 4WD ride quality for beam axles—and paved the way for four-wheel Quadra-Coil suspension on the Grand Cherokee and '97-up Jeep TJ Wrangler. A milestone, a bulletproof vehicle despite the ever-waging controversy about a unitized body/chassis, the XJ Cherokee is likely the best, surely the most popular in sheer numbers, Jeep SUV built to date...That's why we have one, and lucky for us, our '99 is among the best model years! Moses
-
Should You Restore or Modify Your Vintage Jeep?
Moses Ludel replied to Moses Ludel's topic in Vintage Jeep® Vehicles 1941-71
Oh, boy, not a CJ-3B! They still get my attention, in my view the most attractive 80-inch wheelbase flatfender Jeep! Though I built an 81-inch wheelbase '55 CJ-5 for my Jeep CJ Rebuilder's Manual: 1946-71, the CJ-3B would have been my preference...I opted for the more "familiar" CJ-5 look. Light, sleek and, if you like it, and I do, a tall hood to fit an F-head or any practical swap engine, the CJ-3B was built to '64—and for good reason. In my Jeep Owner's Bible, I share a photo of a late-'fifties/early 'sixties Jeep dealership with a new CJ-3B parked alongside the CJ-5/6 models, the Willys style pickup and wagon, plus an FC, each with its following... Make sure the cinnamon rolls leave a lasting impression, Rocket Doctor! Moses -
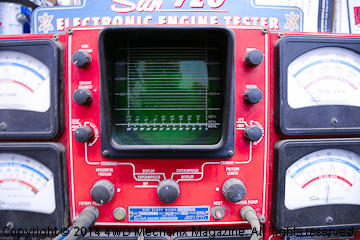
Like your idea of sparing the $120 for a new TPS, bamafan1. As a alternative, the Auto Zone version (purchased on a weekend when Mopar parts were unavailable) was a fraction of this pricing and has work well to date. The cooler #1 spark plug could be revealing, bamafan1! What was the cranking compression on #1 cylinder? A colder plug (un-fouled and still firing) is not a good sign, usually indicating low compression or incomplete combustion. It can also indicate an fuel air-fuel mixture error, typically running rich, which has a cooling effect unless the plug actually reaches the point of fouling out. A fouling plug is equivalent to retarding the spark timing. With low compression or poor cylinder seal (including the weak valve spring possibility with the engine running), modern engines can still clean off a spark plug due to the high spark voltages available. Worth noting, the traditional oscilloscope engine analyzer's spark firing test is very valuable. The scope's ability to assess each cylinder's relative compression and its combustion pattern can be revealing. When you replace all of the ignition parts (even more parts if we follow the OBD-II DTCs!) and still have a cooler plug, this could appear as a weak cylinder firing line with the engine running. Differences in spark plug firing line height, especially after installing fresh tune parts like you have already done, can reflect variations in the combustion efficiency between cylinders! Scopes like my vintage Sun 720 will even perform a "dynamic compression check", shorting out each plug wire (engine at an idle) and comparing the drop in engine rpm as each cylinder goes off line. (This might be more difficult with an MPI engine designed to compensate and restore the idle rpm. There should still be a momentary rpm drop before the idle air control kicks into play.) Eliminating spark to a low compression (or poor combustion) cylinder will barely change the engine's idle rpm. Also, simply "blipping the throttle" while reading the spark firing lines on an oscilloscope analyzer will show firing line changes (i.e., compression irregularities) as the engine load increases. On a scope, throttle "snapping" is a realistic test for low compression because it takes into account the engine load. This test quickly turns up weak valve springs, too, as a quick speed change will exaggerate the valve spring issue. Note: Jeff (Belvedere) is likely onto this one...We used to idle the engine and pull individual spark wires with an insulated spark wire pliers (at each plug wire's insulator to prevent damaging the wire!), noting the rpm drop on a tachometer. This is essentially the same test as the scope's "dynamic compression test" though not as sophisticated. (Again, the Idle Air Control function on EFI/MPI makes this test more challenging.) If a given cylinder, like #1 in this case, shows little or no rpm drop, there's either low compression, a limited fuel supply (with MPI) or poor combustion. Is this time for a leak down test or at least an "air hold adapter" test at #1 cylinder? The $4.97 adapter and 80-90 PSI of compressed air into the cylinder at TDC on the compression stroke could suffice as a quick leak check. (No percentage reading, of course, but if there's a substantial compression loss/air leak, you'll find it quickly!) A quick interpretation of air leakage would be: 1) Leaky intake valve will be audible at the intake. Open the throttle to hear the air leak better. 2) Air exiting the tailpipe is a leaking exhaust valve. 3) Air entering the crankcase would be audible by simply removing the oil fill cap. This air leakage would be blowing past the piston rings. 4) A compression/air leak loss between two adjacent cylinders is typically a blown head gasket. Bubbles in the cooling system can also be a blown head gasket (into the water jacket). Warning: If you suspect a leak between the cylinder combustion chamber and the engine's cooling ports, drop the air apply pressure to below 20 PSI—or you could damage the radiator or blow off the radiator and heater hoses! If you have an air compressor, optimally with an air tank, this quick air leak test with #1 piston at TDC on the compression stroke might help demystify the #1 cylinder's condition and firing capability. A limitation is the static engine not spinning or changing speeds. A running engine is a better check for weak valve springs. OBD-II and handheld diagnostic scan tools are now the alternative to traditional diagnostics methods. OBD-II DTCs, as we've discovered in this ongoing #1 Cylinder Misfire P0301 chase on the Jeep 4.0L engines, are not failsafe. By contrast, the once popular Sun 720 engine oscilloscope analyzer featured a vacuum gauge, timing light with built-in advance, leak down tester, combustion analyzer with A/F meter and other tools, each mainstays for pinpoint engine diagnostics. Unfortunately, most vintage oscilloscope engine analyzers like the Sun 720, which featured a wide array of functions in one machine, have been sold off to vintage car museums as memorabilia! As you would suspect, I've kept my late 'sixties "muscle car era" Sun 720 machine... Moses


-
Thanks, Jeff...Interesting comments about the CPS function. This is a hall effect system and is fairly straightforward. The notches in the flywheel or flexplate and the pickup provide a precise location for the #1 cylinder TDC position (actually the pulse output is 4-degrees BTDC on the 4.0L and the PCM calculates TDC from this generated signal). The rotating, notched flywheel/flexplate and the magnet in the CPS probe generate the pulse signal. Mopar defines the CPS function as: "This sensor is used to indicate to the [PCM] that a spark and or fuel injection event is to be required. The output from this sensor, in conjunction with the camshaft position sensor signal, is used to differentiate between the fuel injection and spark events. It is also used to synchronize the fuel injectors with their respective cylinders..." The CPS would help the PCM sense minute fluctuations of speed caused by a misfire. Why the constant reference to #1 Cylinder on bamafan1's engine is interesting. While fluctuation could be caused by a misfire at any cylinder, there seems to be an epidemic of #1 Cylinder Misfire codes out there, suggesting something other than a local (#1 cylinder only) misfire. If this code is always valid and really does include weak valve springs at #1 cylinder, as in your experience, the only thing I can add is that #1 cylinder is usually the hottest running cylinder in an inline six. That could fatigue the valve springs earlier on #1 than other cylinders. We can test and confirm this with a simple surface thermometer, comparing #1 cylinder's temperature to the other cylinders with the engine hot. A good place to probe heat would be the cylinder head surface at the spark plug areas or the upper cylinder and head mating areas. Let's see what comes up! Regardless of how the PCM determines a misfire, the cause of a true misfire (not just a false signal) would be mechanical. In my view and experience, this could be caused by a variety of factors, here are a few quick prospects: 1) Ignition malfunction including spark wire breakdown, corroded rotor tip or distributor cap contact resistance 2) A lean or rich fuel mixture, more likely lean in the case of electronic fuel injection, especially multi-point MPI with an injector for each cylinder (much easier to determine air/fuel ratio per cylinder than with a carburetor or TBI, which feeds all cylinders through an intake plenum) 3) Low compression, which could be caused by poor ring seal or leaky valves 4) Ineffective or erratic spark timing advance, which could involve several sensor signals like the MAP, coolant temp, intake air temp or mass air flow in a MAF system 5) Vacuum leaks at hoses or the intake manifold junction with the head—good idea to re-torque the intake manifold, we haven't done that yet! 6) Exhaust gas recirculation valve issues: EGR unseated, sticky, fluctuating, fluttering, take your pick. 7) Oxygen sensor or catalytic converter issues, or a restricted exhaust system 8) Crankcase ventilation issues in a PCV system 9) Out of sync crankshaft and camshaft position sensors (worn timing chain, distributor installed improperly, distributor timing position off). This could send a camshaft position sensor fault code, or maybe not if the issue is tottering. The borderline camshaft/crankshaft sync problem could be a loose timing chain issue. This would not be surprising for higher mileage engines. If forum members are curious, I can suggest a quick test that I've used for years to measure timing chain wear. The method is accurate enough to rule out a major problem with the chain. Each of these misfire sources has its cause, and we can drill down to confirm. I like to find actual problems, and I'm sure bamafan1 would like to see his MIL light go out. We'll keep after this... Moses
-
Should You Restore or Modify Your Vintage Jeep?
Moses Ludel replied to Moses Ludel's topic in Vintage Jeep® Vehicles 1941-71
Welcome to the forums, Rocket Doctor! I'm delighted to see your depth of Jeep immersion. I followed your post with earnest and could identify with your Jeep "process" and conclusions...You will have the best of both CJ2A worlds with the stock/restored '47 and a '49 with light and sensible performance and safety upgrades. I recall the original popularity of 2.3L Pinto engines as flat fender transplants, the first one I saw was in a closed course race. I'm even old enough to remember slant four 195 Pontiac Tempest transplants that screamed in lightweight vintage Willys/Jeep CJ 4x4s, one comes to mind that won very steep Western Nevada hill climb competitions in the early '70s. Mickey Thompson popularized Pontiac V-8s and ran a dragster with a highly modified slant four—which was actually half of a 389 Pontiac V-8 and, much to G.M.'s credit, slanted away from left hand drive steering boxes. I-H took a similar tack with the early Scout 152 and 196 slant fours, cut from the 304 and 392 I-H V-8s, respectively. Trusting you'll raise the funding for the 10 mpg trip to Michigan, the '47 sounds very original and worthwhile for a stock restoration. The '49 deserves disc brakes and Saginaw steering, the 2.3L engine transplant will get that rig up to highway speeds. I restored a 1950 CJ-3A with an L-head 134 in the late 'sixties, and that was an agonizing way to drive the secondary highways from San Diego to the Anza Borrego Desert. Most four-cylinder Jeep 4x4s were either flat towed (very bad on a Ross cam-and-lever steering gear!) or trailered. The '3A' eventually got towed behind our V-8 powered '55 Ford F100 pickup. Again, welcome to the forums, looking forward to your participation. As a footnote, I also admit that our '99 XJ Cherokee Sport 4WD with 4.0L and amenities is a rather pleasant way to do the street/trail thing! With a six-inch long arm lift and air lockers at each axle, it will match a vintage CJ on the trail, too! Moses