forman
-
Posts
115 -
Joined
-
Last visited
Content Type
Profiles
Forums
Blogs
Store
Articles
Gallery
Everything posted by forman
-
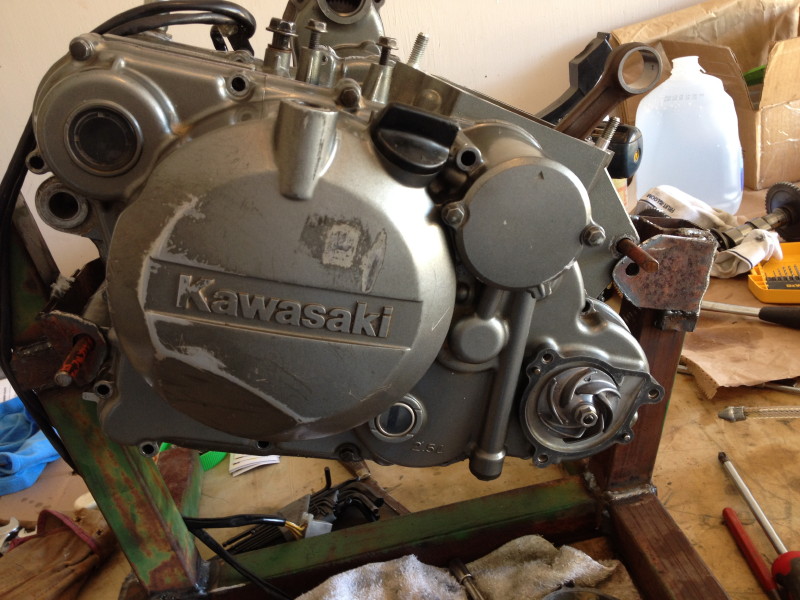
I have started putting the engines right side together and here are a few photos... Right side front balancer, the primary and oil pump drive gears and the shift drum installed. The gear shift lever and everything torqued. The clutch basket The clutch drum then the plates and cover and springs I thought I had a photo but did not. I installed the oil pump but forgot to take a picture before I closed up with the right side cover then I installed the water pump impeller. I'm still waiting on the cylinder and piston.


-
I'm getting ready to finish this project when I noticed the wear pattern on my clutch drum I was wondering if these wear patches could be filed down?


-
An Air/Fuel ratio Adjustment Video at YouTube
forman replied to forman's topic in Dirt & Dual-Sport Motorcycles
I love it! I don't think I asked a question and now I have a whole chapter of information to think about this weekend... learning more with every response Moses. -
An Air/Fuel ratio Adjustment Video at YouTube
forman posted a topic in Dirt & Dual-Sport Motorcycles
I'm thinking of acquiring a road bike later this year and was researching the older Kawasaki Concours ZG 1000 when I ran across this video on youtube. Moses you have opened my eyes by showing the damage that can be done to cylinder and rings of an engine that is over "jetted". I found this interesting and hope you do too. -
I'm getting anxious about not having a motorcycle to ride... I'm still waiting on parts. I pulled my other piston and cylinder ( I have two engines that are in similar disrepair) made some measurements and concluded that both piston and cylinder are probably capable of being hand honed however, the results might just be marginal and not long lasting. I did find a machinist that is fairly close and willing to use his expertise to help me make a better decision. We are probably looking at another overbore and new piston. Moses I loved your video about the work that LA Sleeve does and I know that you purchased some parts from them for your XR 650. It seems that around here everyone wants to use forged pistons and you prefer cast pistons. What was the reason for your decision to use cast over forged?
-
Rebuilding a Jeep CJ-7 Dana 300 Transfer Case
forman replied to forman's topic in 1972-86 AMC/Jeep® CJ and Jeepster Models
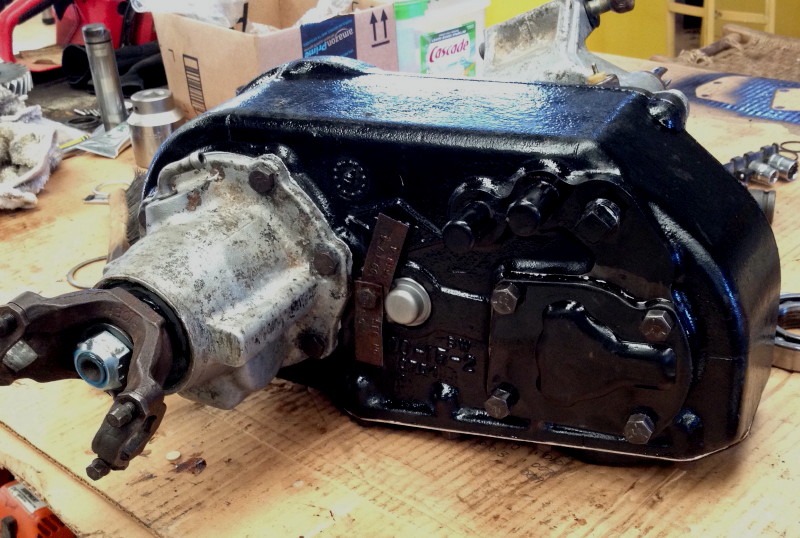
First off I need to apologize for the lack of photos taken while rebuilding this transfer case. I just got started putting things back together and before I knew it I was done. Before Initial cleanup after Moses thanks to you and your superb repair guide for all of your help, it turns out that making tools, scavenging the junk pile for suitable pieces of pipe to help in pressing bearings and ordering the parts were the most difficult areas of the process. I really had a difficult time dealing with some of the Jeep parts vendors! ARRGh!!! The repair of this transfer case didn't cure all of my problems, leaving some work for next winter!


-
Engine Cylinder Hones and Glaze Busters
forman replied to Moses Ludel's topic in Diagnostic and Specialty Tools & Equipment
Thanks Moses, I just need to jump in and do this. Having never seen the process I'm anxious about the work required to do it right. -
Great article Moses! Lets say that you have just been able to touch up the crosshatch pattern and in the process increased the size of the bore slightly over what it was when new. Would you use new slightly oversized rings? If you need a cylinder for your video I have one.
-
I know that you are excited about getting your bike running again, good luck to you! Thanks for the new topics. Spring has sprung here and the annual songbird migrations to summer breeding territories has commenced so we are busy evaluating populations of threatened and endangered species that frequent our area. For me it is a great time to lug the heavy telephoto lens around and try to get some close up shots. This Eastern Screech-Owl let me get very close before flying, I've not had that happen very often. This is a Golden-cheeked Warbler an endangered songbird about the size of your thumb, at least in our area their numbers are increasing.


-
The package did arrive but to late to ship an in stock piston back with the honed cylinder. I'm waiting on a back ordered piston then machine work on the cylinder, dang it! While I'm waiting, Moses and if you have time, would you walk me through the process of hand honing my other cylinder? I plan on rebuilding that engine later this year and will have to freshen up the top end. We can start off by talking about the tools needed.
-
Rebuilding a Jeep CJ-7 Dana 300 Transfer Case
forman replied to forman's topic in 1972-86 AMC/Jeep® CJ and Jeepster Models
I really like your suggestions Moses thank you! -
Rebuilding a Jeep CJ-7 Dana 300 Transfer Case
forman replied to forman's topic in 1972-86 AMC/Jeep® CJ and Jeepster Models
Parts are finally here! I'll be reassembling the transfer case soon. Moses I was reading ahead and ran into a potential stumble when re installing the rear output shaft rear bearing. In chapter 4 of your book page 182 Fig 4-158 I read make sure the bearing cup is clean and install the new bearing cone. My question is do I press it on right now or just place it in the cup, install the seal then bolt up the cover, then use the yoke to seat the bearing? I'm lost on this one! help! -
Very nice Moses I'll have to explore digital editing soon. Right now I'm trying to get the postal service to deliver my cylinder to the correct person in El Cajon to be overbored. It was in San Diego once but now is in Memphis. I'll think that I'll never see it again.
-
I'm curious about NX2 I've never heard of it. Feel free to use some of my images. The only Nikon I own is an FE2 my mom gave me in the early 80's I only shoot a couple of rolls through it a year now, but back in the day I used it constantly.
-
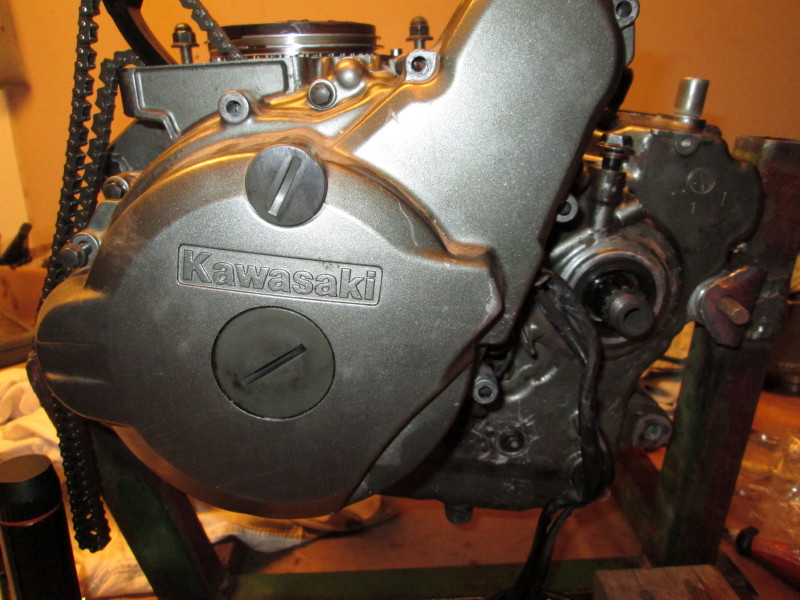
The rebuild continues by enclosing the crankcase with the left side crankcase half, leaving the front balancer shaft, the crankshaft, and the upper balancer shaft exposed, and further toward the back of the engine the output shaft. The three shafts that are "timed" have small indicator marks that will line up with another indicator mark on the balancer weight or sprocket. The front balancer shaft and weight The upper balancer shaft and timing chain sprocket, the weight is inside the crankcase. The crankshaft has 2 marks the bottom one is used with the piston at top dead center. The balancer chain has 3 sets of sliver links that are used to time the trio I mentioned above. The chain guides are next The chain tensioner sprocket assembly and I've added the cam chain Then the "doohickey" this one is an aftermarket part. The starter gears The stator cover


-
I like to use photos to communicate, for me it is so much easier to ask a question in reference to a photo. I'd be interested to hear your editing techniques, I've shied away from digital editing, I think it is because I still enjoy film photography. I seem to tell myself often "you should have taken a better exposure there were 8 different ones to choose and you picked that one" While shooting nature photography I'll carry both digital and film cameras. Often the digital photo count will out number the film 10 to 1. The process of taking a photo with film has made me a better photographer, it slows me down and makes me think about composition, exposure, and color saturation. I found a dead Rio Grande Turkey a few weeks back, my wife says that I will take a picture of anything...


-
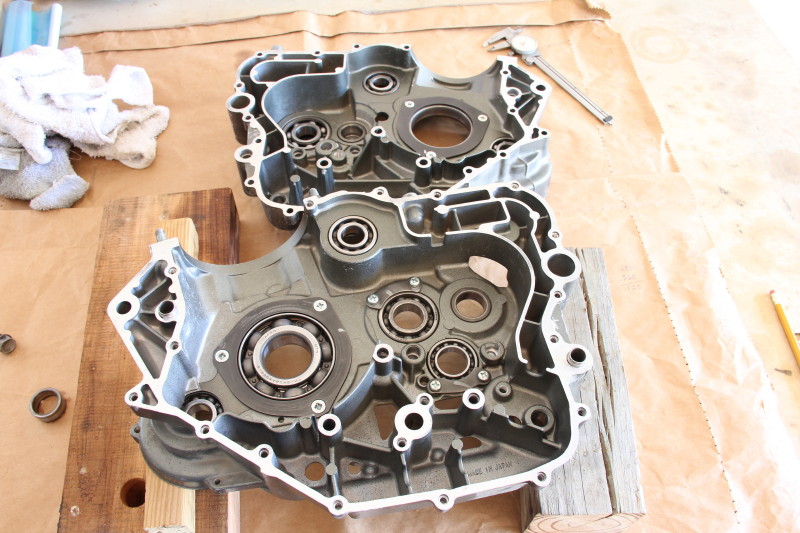
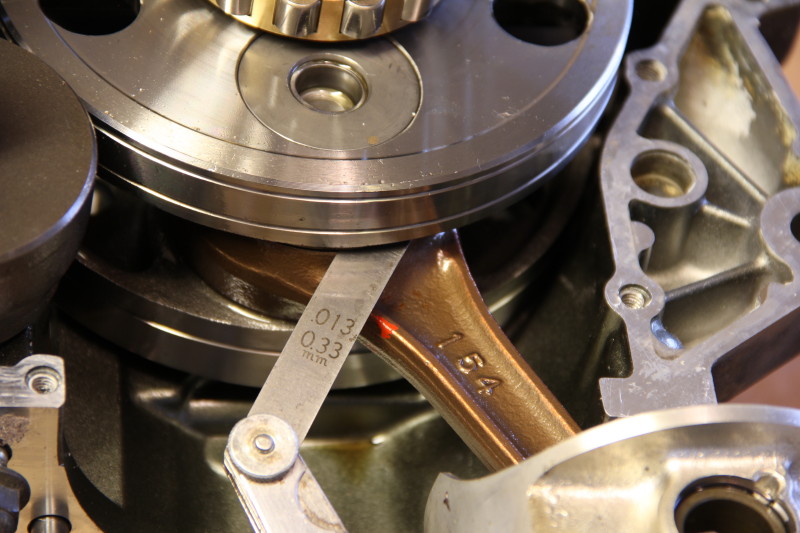
To begin I had a few measurements to make to make sure the components from this engine were in spec. I made these before installing the parts but chose to take pictures while the parts were in the case. The shift forks (3) and their shafts. The respective grooves the forks fit into, this one is on the input shaft. The amount of space between the crank half and connecting rod. There is also a measurement to make of the amount of radial play which I could not make with the limited amount of tools I had to measure with... I chose to inspect by feel ( I know that is laughable because feeling a distance of a couple of thousandths of an inch is next to impossible) It felt good to me so I moved on. The two case halves. The transmission input (left) and output shafts. The KLR transmission in place in the right crankcase half showing the input and output shaft with shift forks and shift drum. The right side crankcase ready to be sealed up showing the oil pick up, front balancer shaft, upper rear balancer shaft and weight, crankshaft and piston. One more photo of the assembly before closing it up. There are not too many complicated things going on here but it does take quite a bit of work to get this far.


-
Kawasaki KLR Motorcycle Engine Teardown and Inspection
forman replied to forman's topic in Dirt & Dual-Sport Motorcycles
Finding that machine shop might be the most difficult part... -
Kawasaki KLR Motorcycle Engine Teardown and Inspection
forman replied to forman's topic in Dirt & Dual-Sport Motorcycles
Lets just say the first cylinder piston is a wash and a great candidate for the overbore I spoke of. What about freshening up the cylinder and re ringing the '02 cylinder? I have never done this or seen it done so I'll have many questions -
Kawasaki KLR Motorcycle Engine Teardown and Inspection
forman replied to forman's topic in Dirt & Dual-Sport Motorcycles
I have the luxury of having another piston and cylinder, This is off of the '02 engine with the cracked crankcase. The previous owner said it used oil and the piston had a thick layer of carbon build up. Cylinder inside diameter 3.937 (3.937-3.9374) service limit 3.9409 Piston outside diameter 3.934 (3.9347-3.9353) service limit 3.9291 Piston to cylinder .003 (.0017-.0028) Ring thickness N .046 2N .046 (.0461-.0469) Ring end gap N .012 2N .013 (.008-.016) I know my problem can be solved by installing an overbore kit, one I'm looking at will run about $450 with new forged piston, rings, gaskets,machine work and shipping. I would like to save some money and hone the cylinder myself but I really don't know what tools, parts and technique that would require. -
Kawasaki KLR Motorcycle Engine Teardown and Inspection
forman replied to forman's topic in Dirt & Dual-Sport Motorcycles
I've acquired a good inside micrometer, and was able to measure the inside diameter of this cylinder. I was also able to measure the ring end gap, and the piston outside diameter. Keep in mind this cylinder and piston were bought off of craigslist and I can't explain why these measurements seem odd. I'll refer to this cylinder as the '98 cylinder. Cylinder inside diameter 3.936 factory specifications (3.937-3.9374) service limit 3.9409 I measured this cylinder in 20 different places I never got a measurement over 3.936. Piston outside diameter 3.924 factory spec (3.9347-3.9353) service limit 3.9291 The piston has exceeded its service limit by .005" Piston to cylinder .012 factory spec (.0017-,0028) Its easy to see why I was burning so much oil but I can't explain the power I felt. Ring thickness N .0455 2N .0455 (.0461-.0469) service limit .0430 Ring end gap N .018 2N .016 (.008-.016) Why the piston is so far gone and the cylinder has room for wear is beyond me I suspect some used parts were exchanged before I bought the engine. The piston and rings will need to be replaced but the cylinder might be repaired by honing. Moses you had asked previously what jets were in the carburetor : Stock main jet below 4000' elevation is a 148 mine is a 150 we are at 2000 feet. Pilot jet and needle jet are stock and rated for my elevation. My exhaust is a straight open pipe I don't know the brand name but it is not stock. -
I spent some time this week asking questions about this type of repair and I've concluded that finding the right TIG welder with the right attitude and knowledge toward repairing my cracked case is going to be a daunting task. Also this repair for me is cost prohibitive. I'm going to use one of my other left side cases that I replaced all of the bearings and seals in previously, with the exception of the bearing race I spoke of earlier. The replacement case race is of the same manufacturer and a test fit up was made. I feel good about my decision. The rebuild will be entitled Kawasaki KLR 650 engine rebuild. Thanks for all of your help on this one Moses!
-
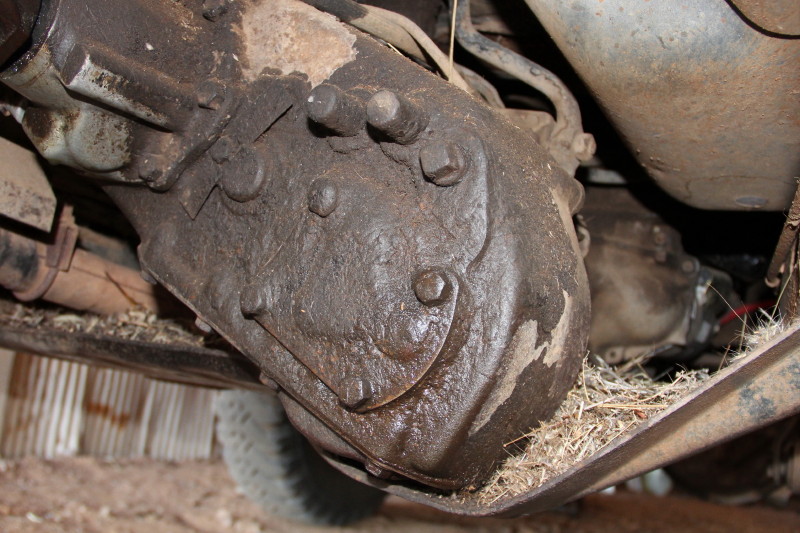
I've included a photo of the bearing race, I would need to press it out from this side I don't know if you can tell or not but the edge of the race is beveled. Also a couple of photos of a non damaged oil drain hole and threads


-
I removed the left crankcase half from my craigslist purchased 2002 KLR engine with 14000 miles. On the tear down I discovered that the engine looked very good despite its age. I wanted to include this type of repair because I think it is very possible to find yourself in this position... well maybe not quite this bad. The previous owner informed me that he had stripped the threads when changing oil. He was not aware of the time sert repair and attempted to use a "wedge" type of bolt to seal the oil in the crankcase. I guess it still leaked and he elected to use epoxy... that didn't work either so he bought a replacement engine. When we met he was selling his bike with an extra engine for $100 I inquired about the extra engine and bought it knowing that I had another crankcase. So why repair instead of using the other crankcase? Using this crankcase will keep the original engine together. There is a bearing race in the left crankcase that looks to me almost impossible to remove. If I can't repair and have to use one of my higher mileage crankcases the bearing and race union would be questionable, What if it wasn't even made by the same manufacturer? I will just post these photos and see if the viewers think it is repairable.


-
Kawasaki KLR Motorcycle Engine Teardown and Inspection
forman replied to forman's topic in Dirt & Dual-Sport Motorcycles
I'll have an inside micrometer available to me later this week. I do want to finish this rebuild knowing that most likely it will take a overbore kit. If you remember we started this thread after I bought a lower mileage engine with a cracked case. I should have photos of that damage tonight, I'll post on the engine case thread started earlier