Moses Ludel
-
Posts
4,447 -
Joined
-
Last visited
Content Type
Profiles
Forums
Blogs
Store
Articles
Gallery
Everything posted by Moses Ludel
-
 Brilliant, Kevin! If this is the cure, it makes perfect sense...Headers often make condensation worse... Both suggestions need follow-up, RareCJ8! Let us know how this works out. Given the driving conditions when the behavior developed, loping along at lower speeds, condensation could be the culprit! Thanks, Kevin...Here are details on RareCJ8's Scrambler: http://www.4wdmechanix.com/HD-Videos-Jeep-CJ-8-4.6L-Stroker-Power.html. Moses
 -
Our Honda XR Motorcycles and Other Dirt Bikes!
Moses Ludel replied to fullchoke's topic in Dirt & Dual-Sport Motorcycles
Greg...Your introduction to helmets reminds me of Nevada's new motorcycle license law of the early '70s. When I bought the pre-owned '69 BSA Victor 441, I wanted to ride on public roads as well as "scrambles". The mandatory helmet law went into effect with the motorcycle endorsement. We lived at rural Douglas County at the time. Carson Valley was still a ranching community with less than 1,500 population, compared to today's 30,000 people in the area. In those years, the DMV office at Carson City, the state capitol, would send a license examiner to the sparsely populated counties on given weeks and days. The waiting line was usually short, and I had my motor vehicle operator's license, just needed the motorcycle endorsement. I parked the Victor at the courthouse lot, and there would be no fanfare about my riding to the examination, no questions like, "Did someone with an endorsement ride that bike here?"...Try that today! The examiner was cordial and for good reason. He had the best job at the examiner's level in the DMV, driving to rural county courthouses, enjoying the scenery and small community cultures! This was his day at the Douglas County Courthouse in Minden. He was pleased. When my turn came, the examiner asked what I needed, and we discussed the motorcycle endorsement. There was a small written exam, and once done with that, I waited for the "figure 8" riding test—the POST test was a standard, and I had seen the layout in the DMV parking lot at Carson City. It hadn't dawned on me that the Minden Courthouse parking lot did not have any lines and circles painted on its surface. So, we had a dilemma. The examiner paused for a bit, then told me to grab my helmet. We walked out of the courthouse to the Victor, and he asked me to start up the bike and go over the controls with him. Pointing across the parking lot to his State of Nevada car, he said, "Hop on the bike and follow me...We'll drive around Minden...You make turns where I do, try to keep up with my car." That last request would pose no problem! I dutifully followed the official car, using hand signals where the examiner utilized his turn signals. I demonstrated my knowledge of the braking hand signal, even though the BSA's left side brake pedal activated the brake light! The examiner was duly impressed, and after driving for 10 minutes or so around Minden, we ended up back at the courthouse parking lot. I parked, shut off the thumper and removed my helmet as the examiner walked over to the bike. He quipped, "You did a great job, let's go finish the paperwork!" It may well be that I was the first, possibly the only motorcyclist to ever perform a true "riding test" on public roads at Nevada. To me and the examiner, it made perfect sense. I rode home with a motorcycle endorsement in my wallet, using hand signals all the way! Moses -
Hi, Mary, and welcome to the forums! You bring a very interesting question. If you're seeking a welding alternative for your reinforcement project, there are some choices. In the body/collision industry, welding is the common choice for repairs or section replacements on a unibody frame/chassis. Welding on sheet metal, even the heftier gauge of the XJ Cherokee's unibody, does have challenges, though. The weld and heat affected zone (HAZ) adjacent to the welds is often troublesome. Many repairs result in "embrittlement" caused by the heat-up/cool down hardening of the sheet metal. This inevitably leads to cracking, especially on a trail Jeep 4x4 subjected to flexing, pounding and torque stresses! Sometimes the sheet material, if originally hardened or metallurgically alloyed for more strength, can actually soften from the welding process or the introduction of the wrong welding filler material. Cautions: For those welding on a unibody chassis, drilling holes in the add-on piece or repair section, then plug or buttonhole welding the new piece to the cleaned unibody, is considered an industry common practice. Under no circumstances should a sheet metal component be "T" or butt welded to a structural sheet metal member. Here is a quick overview and perspective from the American Welding Society (AWS). Take the time to read this if you plan to work with automotive sheet metal: http://www.aws.org/w/a/wj/2002/03/feature/. Also see the Miller Welding guidelines at: http://www.millerwelds.com/resources/articles/sheet-metal-MIG-TIG-GMAW-GTAW. Miller follows the I-CAR standards. I-CAR has strict procedures for automotive sheet metal welding: https://www.i-car.com/. So, to answer your question about alternatives, I can share that several suspension lift kit manufacturers have employed the use of self-tapping (quality grade!) sheet metal screws for attaching support members to the XJ Cherokee unibody frame. On our XJ Cherokee's Full-Traction Suspension 6-inch long arm kit, the braces that anchor the front link-arm suspension to the unibody/frame each have a single large through bolt. Industrial grade sheet metal screws, provided in the kit, are a large part of the remaining support to the unibody/frame. There is no denying the impact force of the XR Cherokee's front leading link suspension arms against this screw-attached crossmember! The axle thrust and bumping against trail obstacles drive all of that force through the lower link arms and into these two braces. Here is one instance where heftier, hex-headed sheet metal screws have performed well. I've rechecked the torque on this hardware several times over the 50K miles since the installation. Surprisingly, none of these screws have sheared, broken or come loose! Here's that installation, note #11, #12 and #13 illustrations: http://www.4wdmechanix.com/Moses-Ludel-How-to-Installing-a-Jeep-XJ-Cherokee-Long-Arm-Suspension-Lift.html. Again, there is a hefty bolt through the unibody/frame, plus some crossmember hardware, so these braces are not entirely supported by sheet metal screws. There is a technique that I really do prefer for sheet metal. Trade products like "NutSerts" and AKV thread inserts are a remedy worth considering. There are even "factory" examples of this type fastener, and they will go into any drilled hole with room behind it. (Some even work with a "blind" hole.) Here is an AVK example available from MSC Direct: http://www.mscdirect.com/product/details/09331760?item=09331760&fromRR=Y. Note the MSC 'Big Book' catalog listings for Nutsert and AVK type insert thread nuts: http://www.mscdirect.com/product/details/09331760?item=09331760&fromRR=Y. Do not be discouraged by industrial size thread insert kits and installation tools costing over $400. As you can see from the first link, a tool can be under $10, the insert nuts are available from MSC, Fastenal and many other sources. This is the best "bolt on" solution for sheet metal, as you end up with a nut embedded and secure, close to flush with the sheet metal surface. (The sheet metal can even be countersunk with the correct body tool for a precise flush fit of the threaded nut insert.) One more example at MSC: http://www.mscdirect.com/product/details/09331760?item=09331760&fromRR=Y. Rivets are similar if you can find properly graded, large enough rivets and an affordable installation tool to match. The disadvantage of a rivet compared to the Nutsert or AVK type products is that the rivet is "permanent". The only way to remove a rivet is to drill it out, and steel rivets, in particular, can eat up a lot of drill bits in the process! I'd lean toward the thread inserts, and if this reinforcement is a stressed member, my choice of bolt diameter would be 6mm (1/4-inch) or 8mm (5/16") stud size. A bolt-on reinforcement member can be removed for chassis and other service work. "Structural member" is an important concept. If you reinforce a sheet metal section that supports critical suspension, powertrain or body safety elements, be sure to improve on the structural integrity and stamina, do not detract from it. A classic situation with unibody "stiffening" and bracing is to make a given section too rigid. On an engineered chassis, added stiffening at one area can cause force to transfer to other areas, placing more stress on the zone that becomes stressed! Be discrete with spreading the stresses evenly and allowing the unibody to behave as it was intended to do. As for adhesives, there are OEM areas of these vehicles that often have members "glued" to sheet metal. However, in looking at the best products 3M offers, they are intended for attaching body panels like door skins and gluing at other non-structural areas: http://3mcollision.com/3m-panel-bonding-adhesive-38315.html. This is obviously tough stuff, but not strong enough to be considered the same as a weld or proper attachment method at a structural section of the unibody—or in your case, for attaching a metal part intended to stiffen or reinforce the unibody frame/chassis. If you were simply doubling up door skins, that might be different. Here is a direct quote from 3M: "This product is not intended to bond structural components of a vehicle such as pillars, rockers, or frame members. If doubt exists as to whether a particular component is structural, then that component should be welded." I trust this helps clarify. I'd be pleased to take our discussion further. Thanks for joining us at the forums, we look forward to your participation! Moses
-
Sounds like a rich mixture, more specifically like the engine is running on its warm-up mode. We could suspect other things if the engine did not clear out as it does when you rev it up and back. You might pull a convenient spark plug when the engine is acting up. Look at the fuel mixture signs of color at the plug. What's the exhaust pipe coloration at the tailpipe end? Does it look richer than usual when the engine is acting up like this? This could point to the coolant temp sensor or a thermostat set too low. What's the engine operating temperature when this is going on? Do you need to test the temp sensor ohms-resistance reading? Is there an exhaust restriction of any kind? When you check the temp sensor, also check the terminal connection and attachment stem of the temp sensor. The vibration/pounding could be opening the circuit or sending a false or intermittent reading to the PCM. If turning the key manually back to "On" from "Start" mode seems to stop the starter run-on, I'd suspect the key switch. To isolate the starter as the trouble, try manually starting the engine by using a jumper directly at the solenoid (bypassing the key switch altogether). See if the starter runs on when you release the jumper. Caution: Make sure the transmission is in neutral with the parking brake set and wheels chocked. Don't run over yourself performing this test! With the Motorcraft/Ford-type solenoid (mounted at the inner fender), you can perform the jumper test easily. If you are not sure of the poles, it's the hot battery lead across to the small terminal marked "S". This essentially mimics the key start mode. Make sure that the solenoid is not sticking, too. The Motorcraft starters are notorious for "sticking" in run-on mode or not releasing the drive and staying engaged. If you suspect the starter, that's a good possibility. We had an '87 Grand Wagoneer 360 V-8 with Motorcraft starter that decided to lock up the drive. By the time I disconnected the sizzling battery lead, the starter and battery cable were toast. Beware. Moses
-
As a footnote, flynaround, there's a limit to working a chassis and powertrain. The 2006 Dakota has specific capacities for pulling a trailer. I'd look at the V-8 Dakota model specs and see what Chrysler had in mind for loads on this vehicle. Tow capacity includes brakes, powertrain, suspension, wheelbase length, track width and frame stamina. If any of this is subpar on the Dakota when compared to your towing plans, you might consider selling your popular Dakota and either using the Ram 1500 for towing or finding another appropriate chassis for your towing chores. For towing, you can't have too much truck, but you can have too little. I like our Dodge Ram 3500 4WD Cummins truck for towing and have never reached gross vehicle weight or gross combination weight. That's my plan, as I want this truck to see a half-million miles of service. Moses
-
Greg...Very pleased that you followed the "Honda Power Up Kit" formula for jetting and the needle. The OE restrictors are likely out of the air box, too, right?...You'll be happy near home with this jetting, and I'm getting away with nearly the same jetting at rides to 6,500 feet: 172 main with straight 68 pilot and the needle at #3 clip position. Will test even higher altitudes this fall, I'm headed to High Rock Canyon and surroundings. Will be filming from the bike, I'll share the link after our ride. Like you, I've ridden a very long time without feeling compelled to do many wheel stands. I got my first two-wheel "Scooter License" at age 14 in Nevada, that was 51 years ago. The limit was 35 mph and 6-1/2 horsepower, which I quickly ignored, building an outlaw Cushman with 8-plus horsepower and a peak speed around 60 mph. The XR650R power to the ground is tremendous, however, you'll have no problem keeping the front wheel on the ground, especially when hard desert riding. You're used to the XR500R, just imagine that bike on steroids! I thought your seat issue might have remedy at Acerbis. Their X-Seat offerings for Honda do not include the XR650R. I found a listing for a seat cover, and this could be more to your liking, anyway. The cover might allow some room for additional padding, and a creative upholstery shop can perform magic. Give these folks a call or drop them an Email to confirm whether the cover allows enough room for added padding: http://www.2wheelpartssupply.com/cycle-works-seat-cover.html?utm_source=google&utm_medium=paid_search&utm_campaign=paid_search_google_pla&scid=scplp203623&gclid=CjwKEAjw68ufBRDt0Zmrn4W_8AwSJADcjp1cXJ1sOqOMW2aLJ0ecHaHzfJJBioL8d2VfaEuWVsBjahoCV8Tw_wcB A place to begin, you need to be comfortable in the saddle! Moses
-
Shock Change for the Honda XR650R Motorcycle
Moses Ludel replied to DavidEasum's topic in Dirt & Dual-Sport Motorcycles
David, you can have your OEM shock rebuilt. There are a number of shops that will rebuild and re-valve/tailor an OEM shock. This is probably the most cost effective approach, and you can even have the shop dial-in the shock for your body weight/height and riding style/venue at Burundi. With any dirt or dual-sport OEM shock, there is the impulse to replace the unit or condemn its function. Assuming the original shock is not damaged, and yours is in this case, it really pays to follow the factory guidelines for adjusting the OEM shock. Most often, you can find the ride, dampening, rebound and sag that work best for your riding—all within the range of the OEM shock adjustments and fluid choices. We do this with auto/truck seats and suspension/shocks all the time, it's the same with adjustable OEM motorcycle shocks and forks. As for shock rebuilders, you may even find an "exchange" unit or take-off OEM shock. Whether you want a premier source for parts to rebuild the rear shock yourself or plan to sublet the unit for rebuilding, I suggest that you begin with Race Tech. Here is the page for the Honda XR650R offerings, both parts and labor, for the front forks and the rear shock/spring (scroll down the listing). I plugged in the 2001 model year, presumably 2000-2007 Honda XR650Rs are virtually the same: http://racetech.com/ProductSearch/1/Honda/XR650R/2001 Trust this helps. There are also other mail-order sources online for seals and rebuild kits if you don't want to ship the rear shock to the U.S.A. Might want to disassemble the OEM shock (by the book, please, don't turn a spring loose at your home garage!) and inspect the damage. This could be just a seal problem if the tolerances are still okay with no scoring. If you need info on safe disassembly and rebuilding, just ask. Moses -
Hi, David! After looking at the parts schematic for the European rear fender and brace, I understand how clearance might be an issue, more likely with the fender and related parts than the swing arm...If you're comfortable with the load capacity and speed rating (should be way more than enough, right?), I believe you'll be very satisfied with the Michelin T63 dual-sport tire choice. And yes, the price of these tires is amazingly reasonable! Mileage, according to anecdotal comments across the internet, is quite impressive for a DOT asphalt/dirt tire. Most other make dirt/highway DOT tires last 2,500 miles, apparently. Michelin T63 riders are often getting twice that mileage. We shall see. I will be embellishing my tire changing equipment for friendlier tire changes regardless. The XR650R, even if these tires only last 3,500-4,000 miles, will be getting regular change outs. The tires will last a lot longer if I back out of the throttle a bit on dirt! Riders need to be conscious that a DOT approved highway and off-road tire will not be ideal for either environment. The purpose-built tires for either highway or dirt riding will always prevail. You have a pavement racing background and know that for Moto GP or Superbike road courses, tires get picked trackside on the basis of asphalt composition, dry pavement versus rain and even the corner layout! You won't have that degree of refinement in a tire that's expected to survive on dirt and rough textured, sometimes rocky terrain, then be expected to suffice on the highway without beating the rider up—like the Michelin Cross AC10 and other knobby tires promise to do despite their superior traction and handling off-pavement. I'm sure this is clear from your riding experience. My punchline is to treat the traction and handling with respect until you become familiar with what the T63, or any other tire design, will do specifically at your operating venue and for your riding style. We'll compare notes on the T63s as we gain experience at challenges like wet asphalt and tighter cornering on dirt. Fullchoke is off and riding as we write! We're a gathering group of dual-sport motorcyclists and dirt XR650R riders with a variety of climates, altitudes and adventures to share and compare. I'm pleased with your excitement about the Honda XR650R restoration. This cycle will pay back on the first ride, promising to put a smile on your face! Moses
-
Here's a place for fellow member Biggman100 to comment! He's explored the differences between the V-6 and V-8 models, and we have discussed changeovers. I have the factory parts listings and pictures through 2008, which will apply here if it comes down to an actual need for specific part numbers. I'm always focused on the chassis and wiring differences, PCMs, the harnesses and such. My first fling at this kind of swap would be lining up your Dakota alongside a V-8 model. The factory option is the 4.7L V-8, so this goes even further with comparisons between the 4.7L V-8 and 5.7L hemi engines. If it gets down to individual parts, I can provide Ram 1500 comparisons between the 4.7L and 5.7L applications. This can be done, it's a question of how many parts and how much effort to bring the engine, transmission, transfer case and drivelines to spec. You mention drivelines, and this is the least of it, as a good driveline shop can bridge any length, mounting or joint issues. The gray area is usually transfer case type and shift linkage, powertrain mounts, speedometer and VSS issues and that sort of thing. Let's see what Biggman100 has to say, and I'll share from my angle, too. I'll drop a note to Biggman100. Moses
-
So, what did you decide for the main jet? If all seems well, check the plug after a hot, hard pull (without going to the ER burn ward from mishandling a scorching spark plug!). You'll find that opening the throttle is something enjoyable on this bike, just don't wheelie the bike through the neighborhood! On that note, power does go to the ground with the correct seating position, and opening the throttle does not have to result in a wheel stand despite the many YouTube examples of wheelies on XR650Rs. If the throttle transitions feel strong and smooth, and the spark plug looks okay for coloration, go for it...If any have questions about spark plug coloration, I'd be pleased to respond. Just open up a new topic, and we'll discuss it! As for the stock XR650R seat, yes, it is hard, especially after an XR350R or XR500R seat from the day! This is the newer, spare seat design, a weight and mass saving gesture, in addition to keeping the seat height as low as possible on this already tall chassis. As for replacements, a number of aftermarket sources offer seats (Acerbis for one) that boast improved riding position and cushioning. We've discussed leg length and inseam, and this can quickly get compromised by thicker seat padding. Touch-and-go here! Moses
-
I suffered firsthand from leaving fuel in the two carburetors of the XR350R. The only solution was removal and careful rebuilding of both carburetors. The "slow"/pilot jet on the primary carburetor was not just clogged, it was ruined. As most know, it is virtually impossible to clear a solidly clogged brass jet. Jeweler's drills, welding tip cleaners, a stiff wire, you name it, most attempts like this result in the enlargement or oval shaping of the soft orifice. The cleaning attempt went nowhere, and fortunately, jets crossed over to a Kawasaki application with a much less costly (under $8 including shipping and tax) replacement Keihin jet, purchased through the local Kawasaki source rather than Honda. The overhaul gaskets came from Honda. Lesson well taken. I now shut off the petcock and run the bowls as dry as possible, bike upright, before stopping the engine. This drops the fuel below the pilot and other passageways. So far, long periods of setting have not seen the problem return. I do try to ride the bike to avoid stale fuel, otherwise draining the tank and refilling with fresh gasoline. As for overfilling the crankcase and creating blowby and valve seal and guide seepage, that's an excellent point to share, Greg! My XR500R has a dry sump system, and overfilling issues are a bit less likely to happen, though they could. Worth investigating on this machine. It only ran 30 minutes when I made the blue smoke judgment call. Was I too hasty in condemning rings and such? Maybe the valve guide seals are bad or damaged from overfilling the oiling system. The crankcase did have oil seepage, but that, too, could be from excess pressure caused by overfilling. At this point, an engine teardown is warranted, the crankcase seepage won't disappear by simply dropping the oil level. The guide seals are likely ruined from the bike setting up for years now. Moses
-
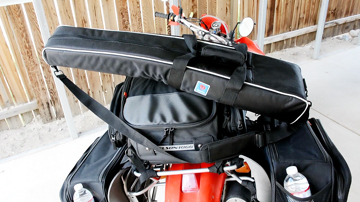
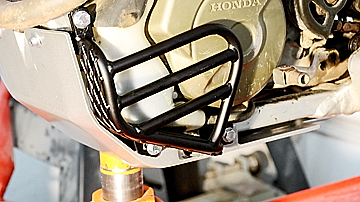
It all began with a passion for desert enduro bikes. After a dozen viewings of "Dust to Glory!", my bike of choice was the Honda XR650R liquid cooled thumper. Finding the right used machine, rebuilding the engine top-end with machine work by L.A. Sleeve, dialing the tune, after months of waiting, I finally mounted the beast and headed into the desert. An hour of dirt riding validated my choice, for my kind of riding, this is the perfect motorcycle. Fresh top-end rebuild with a Hot Cams Stage 1 camshaft, the magazine's XR650R is ready for the desert! With an estimated 55 horsepower and 50 lb-ft torque in this form, the bike will meet every performance demand. My original goal with this motorcycle was a reliable, highly capable motorcycle for HD video filming at off-road events and travel-adventure rides. And now I faced a significant obstacle: Where would I put all the camping and video gear? Was a purpose built enduro motorcycle able to perform double duty like this? Michelin T63 and Cross AC10 tires were the first step toward taming the desert beast and making it more on-highway capable. The DOT approved T63 tires offered the best trade-off for both dirt and asphalt use. The internet is rife with examples of Honda XR650R motorcycles morphing into supermotards and dual-sports. In fact, despite its reputation as the ultimate Baja racer and "off-highway" desert bike status across North America, the Honda XR650R reached much of the global market in semi-street form. Draped in highway amenities and trim for Europe and Australia (detuned substantially for the Down Under market, making it all the more street worthy), the XR650R has the ability to serve incredibly well as a dual-sport. My cycle was purchased in just that form, the previous owner was Texas based and had added a Baja Designs conversion kit and DOT tires. The bike was on- and off-highway legal, and I readily registered, plated and titled the motorcycle as such at Nevada. Off pavement, the Michelin T63 tires work well. DOT for the highway, they deliver on asphalt, too. Here, I test the tires at Nevada's wild horse country and later on a curving ribbon of asphalt. The Honda XR650R dual-sport conversion can deliver in both worlds! Here I was with a dual-sport platform, so why not go the next step and add the necessary cargo racks and luggage? As a highway rider as well as a dirt guy, I instinctively switched to the Michelin T63 tires for an on-highway improvement. Tested on dirt and the highway, the tires were as close a compromise as practical for both asphalt and Nevada's graded gravel roads and alkaline dust single-tracks. The next step was a leap, the choice of TCI Products' Sequoia and Borrego racks, along with TCI's skid plate and engine guard protection. Installed, there was no going back. The Johnny Campbell/Steve Hengeveld Honda A-Team profile vanished. Was this okay? Well, truthfully, I did pause for a moment. After years of selling myself on the idea of a Baja-bred desert enduro bike, to see these, admittedly, well-crafted and precisely fitted saddle bag and tail racks, hanging off the back end of a race-bred dirt motorcycle, was certainly a "different" look! This video gear and motorcycle camping gear need a place to ride! The Nelson-Rigg luggage and TCI Products racks have provided an outstanding solution. The package transformed the Honda XR650R desert enduro bike into a dual-sport that rivals the "big" adventure-touring bikes—at half the curb weight and nimble enough for single-track and fast-track desert! Once I added the tastefully designed and rugged Nelson-Rigg luggage to these quality racks, I was able to exhale. In fact, as I fitted the luggage onto the stable and sturdy TCI racks, following closely with the video cam to catch the nooks and crannies of the bags, it became clear that this is one good looking, highly versatile and rugged package! I'm thrilled with the utility of these racks and bags. Moreover, the cycle has the best of both worlds: Capability off-road yet ample suitability for short—and even long—highway riding! Click on the links to see the tire testing, the TCI Products rack and engine protection installations, and my choice in Nelson-Rigg luggage. You'll not only be impressed, if you've been indecisive about converting your pristine enduro bike into a dual-sport, this might very well tip the scale! Moses


-
Pjcrews...I followed your link and made a copy of the electronically controlled fan. When you want to attach photos, click on the "More Reply Options" below the editor box (right side). You'll then have access to the "Attach Files" button (left side below editor box). Your files (.jpg photo, PDF, whatever) will upload once selected. You can then post the image or file wherever you place the cursor in the editor box. It will become clearer as you try this function. I also made a PDF of our fan clutch service procedures, which you likely have memorized by now! One of the key notes in the service guide is reference to DTC codes. If you disconnect the electronic fan clutch, that circuit will likely send a DTC code and trigger an engine check light or "MIL". This could be a nuisance if you were to attempt a clutch swap with a thermal viscous (non-electronic) fan clutch. Here is the factory (2005-2006 coverage) manual section devoted to the 5.9L diesel's electronically controlled fan: Electronic Fan Clutch Ram Diesel.pdf Derale and others make fan clutches for the Ram Cummins diesel 5.9L. However, the Derale mechanical (thermostatic) fan listing is for 2000-2003 model year. You might call the Derale tech line. Here's the website address: http://www.derale.com. Ask about retrofitting a fully mechanical clutch unit like their thermostatic type, and clarify what to do with the existing wiring and plugs regarding DTC codes. Derale likely has been over this road with other Cummins owners. At Summit Racing, here is the listing for the Derale fan clutch for the 5.9L diesel (presumed to be 2000-2003 models): http://www.summitracing.com/parts/der-22616/overview/. There is also a Hayden electronic fan clutch available at Summit: http://www.summitracing.com/parts/hda-3281/applications/. This #3281, according to the Hayden website catalog, is for models up to 2004. '05 up models like ours use the Hayden #3282. You might want to see if the Hayden #3282 fan clutch (designated as an OE replacement) has better wiring and reinforcement of the wires. Here's the Hayden catalog, see the Dodge Ram 3500 fan clutch listings: http://www.haydenauto.com/upload/HaydenAuto/Documents/Cat_Hayden/2013_HaydenCatalog_FINAL.pdf Here is a great PDF description of various fan clutch types and designs, plus troubleshooting, also from Hayden: http://www.haydenauto.com/upload/HaydenAuto/Documents/Cat_Hayden/Fan_Clutch_Operations_TS_6980012.pdf Overall, you'll need to work around the DTC codes if you decide to opt for a fully mechanical (thermostatic, viscous) fan clutch. If you stay with the electronic fan clutch, look into the Hayden unit to see if it has wiring improvements over the Mopar unit. (It may be identical, so confirm before buying!) If you're stuck with the OEM type, electronically controlled fan clutch unit, consider fabricating a sleeve mount or harness clamps that will relocate and secure the wiring far enough away from the flexing fan. If the harness can be moved that much, this could solve the issue of wires getting chafed by the flexing fan. As a last consideration, Derale and others make replacement fans that might be more rigid or offset slightly in their mounting location. Maybe the correct fan could ensure or provide clearance to the wires if the fan hits water. Any fan must also have sufficient clearance to the radiator core and shroud. Here is the Derale catalog download for fans. You can make some comparisons: http://derale.com/images/pdfs/Derale-Catalog-2014.pdf These are places to start...You have an unusual issue here. Clearly, Chrysler did not expect these trucks to do much water fording. Let us know what works here, happy to provide more ideas and suggestions. Moses

-
Hi, Pjcrews, and thanks for posting this topic. There may be an aftermarket non-electric (viscous or thermostatically controlled) replacement fan clutch that would eliminate the issue. We can look into that solution. Meanwhile, can you post a few pictures of the issue? I'd like to see what's happening here. There may be a way to improve the wiring layout. Waterproofing in itself is a challenge. I'd like to see how this tube or the wiring harness winds up interfering with the fan clutch and the A/C wiring. Moses
-
Welcome to the forums! To answer your question on changing over brakes, I'd begin by saying the best practice is to line up a donor vehicle that is original, and use the layout and parts as a prototype. Typically, you will change the master cylinder and booster assembly, the linkage at the brake pedal, the proportioning/combination valve and other pieces that may differ. Compare brake lines and hoses, too. I begin by studying the parts and part numbers in a factory parts manual, and here I can help. Below is a PDF with not only part numbers from Mopar but also the layout schematics for your parts. All pages are relevant, you're comparing individual parts and model/equipment applications. Zoom into the images and text for finer details, an advantage with a PDF and bitmap images. You can do some preliminary work by comparing the parts differences between the manual braking system and the power braking system. From there, determine which parts must be used in the conversion: Jeep CJ Manual Versus Power Brake Parts.pdf As a footnote, be aware of the brake bleeding procedure for these later CJs. You need to follow the factory approach and shuttle the valve properly at the proportioning/combination valve. Without doing so, you will not be able to bleed brakes effectively. This is a place to start...Looking forward to your involvement at the forums! Moses
-
stevecherokee, welcome to the forums! With 306K miles on the XJ's OE transmission, if this has the original Mopar/NV lube still in it, the cost of Mopar oil would seem negligible. The NV3550 can be as touchy as the AX15 in terms of synchronizer fussiness and finding the "perfect" oil. Redline may have recommendations, and that's an option. Also, GM used the 3500 transmission in S-trucks and light pickup powertrains. There is a GM lube, I used it in a Sonoma Z71 4x4 pickup with an NV3500. You might price compare the GM versus Mopar oil. Everyone can benefit from a lubricant company's viewpoint. I researched and found the Valvoline oil catalog for manual transmission lubes and oils. Take the time to review the listings. (Jeep is listed under "Jeep" not Chrysler.) First, stevecherokee is correct with the Mopar recommended lube (#4874464), and according to Mopar, there is no substitute. According to Valvoline, there is: Valvoline Transmission Lube Catalog.pdf Straight from Valvoline, a supplier to many OEMs: General Motors & Chrysler: Valvoline Synchromesh Manual Transmission Fluid • High performance manual transmission lubricant designed to meet the extreme demands of passenger car manual transmission gearbox applications • Enhanced performance in both low and high temperature operating conditions • Excellent wear protection under high loads and extreme pressure • Resistance to oxidation and remains stable under extreme pressures • Exceptional anti-foam performance for added protection Recommended for General Motors and Chrysler vehicles including GM part numbers 12345349, 12377916 and 12345577 as well as Chrysler part number 4874464 Valvoline Lube Part Number: 811095 It's easy to get lost in this maze. I cut through to a source that private labels for OEs. You may prefer Amsoil or Redline, and if there is an assurance that the synchros will work with their lubes, go for it. For me, the cost effective first choice would likely be Valvoline #811095 lube. Price it! Moses
-
Our Honda XR Motorcycles and Other Dirt Bikes!
Moses Ludel replied to fullchoke's topic in Dirt & Dual-Sport Motorcycles
Doesn't the XR500R have a manual (handlebar) compression release lever, too. I know we have the kick start cable decompressor on each of our vintage air-cooled bikes. Thought you could at least release compression with a handlebar hand lever on the XR500R. Eastern Oregon is great, much like the high desert at many parts of northern Nevada. We'll share trails over time, there are scores of great riding areas, one of the closer ones is High Rock Canyon above the Black Rock Desert, an original section of the Southern Route on the Oregon Trail. My good friend at Halsey/Brownsville has ridden at several areas you discuss. Kirk has dirt bikes and a Jeep TJ Wrangler Rubicon. They do the lakes around the Mt. Bachelor Area, too. Your mention of Tillamook Forest and Trask brings back a flood of memories. Friends at Warn Industries did the Jolly Jeepers run to the coast annually, I covered that for OFF-ROAD Magazine years ago. Wonderful coastal ranges at Oregon, always terrific when they open to the ocean. Sand Lake and other dune areas have been great photo backdrops, too. Warn films ad footage at the coast a lot. The ISDT has always been a benchmark for me. We have hare-and-hound but not the Trask Mountain wooded stuff, although the Wagner Cup Trials have been held at Donner Ranch in the Sierra just 70 miles from us. We watched a few years ago and even my wife, a non-motorcyclist, got totally into the trials riding and competition! Of course, there's the Rubicon Trail, which I cover on the ground mostly, filming events like the Wheelers for the Wounded. In the mid-'90s, I wanted to take the XR350R over that trail, never found the time. Today, I would not subject any of my bikes to that level of abuse, the trail has gotten progressively worse over the years. 35"-37" tires are the "norm" for the Rubicon Trail 4x4s. I did know that our XR500R engines have their differences. 1984 has the XR500R at its peak just prior to the intro of the XR600R. Many regard the XR600R as the same league as the XR650R. I'm very tactful with a local ex-racer who has run the Virginia City Grand Prix many times. He still swears by his XR600R bikes. I believe the XR650R takes it to the next level, as you will discover shortly, Greg! I'd like to see you through the XR350R overheat issue. The troubleshooting list I provided will be helpful. These bikes were not known for overheating, although air cooling, 9.5:1 compression and only 23 horsepower can create a conflict quickly! There is a big difference between the XR350R and the XR500R. I show my respect when riding the 350, although it has been ridden, for sure! That bike definitely has a place in our stables. Moses -
Hello, bbevrotte! Welcome to the forums...Since you didn't get an immediate response, here's my take. First off, according to Mopar parts references, the upper control arm with ball-joint is a single, unit-piece replacement item: Mopar Part #52090206AF or the current supercedure. If that's true of the aftermarket, you're replacing the arm as a whole and not just the ball-joint. Look into this and let us know. If the ball-joint is a separate replacement item now, continue as I describe below...Here is the parts schematic (zoom into the page for detail) that covers your WK Grand Cherokee: WK Jeep Grand Cherokee Front Suspension Parts.pdf If you review the lower control arm ball-joint steps at the top of this topic, you will see that the task for the upper ball-joint would be the same through Step #4. First, I would make sure that you have the C-press and tools. (For occasional use, Harbor Freight has a nice knock-off kit for both a C-press with sleeves and a 4x4 additional sleeve kit to round out these tools. The 4x4 kit is more for beam axle ball joints, though you might find the sleeves helpful.) Prepare for removing the control arm but don't do so unless you cannot get the C-press to fit safely on the ball-joint of the upper control arm. After loosening the upper ball-joint stud, you should have decent range of movement at the upper control arm. If enough range to get the C-press into position with the control arm still attached, simply remove and install the ball-joint. If not, either remove the upper control arm or, if somehow easier, first remove the knuckle and half-shaft. A General Ball-Joint Warning: Always be clear whether a ball-joint is a press-in type or a thread-in type. Do not force a threaded ball-joint loose with a press or C-press, you will ruin the control arm or beam axle! Use the proper size and type socket on a threaded ball-joint. Click here to see an example of a threaded ball-joint application for a Chrysler passenger car or IFS light truck. At the lower part of the article, you'll see the OTC ball-joint removal socket. Note that the ball-joint will have a hex-head or similar means for rotating the joint with a specialty socket. If there is simply a shoulder that accepts a press sleeve, with no flats or slots, the ball-joint is a press-in type. Let us know how this works. If you encounter any difficulty, post here, and we'll walk through the installation. If this turns out a straightforward project, please share your findings and results. Let us know your Grand Cherokee suspension is safely back together! I'm quite puzzled why we're replacing ball-joints on these '05-up Grand Cherokees already. The beam axle WJ steering knuckle ball-joints would last for an incredibly long while, like other beam axle parts. What's with the ball-joints on these later IFS models? Is your vehicle modified/lifted? Oversize tires? How many miles on the odometer now? Driven off-road a lot? Moses
-
Thanks for the insights, Greg! Our favorite places compass still bears strongly NW. I'm a U of O grad (W '80), and we lived a total of nine years at Eugene/Springfield and Oakridge, two stints, 1977-82 and 1990-94. I contributed the 'Drive Time' column to the Oregonian from 1993-97. Know both sides of the Cascade Range, can remember Bend when the population was only 10,000! Did Search and Rescue with the 4x4 club out of Oakridge, we dispatched to the coastal range and rivers, Willamette Pass and Waldo Lake. We'll compare notes on our riding interests and venues. I have two good Oregon friends who ride on- and off-highway, one with an XR650R dual-sport conversion, he's based at Portland and works at Warn. The other friend from Oakridge days is now at Brownsville/Halsey and riding a WR250 Yamaha to work at Cascade Pulp—he's settled down since his Honda CR period at Oakridge! I recall the handlebars for the Victor 441, they did have a good feel. That bike was an absolute blast and proved the point: You're always riding the "best" bike ever, because you need to be in the game on whatever's beneath the seat of your pants! The BSA thumpers felt great for that era. In the desert and scrambles, we didn't know any better. Brit bikes were racing the Baja! In hindsight, the minimal front fork travel was horrible, I can still hear the forks bottoming! Vertical rear coil-shock suspension, by today's standards, was also terrible. I get a kick out of "On Any Sunday", watching the four-stroke bikes tail dance across the desert, the riders bobbing up and down with the rear suspension...First breakthrough was cantilever shocks, then the mono-shocks and our Honda Pro-Link—such a monumental gain, thrusting the bike forward instead of straight up and down! The seat height is high on the XR650R. I'm a 32" inseam, and it's a stretch. I'm back at the gym now, consistently after the magazine had me parked in front of the computer for longer than I'd like to acknowledge...I, too, discovered some height shrinkage. Stood 5' 11" at my peak, a recent check has me barely 5' 10". According to most, some of this is age, though denial has me thinking that by pushing away from the computer, working out more and riding the dirt bikes, I can stretch back to 5' 11"—if not, at least I'll be healthier and happier! Will update on the effort! As for the exhaust and uncorking your XR650R, the Power-Up Kit difference is in the tailpipe tip. If yours looks like mine, you're fine. Not sure whether David's Euro model comes with the Honda Power-Up tip, I'd like his feedback. Regarding my Hot Cams Stage 1 camshaft (not a Honda HRC camshaft, which is more like the Stage 2 Hot Cams), I went with the Stage 1 for two reasons: 1) When researching, and my concerns are exactly like yours, I discovered that the grind is actually for low end to mid-range performance gains, not mid- to top-end gains, and 2) as I noted, the auto-decompressor on the OEM camshaft did not thrill me. The Stage 1 camshaft eliminates the auto-decompressor system. (In the magazine illustrations and videos, you can see the parts differences.) In a nutshell, I am thrilled with my engine's performance, very stable idle and immediate, massive torque from throttle tip-in to redline. I don't over-rev this engine and shift well below redline by instinct, there's absolutely no need to wring out this engine, it enjoys being upshifted and laying down torque in the next gear up. (A sixth gear would be nice, I do like the stock 14/48 sprocket arrangement for my multiple use riding but find myself, amusingly, often reaching for a sixth gear, conditioning from the earlier XR experience.) If you're okay with using the OEM manual decompressor lever for starting the bike, I highly recommend this camshaft if you want a change. Is it a "must" over stock, and should you go to lengths and change out the camshaft? Probably not—unless you develop the same disdain I did for the auto-decompressor setup. Your XRs from the State of Oregon sound intriguing, what a find! The account of how little they needed to get going again does draw attention to Honda reliability. I have the '84 XR500R under a tarp (dry climate here at northern Nevada, fortunately!) and earmarked for restoration. It's completely intact and quite solid. Our youngest son bought the bike over the phone from a San Diego County owner several years ago. (This is the son who just bought the 2003 Honda XR400R with 134 original, documented odometer miles!) He rode the '84 XR500R about 20 minutes with blue smoke coming out the tailpipe and parked it. I took the XR500R off his hands for what he paid for the machine, well worth it. This front and rear disc brake model is easily restorable, and as a seasoned professional motorcycle wrench, I would expect to rebuild any used 1984 motorcycle's engine. (Similarly, our fellow forum member Forman rebuilt his Kawasaki KLR engine.) For those of us who ride the desert, these XRs are great machines. Objectively, a vintage XR200R, XR250R or XR350R makes a bit better tight and twisty bike for single track trailing. For a desert playa or sagebrush 'Hare-and-Hound', however, either is the XR350R or XR500R is in its element. So is the XR600R, XR650R or any of the Honda CRF models. Where do you ride at Eastern Oregon, Greg? Do you get to the coast, too? Let's open up a topic at our single-track travel forum: http://forums.4wdmechanix.com/forum/35-places-you-have-been/! Would be great to add some photos and get David's moto view of Burundi, too! Moses
-
At the forums Garage Photo Gallery, member "FullChoke" (Greg) responded to my photo of the magazine's 1984 Honda XR350R motorcycle. We have identical '84 XR350R motorcycles. Greg's cycle has engine heat-up problems, and this raises the issue of how to keep any air-cooled dirt or dual-sport motorcycle engine running cool enough. I'll begin with sharing our exchange at the Garage (below), followed by pointers on how to keep an air-cooled dirt or dual-sport engine from overheating. ************************************************** My comments at the Garage Photo Gallery: Moses Ludel 23 September 2013 - 02:33 PM The Honda XR350R cycle has been in our stable since the late '90s. Rick Sorensen, an A&E aircraft professional, had set up this dirt motorcycle for desert enduro riding. Rick's attention to detail, tuning and appropriate upgrades has made this one of our favorite dirt motorcycles to date. When new, the 1984 XR350R came with many advanced features, including Pro-Link rear suspension, a disc front brake and the four-valve, twin-intake and exhaust thumper engine design. The performance, dependability and flexibility of this engine has been a constant source of satisfaction. Under the most challenging conditions, including crawls through milder "rock gardens", the cycle and four-valve engine have delivered tractor-like stability. In other online forums, there is much talk about the "failure prone" and "problematic" dual carburetors on the XR350R and XR500R engines. In my experience, nothing could be further from the truth. I have rebuilt these carburetors and set them up to factory specifications, adjusting linkage and cables accordingly. The dual 26mm Keihin carburetors are stable and flexible enough to get by with the same jetting from Johnson Valley (King of the Hammers) to timberline at Nevada's high mountain ranges. Note: I jet for our base at 4500 feet elevation. The carburetors tolerate short rides to 8,000 feet and drops to 2,500 feet. That's very flexible, and though I would re-jet for extended riding at either of these high or low altitude points, these carburetors will "function" over that range. Simply put, I'm not fiddling constantly with the carburetors. The transition to the secondary carburetor is seamless, and by making sure there are no vacuum leaks, the tuning stays rock steady. Sure, EFI delivers more power and refined tuning, but these twin Keihin 26mm carburetors do work well and can be adjusted, or even re-jetted with care and patience, when you're 120 miles from a paved road. As for handling, I always ride the motorcycle that's under me. Sure, a CRF450 or XR650R could "run circles" around these earlier XRs, but that's not what I'm riding here. The XR350R can provide a great ride when handled like, not surprisingly, a tuned XR350R and not a CRF450. This logic applies to road cycles, too. I never rode our Honda Gold Wing or the BMW K1100LT like I did my two 1969 BSA motorcycles, the lightweight 650 Lightning or the 750 Rocket III. When I hopped on my youngest son's Yamaha YZF600R6 a few years ago, that was a different story as well. For this XR350R workhorse, I'm considering a dual-sport conversion kit from Baja Designs to enable highway access. We have an '84 XR500R waiting in the wings for restoration, another dual-sport candidate. Each of these bikes would weigh under 300 pounds converted, much nimbler on dirt than a KLR or BMW in any form. Nevada's new OHV permit program makes it just as sensible to opt for a DOT-standards conversion and license ("plate") an XR for dual-sport use. We carry insurance either way. On that note, expect details shortly on what direction this takes. If the dual-sport conversion route, I'll cover the steps at the magazine in an HD video 'how-to'. Moses Greg's comments at the Garage Photo Gallery: fullchoke Yesterday, 09:22 PM The1984 xr350r has a history of running hot and burning up. I think that was blamed on the new head design and the 2 carb system. Possibly the overheating could benefit with richer jetting. I know mine gets hotter faster than any bike I've owned. I haven't run it much and when it is used it has been a buddy's bike, usually run fairly slow. When compared to other bikes running over the same terrain it is noticeably hotter. For that reason I run a full synthetic oil, hoping for more protection with a higher boiling point. The front disc brake is a very nice feature, best thing about a very good bike. Greg ******************************************************************* How-to troubleshoot an air-cooled motorcycle engine overheating problem: As for overheating, let's start with a systematic troubleshoot. First and obviously, the engine cooling fins must be clean with sufficient air flow. Also, a four-stroke engine does not like to idle for extended periods in still air. This even applies to liquid cooled dirt and dual-sport motorcycle engines. (There are constant internet discussions about overheat, even on models like the liquid cooled XR650R and others.) Two-strokes with premix fuel have less tendency to overheat, though heat can still be an issue. When we ride extensively in the desert during hotter weather, I'm always conscious of air flow. After a good high speed streak or even picking through basaltic rock flows, my Honda XR350R remains "reasonably" cool. I'll let the engine idle for just a moment to help stabilize temperatures before shutting it off. We do crawl in stand-up-on-the-pegs type challenges, one location in particular is at high altitude. This engine has never reached critical temperatures. Your use of synthetic oil can help, too. Running cool at high altitudes is in part what you suggest. Proper jetting for sea level to 4,500 feet, then running the engine at 7,000 feet, makes the fuel mixture richer. I've never fouled a spark plug or experienced blubbering or unstable operation with these richer mixtures. In my experience, jetting is not that sensitive on these four-strokes, they are way more flexible than many give credit. Main jetted for best performance at 2,500-5,000 feet (our typical high desert country), this same engine has run flawlessly from 2,300 feet on the floor at Johnson Valley, CA to nearly 7,000 feet—without a re-jet. Of course, if the engine were operated consistently at 6,000 feet or higher, I would re-jet. Keep the jetting within a reasonable range. Read the spark plug color after a hard, open throttle run and prompt shutdown! That's the main jet's realm. If anything, jet slightly rich. In current jetting, my XR350R can run at sea level without burning a hole in the piston. Again, if I were to run the length of Baja, I would jet for sea level to 4,000 feet. Never jet so rich that fuel can wash oil off the cylinder walls nor so lean that the valves and piston are at risk! Learn to read the spark plug. Often overlooked is the importance of proper valve clearance. Valves adjusted too tight will cause engine overheating and also lower compression. Unseated valves lead to valve face burnout and seat damage, too. Adjust valves to specification, and also adjust the decompression lever and kick start cables. This is a big part of maintenance on the XR350R, the XR500R and similar Honda dirt bike models. The auto-decompression camshaft design eliminates the kick starter cable on later XRs. However, the manual (handlebar) decompression lever adjustment remains very important on every one of these models. On the XR models with dual carburetors, folks need to get over the idea that these engines never run right. Actually, this myth is helpful to those of us who value the dual-carburetor era, Pro-Link models—you can buy them at bargain prices! A common mistake is for the carburetors to be sync'd improperly. There is a very clear adjustment here, which I can share if necessary. Be aware that these carburetors do not open simultaneously! The linkage is actually "progressive", with a lag stage as the primary carburetor provides a smooth idle and light tip-in air/fuel flow. Then the secondary carburetor (which has no idle mix screw) comes into play. Think of this like an automotive engine with a progressive four-barrel carburetor or multiple carburetors. Adjust the cables and the staged throttle linkage to specification. These engines will start readily and run fantastically if the jetting, float level and needle settings are correct! General footnote: Current ethanol fuel wreaks havoc on motorcycle carburetor passageways. Do not leave the bike parked for long periods with fuel in the carburetor bowls. Shut the petcock, and with the bike upright, burn fuel until the engine stalls. Fuel standing in the bowl will clog jets, it did mine. The immediate symptom is an unstable idle and poor low throttle response. (I ended up rebuilding both carburetors after letting the cycle sit for too long with "winterized" and "Ethanol" mix fuel in the tank and bowls!) Use a fuel stabilizer additive, this can help for shorter storage. Long term, drain the fuel tank and the carburetor(s). Without stabilizer, fuel can become stale and worthless in months, depending upon the climate. Air/fuel flow and ratio are a critical part of air-cooled engine performance. Keep the air filter clean and oiled properly, whether stock type or aftermarket. A clogged cleaner element will make the engine run rich or stall, much like leaving the choke on. Also, when considering a lean fuel mixture, always take air leaks into account. Air leaks on the manifold side of the carburetor(s), between the head and carburetors, can lean out the fuel mixture. Check for leaks at flanges and junctions. Using a can of spray carburetor cleaner or WD-40, spray a fine mist at flanges with the engine idling. This can quickly turn up an air leak as the engine speed flares up or changes. Avoid spraying at high heat areas that can ignite the spray! Once you've worked through the intake side, make sure there are no exhaust restrictions. I have a "tunable" SuperTrapp exhaust end that is set up with the right number of discs for proper backpressure. I periodically remove the disks and gently bead blast the carbon away to keep tuning accurate. Improper exhaust backpressure or clogging can be a major source of overheat on a motorcycle engine. After fuel mixture/jetting, carburetor sync'ing, air leaks and exhaust restrictions and tune, there is the ignition spark and timing. Of course, spark must be adequate, and the spark plug should be the correct heat range, especially on an air-cooled engine. A "hotter" plug can be serious trouble if not in place for a good reason. Hotter spark than the stock Honda ignition (in good condition) is rarely necessary. Note: The compression ratio is higher, so you also need to run better octane fuel, especially at lower elevations. This may not be true for high altitude. I can run 87-octane in the XR350R at 4,000-8,000 feet because the atmosphere effectively lowers the compression ratio. I am not as flexible with the Honda XR650R at 10:1 compression and a bore size within 0.060" of a 327 or 350 cubic inch Chevy V-8! If you're at a lower elevation with high compression, spring for 91-92 octane fuel. This helps prevent detonation/ping, overheat and stress to the engine. For an XR500R, XR600R or XR650R, I would run 91-92 octane all the time. The last item on our checklist is spark timing. Either retarded or over-advanced, spark timing error can kill a motorcycle engine. Check the spark timing from idle to full-advance at speed. Make sure the timing advance is set properly. You can test with a conventional timing light or a light with built-in advance, this is not rocket science. I can help cast light on the procedure and expected results. With an electronic ignition, spark timing either works or it does not. If a motorcycle is old enough to have a mechanical spark advance mechanism, like our BSAs of yore, a sticking or defective spark advance mechanism can cause overheating as well as performance problems. Of course, there are overheat causes unrelated to the engine, like too much friction in the gear train or binding brakes (a sticky front or rear brake caliper, brake shoes dragging or warped/defective rotors and drums). Wheel bearing resistance, low tire pressure or chain drag can also overheat an engine. Check for resistance with the motorcycle wheels and tires lifted safely off the ground or floor. This is a place to start, and I am happy to continue this discussion. Glad that FullChoke triggered this topic, that's what these forums are all about! Moses
-
Very sensible to be clear here. As you note, valve timing is a big thing with a four-stroke, especially an engine with an overhead camshaft, long chain, a tensioner and a timing sprocket that must align properly. Glad you confirmed! Looking forward to your success story with this engine. You'll really like the renewed performance, David! Moses
-
David...I looked at the parts diagram, and your under-fender bracket does not attach with the same four bolts as the TCI support bracket. However, you might be able to substitute the TCI Products bracket for your stock EU bracket under the fender. If the TCI part could support the rack, the fender, your taillight and the license bracket, you would have one bracket for all these needs. Do you have the four screw holes in the bike's aluminum frame for the TCI bracket to attach? It might be possible to use the TCI Products bracket with its four screws going forward into the frame, then add some links from the TCI support to catch the rear of the fender. The only issue would be the height of the fender above the support, the point where I drilled the holes and put the spacers. Even that could be adjusted if necessary. The idea with the TCI under fender support is that it eventually must take a good load. TCI stated flatly that they regularly place 60 pounds on this kind of rack. There was no weight limit in the literature, and the rack itself would support a considerable amount of weight with no issue. However, considering the four 6mm screws that hold the under-fender support bracket to the bike's frame, I will likely limit my total load to 70 pounds, including the weight of the bags and rack. That weight would be distributed between the two seat bolt points (where I show the rack pivoting) and the brace point where the two through-the-fender screws attach to the under-fender bracket. I'm happy to take measurements or provide close-up photos if you want to pursue this. The racks and bags are terrific. I had concerns that the aesthetic line of the bike would suffer, losing the spare "Baja enduro racer" look. I quickly got over this with the utility and sleek design of the racks and luggage. The result is a true dual-sport profile that's very functional and at the same time proportionate and attractive. I like it! Moses
-
Hi, fullchoke...We do have a lot in common! Wow, what are the odds, we each had BSA singles and XR350R and 500R models. Each of my air-cooled XRs are 1984 models. We sold the '83 XR200R when our youngest son went to college in 1999 or would otherwise still have it, too. He's coming around to dirt riding again, and we recently found him a buy on a 2003 XR400R, 134 actual miles on the odometer, essentially a brand new bike! Thanks for your concern about the work I needed to do on the XR650R. The previous owner was quite fair, there was relief for the expenses I encountered, and frankly, I'm now pleased that the top-end rebuild is done. As strong as these bikes run, I'm sure many could be on their last leg and still "feel good". The top engine rebuild with low overall mileage on the bike is good. The places I ride and plan to use the bike, the loads planned, there will be no guesswork about the condition of the engine. I have always done my own engine work, which should not surprise anyone, and the collaboration with L.A. Sleeve Company on the machine work was assurance that I have a fresh and very reliable machine! As for your wonderful new acquisition, and you will be thrilled before this is done, the guideline I follow is the factory Honda "Power-Up Kit". This is actually tuning the bike to the European and other market standards. I did not pull my tuning specs out of thin air, instead doing my homework and even acquiring a non-North America shop manual copy to verify my findings. The post above with the official carb jetting specs PDF is from the non-N.A. manual. From this non-U.S. manual, we can glean that the basic engine is exactly the same throughout the world. (I researched the compression, cam timing, ignition and other key features to confirm.) The tune differs in various markets, though. In fact, there is a different carburetor model used in Australia that has a radically smaller main jet (112#). If the PE78D Australian carburetor has the same throat/bore opening and air flow as the PE78C (other export markets other than U.S./N.A), this Australian bike has been severely detuned. For those curious, the U.S. replacement carburetor is a PE78A. There were originally two non-California (XR650R A) part numbers and one for the California XR650R AC models, each a PE78A type Keihin carburetor. Keep in mind, the U.S./N.A. XR650R was originally for off-highway only use, an enduro motorcycle without street use equipment. This Australian market bike is actually geared for asphalt highways at 41/15 sprocket gearing and comes with a complement of lighting, directional signals, chain guard and mirrors, more like the XR650L although we can assume there are no other similarities with the air-cooled XR650L model. I'm encouraging an Australian XR650R bike owner to jump in here to confirm that the Down Under XR650R is otherwise a true Honda XR650R. For those curious, here are the model distinctions for Honda XR650R models sold in markets outside the U.S. or North America: Honda XR650R Markets.bmp Honda Euro and Australian XR650R Models.bmp Honda XR650R Carburetor Tuning.bmp "Uncorked" is the parts list I've furnished in the above threads at this topic. These part numbers have been available through Honda motorcycle dealerships and online official Honda parts suppliers. The 175 main jet is standard for sea level on this engine everywhere in the world except North America and Australia. The compression ratio of 10:1 justifies the 175 main jet for full performance. That this 649cc engine will run on the 145 (aftermarket), 125 (N.A.) or even the 112 main jet at Australia, is a testimonial to the engine's stamina and flexibility. A 125 or 112 main jet with a carburetor bore like this and 649cc engine displacement, sounds like a piston hole looking for a place to happen! Like your bike, my engine had a half-baked approach. The restrictors were removed from the air box as per Power-Up guidelines, and the OE manifold was round like your non-California engine. (My bike sold originally in Texas.) The needle-and-seat, the pilot jet and the muffler tip were Power-Up variety, too. For the longest while, I could not imagine why the engine had every Power-Up Kit mod except the 175 main jet. It finally dawned on me that the previous owner may have reinstalled the 125 jet when compression dropped and the engine seemed to run rich. This was from the intake valve damage and loss of compression, not from over-fueling the engine with a 175 main jet at Texas. Those familiar with my books and journalism know that I do not make assertions that fly in the face of OEM norms. My jetting recommendations are Honda's own, both stone stock applications sold outside the U.S. and the "kit" that was allowable for these bikes as "off-highway" use only. Off-highway or "competition" improvements do not violate EPA and California emissions because the bike is not presumed to be street ridden. (There is a Green and Red sticker program in California, but we'll leave that issue alone.) Note: There's a jetting chart and comments at http://xr650r.us/jetting/. What you'll discover is that the baseline for the author's chart is a 175 main jet at sea level. He adjusts for both altitude and ambient temperature. His main jet chart goes as high as 182 (sea level at 20 degrees F) and as low as 150 (for 12,000 feet elevation and 100-degrees F if you can find such a place on Earth!). Nowhere does he mention a 148 or smaller main jet. He talks about the HRC and Power-Up parts and also the Stage 1 camshaft that I'm running. His chart includes needle settings for the B53E needle and seat package. There is also commentary about the standard pilot jets versus the "S" pilot jets. The author and I believe that reading spark plug coloration is a sensible backup to any jetting experiments. So, what you need to do is compare your bike to mine, and that's not difficult. At the magazine's free articles and how-to videos on the XR650R work, and clearly at the highly detailed 54-minute HD video how-to I did on rebuilding the top-engine (a streaming rental at Vimeo), you can readily follow the camcorder and photos as I show the intake manifold, the tailpipe and the unrestricted air box. These parts are easy to spot and compare. Whether you have the N.A. type tailpipe tip or the Power-Up Kit version will be clear. There's considerable size difference in the tailpipe outlet. For a quick comparison, see my coverage of the TCI rack installation. The muffler and tailpipe tip are prominent in the article's photos and the video. Worth noting, I stayed with the stock air filter box, air filter and flame trap. I tossed out the popular brand aftermarket air filter that could not seal properly at the edges. (You hint of a similar issue, Greg.) I'm now running the OEM Honda replacement parts, including a new flame trap screen, new OEM air filter and a new air box "O-ring" that seals between the black air box and the white side cover's lip. I'm sure many have stories of performance gains and unleashing latent horsepower from aftermarket air filters. I have no desire to periodically replace intake valves and service the cylinder. Nikasil is very tough but can be seriously damaged by fine dirt running constantly through the upper cylinder. Considering our alkaline dust at Nevada, I opted for the stock air filtration system. The engine's performance is excellent, with no signs of air flow restrictions, and I'm good with "stock"!. We're both very fortunate not to have the California suction valve system and other one-off pieces for the Golden State models. If you have the wherewithal, consider doing a cylinder leakdown test for piece of mind. If you do so and the engine still has the auto-decompression OEM camshaft, make sure you back off the rocker adjusters enough to be certain all four valves are seated with the piston at TDC on the compression stroke. Many try to run a conventional "compression test" on these engines, only to find that compression is a fraction of "normal". An exhaust valve unseating as you kick through with the auto-decompression type camshaft will do just what de-compression is designed to do: release compression to ease cranking! As I noted in a thread above, the Hot Cams Stage 1 camshaft is a sheer joy. You and I can readily start a thumper with just the hand compression release lever. (I describe my current kick starting technique, which differs some from the B44, but not in principle.) Many seem to like Honda's auto-decompression, I cannot figure why. On top of that, the camshaft's weight with the decompression mechanism is an awful lot of upper valvetrain mass to spin at speed. Talking about speed, these engines when operated properly, which is to say by taking advantage of the massive low- to mid-range torque (more of both with the Stage 1 camshaft!), do not require redline throttling. We understand this from having pushrod Beezers. I had three of them, each '69s by coincidence, the B44, an A65L and an A75R Rocket III. I actually liked the Lightning 650 twin on the road, it was far less weighty and more nimble than the A75R, although the A75R triple cylinder engine was significantly smoother and did tolerate extended high rpm operation. Gene Romero (Triumph Trident) and Dick Mann (A75R BSA) proved this. That said, do we plan to reenact "Dust to Glory"? (Watch this streaming from Netflix or rent the DVD, you'll see what an HRC version of the XR650R does for Johnny Campbell, Andy Grider, Steve Hengeveld, Mouse McCoy, the Roberts family team and others.) Our rpm ceiling and riding may not create fuel starvation even with a 145 main jet. An old tuner's trick, you likely know, is to run slightly rich, short of fouling the plug or fuel-washing the cylinder(s). This keeps the upper cylinder cooler. On the Honda XR650R, liquid cooling likely compensates some for the ultra lean mixtures in N.A. carburetors or even the Moose Racing kit. Synthetic oil goes a long way here, too, and so does Nikasil. A friend at Portland shares that just switching to Amsoil on his XR650R made his leg on the exhaust side of the bike substantially cooler. I'd like to test and confirm this. As you crack the throttle, you can instantly feel exhaust heat when the XR650R makes horsepower and BTUs! What it comes down to is actual air-fuel ratio. I am academic, and if I thought the 172 main jet was risky, I would install an oxy-sensor bung at the appropriate position on the muffler and test with an A/F meter. More traditional testing, like spark plug color after hard acceleration and a quick shut-off, would be equally revealing. I can tell with my engine that the 172 main jet will work well at our altitude and with the Stage 1 camshaft. If I encounter trouble above 6,500 feet, I might consider a change. Short runs over Ebbetts or Carson Pass would likely not create an issue, I've done this with stock sea level and slightly leaner jetting on many of my motorcycles. And planning for such a trip, I might simply install a hotter spark plug for climbing over the high passes. I'll update on this point. I look forward to our discussions, Greg, and hearing more about your bikes. Happy to address our 2000 model XR650R motorcycles or the twin-carb XR air-cooled models. Even happy to reminisce about BSA motorcycles...Thanks for joining us here, looking forward to starting new topics and threads! Moses
-
1979 Jeep CJ7 Engine Needs Help
Moses Ludel replied to MountainHound's topic in 1972-86 AMC/Jeep® CJ and Jeepster Models
MountainHound...Every day of reliable transportation and four-wheeling is money saved and expenses postponed. Count the "free" miles! You did the right thing here, if the '79 engine and cylinder head will behave itself and prove predictable and reliable, what the heck, right? The 4.0L head conversion and pushrod relationship sound like the issue. Rocker arms are plentiful and not expensive (new or used). Confirm your pushrod clearances, and go for it! The later crankshaft stick out and pilot bushing/bearing comment is about the rear or flywheel end. This simply needs to be checked for a match. The front snout is not an issue, a shorter snout can be used with your Mopar EFI pulley by simply installing the longer bolt and special washer (available from HESCO) for this crankshaft conversion. There is nothing intrinsically wrong with your 1979 258, you're past the intake and exhaust manifold issue with the EFI conversion as long as the intake and exhaust ports lined up okay. The Mopar EFI conversion intake manifold is supposed to work with a 258 port arrangement. Beyond that, if you want to take the guesswork out of the engine, run a leak down test once you know the lifter clearances are correct. We can discuss the results. (You'll find leakdown test pointers at my forum topic post: http://forums.4wdmechanix.com/topic/164-how-to-make-an-inexpensive-engine-cylinder-leak-tester/?hl=%2Bleakdown+%2Btest.) As for metal sweeping through the engine, that's not a good thing, but a string of oil and filter changes could remedy the situation. Keep us posted! Moses -
The magazine's YouTube Channel generates a lot of questions, and I encourage viewers to join us at these forums. A current exchange involved a viewer installing a 4.0L Jeep water pump and asking about how to seal the gasket and engine-to-block. This is worthwhile for our forum community, here is the discussion: Question from Ben D.: Did you use Gasgacinch between the water pump gasket and block? Looooong time ago I remember using RTV. Was it necessary? My reply: I like Gasgacinch on a cut paper gasket like the water pump. RTV can slough and find its way into the radiator tubes and clog. An even coating of Gasgacinch, on each side of the cut gasket, is wise. Gasgacinch resists coolant, gear lube, engine oil and other automotive fluids. It works well around higher temperature castings. Edelbrock private labels the product for its valve cover and intake manifold gaskets, each a higher heat area of the engine. (Gasgacinch is not for an exhaust manifold where I would use Permatex Ultra-Copper RTV or Permatex Copper Spray-a-Gasket Hi-Temp sealant.) Like many other professionals, I have used Gasgacinch in motorcycle engine work. My recent XR650R Honda project's rocker box to cylinder head seal is one example of a precisely machined, interference fit without a gasket, using only Gasgacinch for that fit. (There is no factory gasket here, just sealant.) This is a good discussion for the magazine's forums at: http://forums.4WDmechanix.com. Join us, Ben!...Moses I use Gasgacinch on transmission and transfer case cut gaskets, engine oil pan (cork, rubber or composition) gaskets, seal jackets and shells, bolt threads, and many other paper gasket and interference fit locations. It works well when coated evenly, and Gasgacinch has excellent tacking ability for holding an awkward cut paper or cork gasket in place during installation. The YouTube video series on the Jeep Cherokee 4.0L cooling system and water pump work is at: http://www.4wdmechanix.com/How-to-Jeep-4.0L-Water-Pump-and-Serpentine-Belt.html. Gasgacinch is a long time respected sealant and belt dressing, and yes, it can help preserve and quiet belts! Moses