forman
-
Posts
115 -
Joined
-
Last visited
Content Type
Profiles
Forums
Blogs
Store
Articles
Gallery
Everything posted by forman
-
Kawasaki KLR Motorcycle Engine Teardown and Inspection
forman replied to forman's topic in Dirt & Dual-Sport Motorcycles
Moses you have done many things with your skills. I know that I speak for others also when I say Thanks for being here I appreciate your expertise. Sounds like you had fun along the way! A used motor was the donor for the crankshaft connecting rod, piston and cylinder. Nothing was taken apart any further than it had to in order for it to be placed in my salvage bike engine case. I mentioned more vibration than my other KLR and that is true but I really need to describe it as a buzz rather than a rumble. I feel certain that the counterbalance weights were aligned correctly. The head was in great shape when I received it and the valve clearances were spot on. This afternoon I pulled the oil filter and found a large amount of small aluminum debris, while it was not enough to clog the filter I was concerned that the camshaft journals might have suffered some damage. After work I stripped my bike to allow access to the valve cover and opened it up to inspect. I've included some photos of that process. A first generation KLR is easy to work on especially if there are not any cosmetics to remove... Thanks to a bunch of thieves it is really easy to get to the engine. By removing the seat, gas tank, 3 bolts on the radiator fan, the upper engine mount, the coil, spark plug wire, the valve cover bolts and finally removing the cover up and over the cam gears the whole head is exposed. I removed the journal bearing caps and lifted the cams to reveal that there was no visible damage... whew! seen in the last photo


-
I pulled the oil filter and passed a large magnet over it but I did not pick up any ferrous metal. The close up photo of the filter reveals many small chips of aluminum. Well all I have to do is open up the motor and start looking for a bright shiny spot! This is the filter out of the 2006 salvage bike.

-
I'll quickly address your questions. I painstakingly cleaned all passages but I could have had a piece of debris lodged in a passage restricting flow. Sorry I mentioned replacing the crankshaft but forgot to mention that the connecting rod was replaced as well... another used part. I will pull the oil filter soon and see what it has picked up.
-
Continuing with the stolen bike repair... I chose to replace all of the bearings in the lower cases, I then purchased a salvage crankshaft and intended to have it rebuilt but the parts were obsolete. The repair to the valve seat, broken and bent valves, guides and incidentals was above my skill level so I had the work professionally done for about $475. Project on hold again. At some point last fall I completed the lower case rebuild and felt confident of my work. As to the completion of the engine rebuild all I needed was my cylinder re-sleeved, a piston and rings then the sleeve bored to the new piston specs and all the gaskets. Did I mention that I live in the middle of nowhere? This type of motorcycle work is difficult to acquire. Sending it off would cost about $500 and shipping. I fell victim to a smooth talking craigslist seller and bought an engine that was supposed to be a 2007 with 4000 miles. In reality it was a 1998 with many many more miles. Have you ever been able to receive a refund from a craigslist seller? Me neither. I did sell the head for half of what I paid, and used the piston and cylinder to complete my rebuild. Did I think about honing and replacing the rings? Sure I did but didn't know how to go about it so I put it all together and had a running, soon to be inspected and licensed motorcycle. The bike ran great with lots of power but I noticed that there was more vibration than my older KLR and dismissed the vibration as just being different because of the difference in bikes. One day after driving the bike around 100 miles since rebuild I decided to pull an oil sample, not to have it analyzed but just so I could look at it. I swear it looked as though it were metal flake paint it had so much metal in it! I haven't torn it down yet but am curious as to what has happened to cause this I assume it is of my hand. This is why I bought the $100 dollar engine yesterday. The photo is of the 2006 KLR that was once stolen.

-
I knew the right answer when I posted but some how I was hoping you might say TIG would be the answer go for it! I'm excited to have you encouraging me to do the work the right way, and it gives us an opportunity to post procedures with photos. Cleaning up the valves, honing the cylinder and re-ring the piston will give me reason to ask many questions. Some that come to mind are which hone to buy? How does the removal of valve material affect the valve clearance? How do I select which rings to buy to complete the top end service? I have a long KLR story... I guess I should get it recorded so let me begin. I purchased my first motorcycle in 2012 (I'm 53 now) a 1996 Kawasaki KLR 650 with 32 k miles and several maintenance issues. I bought the KLR because a coworker owned one and he recommended the bike based on his thoughts of how I would enjoy riding. I bought a Clymer manual and began learning that most everything on this bike needed attention. My coworker friend thought I was crazy because it was all he could do to keep air in the tires and gas in the tank of his bike, why was I constantly taking mine apart?. I live in rural America and have many miles of dirt roads to ride but discovered soon that the tire tread made a huge difference on the slippery gravel I rode on (kinda scary to a new rider). I also enjoyed highway travel in fact I rode my bike to see my kids who live on the east coat a 3400 mile round trip. I made some ammo can panniers to help carry my camping equipment. Sometime before the trip I bought a 2006 KLR that had been stolen and returned to its owner in really beat up condition. I basically bought the frame and accouterments for $250 because I needed a muffler and turn signals and a skid plate also a rear shock in better condition. However the engine was also included in the deal... I brought it home thinking that I would eventually sell it as junk iron. One day I began disassembling the trashed motor ( the crank would not even turn in its bearings) I began to think that I could rebuild this engine and have 2 KLR's. I had no experience in doing this only the Clymer manual. The second photo shows the debris I dug out of the crankcase. The third photo shows the cylinder and piston. The fourth the crankshaft. The fifth is of the valve seats and broken valves. Just when I thought it impossible I realized that it all cleaned up well and with some money I could replace what was broken or bent or evaporated right??? What was I thinking!? My daughter was getting married soon and my wife and I would soon be welcoming grandkids 4 and 5 there would be no extra money to try to resurrect this motor. So I put the project on hold for about 6 months. It wasn't until the ride home from the east coast that I decided to complete the build even if I had to use salvage parts ( I know I know not a good idea). More later....


-
Need Some Help Restoring a Jeep CJ-7 4x4
forman replied to forman's topic in 1972-86 AMC/Jeep® CJ and Jeepster Models
I was able to remove the stubborn bolt and the Dana 300 is now free of its place behind the Tremec 176 transmission. We have a pressure washer that I hooked up to a water heater and because it was cold today I felt like I was steam cleaning the transfer case. Here she sits on my tailgate. I'm looking forward to taking it apart, be patient i'm thinking at times this could be rather slow.

-
I bought this 2002 KLR engine from a listing in craigslist for $100. The previous owner stripped out the oil drain plug threads then attempted to use a tapered bolt that spread the stripped threads and cracked the engine case. I have another set of engine halves. I could transfer parts from this damaged engine into the good case halves, but I was wondering if this case could be repaired as it sits? I'm pretty sure that the case is made of cast aluminum.


-
Need Some Help Restoring a Jeep CJ-7 4x4
forman replied to forman's topic in 1972-86 AMC/Jeep® CJ and Jeepster Models
Thanks Moses for the diagrams and advice. I have one stubborn bolt in a difficult place but i feel like I'll get the transfer case off today. I spent the day traveling to pick up an engine for my Kawasaki KLR 650. I'll have to start a thread in the dirt bike forum and tell all about it. -
Need Some Help Restoring a Jeep CJ-7 4x4
forman replied to forman's topic in 1972-86 AMC/Jeep® CJ and Jeepster Models
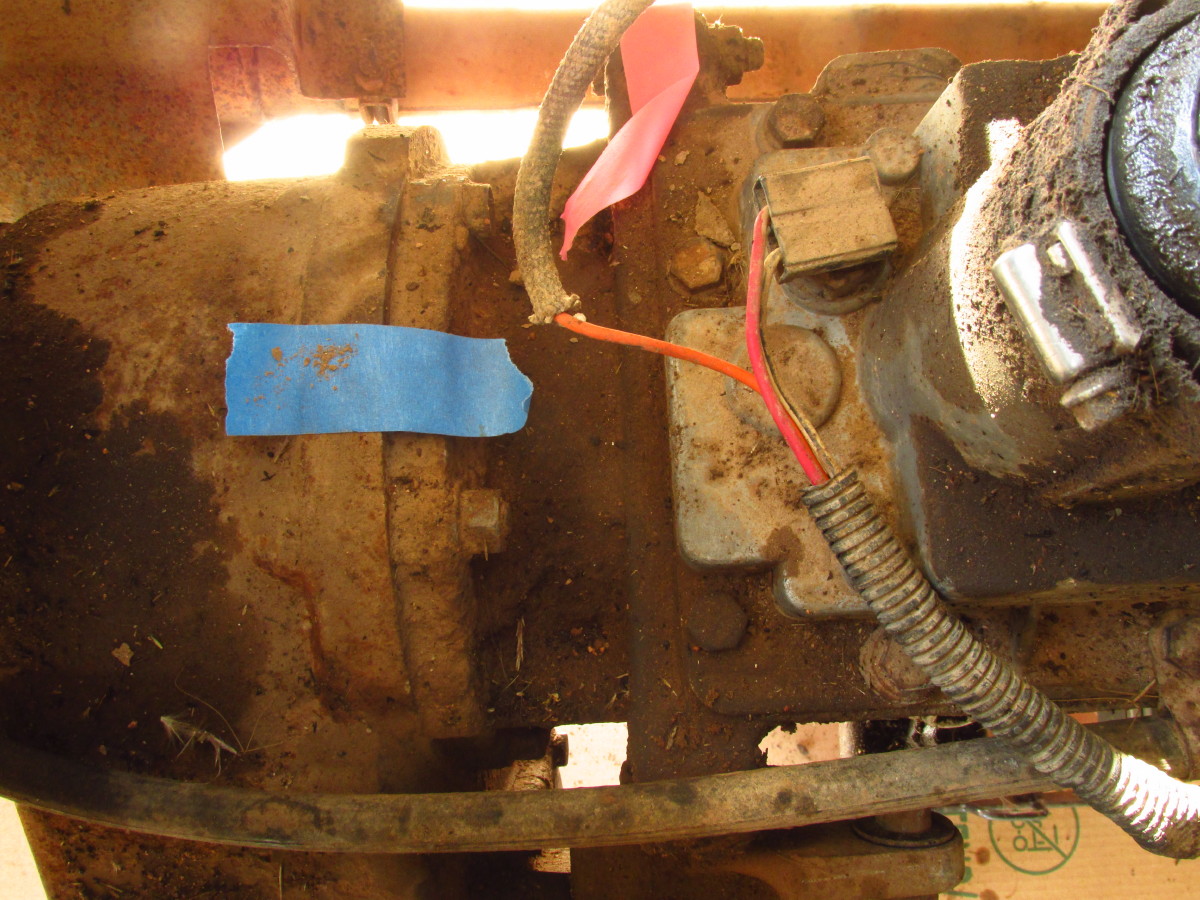
Moses in your rebuilder's manual you removed both transmission and transfer case at the same time. I would like to only remove the transfer case at this time. Here is a picture of my transmission passenger side. Can you identify if for me please. If it is okay to remove just the transfer case would you separate the two where the transmission case mates with transfer case, 6 bolts I believe, or a little further up toward the front of the jeep where it can be separated by removing 4 bolts? I added another photo... should i separate at the blue or pink tape? I'm thinking it is a T176

-
Need Some Help Restoring a Jeep CJ-7 4x4
forman replied to forman's topic in 1972-86 AMC/Jeep® CJ and Jeepster Models
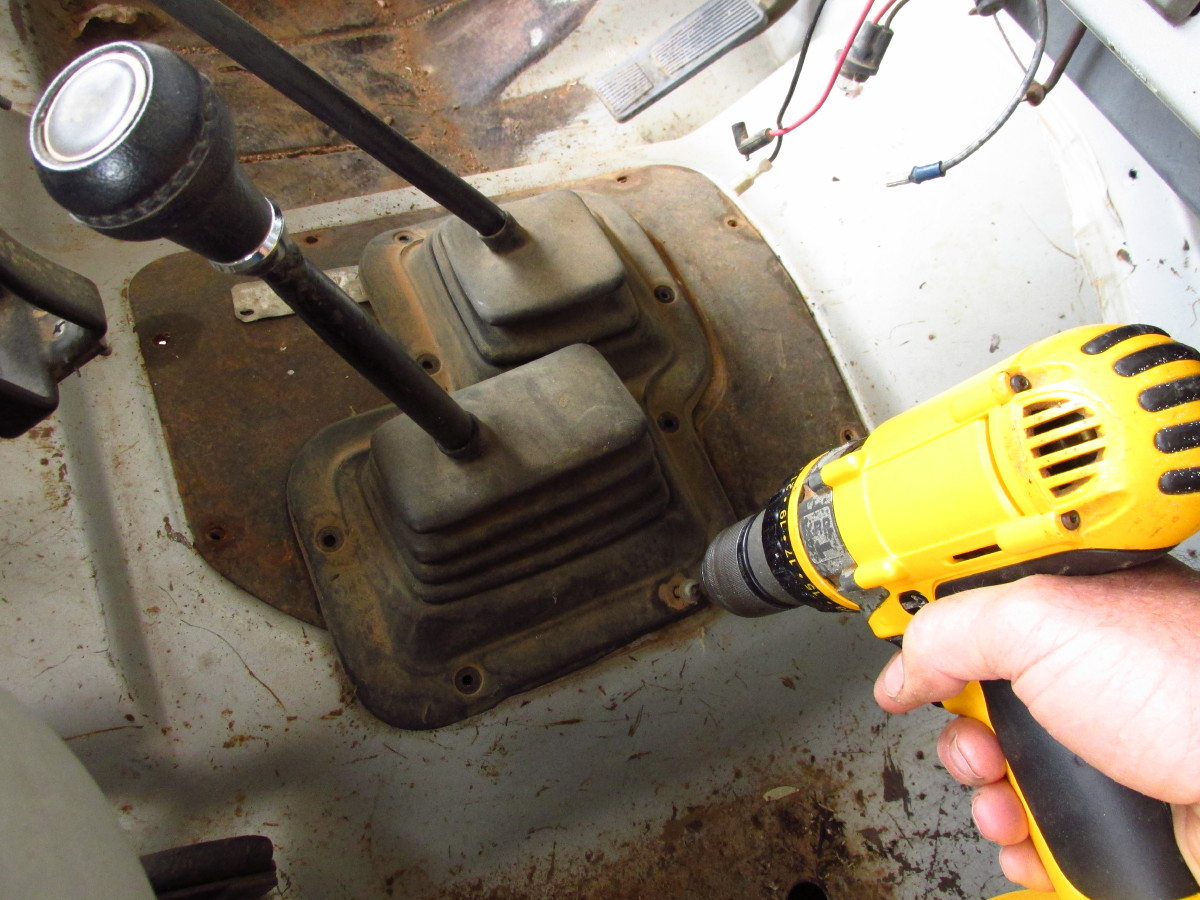
So I went out this morning and found an empty bay in one of our open garages put the jeep on stands, slipped a piece of cardboard underneath to scoot around on and began the process of removing the transfer case. The floorplate and rubber shifter boots came off easily. Underneath the plates made me wish that I had done a better job cleaning before starting this project. If you look closely at the first photo you will see a hose clamp arond the uppermost part of the transmission just below the stick... I don't know if that is the way it is built or something one of my coworkers did in years past. I removed the rear output drive shaft at the ujoint and disconnected the speedometer cable on the output housing along with the black hose of which its purpose is unknown to me. I supported the transmission and transfer case by placing my motorcycle lift under the bell housing so I could remove the skid plate crossmember. I broke a bolt off even with the frame arrrg! I think this transmission mount is in need of repair in photo 5. The shifter assembly and front drive shaft came apart just like you said in chapter one. I drained the transfer case and transmission fluid, both fluids were thin and smelled bad. Probably because it was 30 years old.


-
Need Some Help Restoring a Jeep CJ-7 4x4
forman replied to forman's topic in 1972-86 AMC/Jeep® CJ and Jeepster Models
Moses your book finally arrived and I looked through the section on rebuilding the Dana 300 transfer case. I believe that I can do it but of course I'll need your help along the way. First a little about "my jeep". I work for a state fish and wildlife department and the 1984 CJ-7 is on my property list and I am responsible for its maintenance and up keep. So why don't I just take it to a mechanic and let them charge me thousands of dollars to repair this Jeep? I'm afraid that would draw attention to a vehicle that probably needs to be a surplus item and sold. I like this little buggy and don't want to let that happen. We have traveled many miles and it has never let me down. All of those miles have been off road since the Jeep was brought here from the headquarters surplus 12 years ago... I acquired the Jeep as my "property" a few years back and it was all I could do to keep it limping along because I didn't take the time to learn more about the way a jeep works. Until I found 4WD mechanix.
-
Need Some Help Restoring a Jeep CJ-7 4x4
forman replied to forman's topic in 1972-86 AMC/Jeep® CJ and Jeepster Models
Moses, this troubleshooting video is short and I hope sweet and to the point. The Jeep is a 1984 CJ7: I really didn't expect anyone to be able to troubleshoot with such a short video. I'm interested in being able to ask questions using videos. I ordered your book online and I'm waiting patiently. -
Moses, can we post videos or a link to a video? I'd like to share my technical issues and think that video would be helpful. Forman
-
Need Some Help Restoring a Jeep CJ-7 4x4
forman replied to forman's topic in 1972-86 AMC/Jeep® CJ and Jeepster Models
Thanks Moses! I have ordered your book. I'll look it over and see if I feel like I can tackle the job successfully. If I feel confident that I can finish I'll begin gathering tools and start taking pictures. forman -
Hello out there! I found this forum recently and decided that I would like to do some work on a 1984 CJ 7. I will need tons of help. To begin with I have a hard time shifting from 2H to 4H to 4L and all in between. Most likely due to the fact that the Jeep is 30 years old, and likely no one has looked at the oil level in the transfer case! I have posted a couple of pictures to ask for help in identifying the transfer case on my CJ. I think it is a Dana 300? To be specific I would like to know if I could read or watch some recommended videos on the removal and proper way to rebuild this transfer case. What tools would be required to complete the rebuild properly, and what should I look for when opening up the transfer case. I want to do it right but don't want to exceed my skills. I would be willing to take and post photos along the way.