DavidEasum
-
Posts
68 -
Joined
-
Last visited
Content Type
Profiles
Forums
Blogs
Store
Articles
Gallery
Everything posted by DavidEasum
-
Getting the Hang of Riding Off-Road
DavidEasum replied to DavidEasum's topic in Dirt & Dual-Sport Motorcycles
This is the "Plaine de l'Imbo". There I am front & center in the opening seconds. The XR is in the background. I'm still a little dazed from the beast having bucked me off... We are starting to worry however about our ecological impact on the plain, so we might have to constrain ourselves to a more delimited part of it. And the black Yamaha Tenere you see in the video makes so much noise you could probably hear it in Nevada! But this is not the only riding venue we have - and this is not typical of most of the rest of the country. Here's another link that will give you an idea of more typical scenery. There are single and two-track trails of all sorts going from hill to hill. We basically live in a moto playground - just stay off the roads as Burundian traffic is dangerous for bikers! David -
Getting the Hang of Riding Off-Road
DavidEasum replied to DavidEasum's topic in Dirt & Dual-Sport Motorcycles
Hi Moses, Great tips. Indeed, I have found that throttle is your friend. Now I need to learn to dose it appropriately for the conditions - traction, lean, speed, RPM etc. I'm amazed at the amount of soreness I am feeling right now - abs, neck muscles (probably from falling), knees in particular. Goes to show what a good work-out this sport provides! I have the bark busters - I guess. But they're plastic. I'll attach a photo in a minute. I think I should make sure that they're real tight and that the lever clamps are looser. Not sure about how tight to make the handlebar. All of it had sustained previous damage from the previous owner(s), but I had replaced the clutch lever carrier, pin and bushing, as well as the lever. The carrier survived this fall, but obviously the new lever did not. I might consider better levers at some point. Helmet (Arai XD4 I think it's called) will need replacing at the next opportunity though. There is no visible damage (maybe a scuff) since it hit in the sand, but the violence of it made me wonder whether I should stand up immediately or not. The trailer is great - I'll try to do the Netflix thing through my sister's account - but not sure it will work. D.

-
After having rebuilt the top end of my recently-acquired '02 XR650R - and going through a fair number of other problems on this bike that had not been well cared for, I have finally managed to take it out into the dirt. Prefix: I have never been off-road for more than a few minutes, and I have only once or twice in my life ridden a dirt bike. I am more accustomed to big bore sport and super-tourer type bikes - on the road and on the (paved)track., Plus, I'm an old dog for whom new tricks will come with difficulty. First impression: What a blast! The venue was what we call "la plaine de l'Imbo." It's a flat, somewhat sandy area that lies in the valley/river bed of the Rusizi river, north of where it pours into lake Tanganyika. There are a few jeep tracks that lead into it and then it gives onto some sizeable sandy/grassy open areas where you can get some serious speed if you want. The few people out there are rebels or soldiers or cattle poachers. The fauna is a few cows, hippos, birds, and probably a few crocodiles. Vegetation is thorn bushes, reeds, palm trees and sisal plants. The thorns are a common problem according to my buddies. I'll try to put up a YouTube link to footage taken from a remote control helicopter thingy. As we rode in, I tried to follow the leader (he is an experienced fast-boy and was on a proper Yam 450 dirt-bike). It felt pretty good at first (I thought I was Superman, actually), but after losing confidence in a couple of sandy parts, I turned the throttle down a bit. Despite easing off, I got caught out by a little S bend in the trail and I washed out the front. In attempting to recover, I got crossed up on too much throttle and had my first crash. And it was a Duzie! Classic high-side - up and over the bars, landing on my back and head, facing the opposite direction! So much for my brand-new expensive helmet ! I didn't want to have to replace it in such a short time, but the whack was surely enough to compress the styrofoam at the back. The rest of the gear apparently did its job well. Though I'm sore today, it surely could have been worse. Unfortunately, the crash broke off the clutch lever. A bit of a downer, especially since it broke in such a way that you couldn't just hold it in place for starting off. Nonetheless, I ran nearly down to reserve, practicing sliding the front and rear, seeing how the bike moves around under me, testing out different behavior as a function of body position. It wasn't enough for me to say that "Oh, if I do this, the bike will do that," but it was enough to start getting the hang of things (and enough to have me fall off a few more times ). One thing is for sure: staying in the throttle will save a lot of scary situations. So... off to replace the clutch lever, tighten up the lever protector/bash guards, and maybe loosen up the clamps holding the lever gear so that they might survive the inevitable crashes I will have soon enough! (Riding tips and advice on how to avoid lever/handlebar damage will be much appreciated). D.
-
Indeed, put away wet & dirty. After my first ride off road, the clutch has held out - it might hang in there for a little while yet. I hope at least as long as it takes to get the parts. I'll probably stick with frictions and a new bushing. The bike is running well so I'm not going to bother fooling with the jetting again until I have reason to take the tank off (my thought was to substitute the 65S slow jet for the straight 65 that came in the Moose kit to see what happens). D.
-
Hi Moses, In the end, after having the 120/80 rear and 80/90 front on the bike for a short while, I think that I would have gone with your choice of sizes rather than mine. This is not for any particular performance reason at the moment - it's primarily because the ones I have on look pretty skimpy in contrast to the rest of the bike, Riding with what I've got is ok, but I do notice that the leading edge of the blocks on the rear have already taken a little bit of wear - in only 100 kms. YMMV David
-
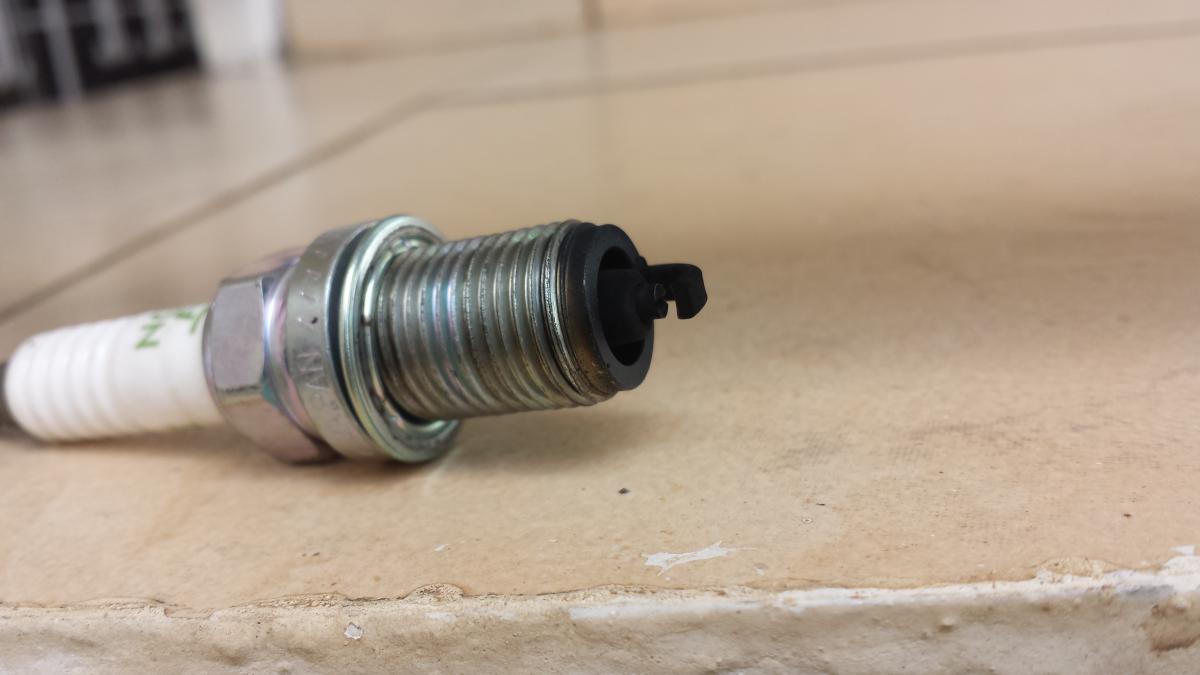
Hi Moses, Didn't have a chance to ride yesterday, but took it to town today to try to resolve the non-clip masterlink and the busted chain adjuster bolt in the swing arm. I've done in total about 90 km since the top end rebuild. It's interesting/frustrating/par for the course that when I look at the fora on the XR650R, every problem that is mentioned about this bike is present on mine... Of course there was the overheating, then there was the top-end problem that we've discussed at length, then there was the right side footpeg (took a Helicoil to sort), the chain adjuster bolts, the kickstarter bolt, ad infinitum... And then there's things that I've not even touched like the swing arm bearings, the shock linkage bearings, the rusted spoke heads, and so on. Aside from the rear wheel being a minefield, I've noticed some play in the swing arm and rear shock, but I'm not gonna go there yet. That's yet an uknown and this beast is starting to look like a money-pit. Better enjoy some riding first. Clutch is still iffy even after adding more free play to the cable (though it might be a shade better than day before yesterday - hard to say. Question: replace steel and friction and springs - or only friction and forget the rest? And what's the part number of the updated release bearing? For the rest, I managed to get the rusted chain adjuster bolt out - after failed easy-outing with ever increasing sizes, and then having to resort to drilling it out with the intention to Helicoil. I actually found a supply of those (Chinese) in a tool shop run by a Russian (!), who also happened to have a portable hydraulic press with which we totally mangled the non-clip masterlink - now permanently on, or off limits... (à la Chernobyl). Anyway, just getting home, I was able to do the first WFO pass and plug chop - in 4th? gear. Uphill, so I think it's a valid chop. I've attached the photo (and just for fun I've included a photo of the plug that came out of the bike before the top-end rebuild - it's a little crusty). As you will notice, the new plug has got (in my opinion) an ok looking electrode, but the body surrounding is it a bit black. My immediate suspicion is that this is from pretty good main jetting (with the 170), but overly rich slow speed (65S) and perhaps even idle circuit. I'm at about 3,000 Ft, and most everywhere I will go from here is higher (up to about 7,000 ft max). Temps are in the 80s here and going down to the high 50s for a low at the highest altitudes. I've not done the mixture screw adjustment yet, so this may have an impact. Your thoughts? Tomorrow I'll flush the cooling system (with locally-sourced radiator flush made in UAE). I will also do the mixture screw adjustment. D.


-
Hi Moses, I guess you could say dust seal. It wouldn't stand up to any serious vacuum if it were present (even in good condition). But whatever the case, my woe has has come down to valve adjustment - not carburetion. At least so the 30 odd Kms I did today would indicate. After turning the engine over several times this morning, I never got the right side exhaust valve to loosen up. So I figured that perhaps it was like the others and just had a moment of rambunctiousness at the specific moment that I had adjusted it and the other valves before. We'll blame it on a full moon. So I simply adjusted it again (this particular one is a pain in the access department...). I didn't even bother to touch the carburetor since I figured this has to be it. When I think back to when the engine started messing up yesterday, it was immediately after being subjected to stop and go traffic and then a good blast when I untangled myself from the mess. Something must have just gone "click" in the autodecompressor and tightened that valve up. Anyway, to end the suspense, it ran fine all day today after the adjustment. There was one scare when power abruptly fell away and the motor was popping and snorting - but it was that I had simply run out of gas . Pretty much right in front of a gas station. Now that the engine runs regularly, I can make some other observations: I am accustomed to riding multi-cylinder big-bore sport bikes while wearing earplugs. Today's ride on the BRP was without plugs, and I am a bit surprised by the mechanical noises coming from the engine - it's like riding a tractor. I don't think anything is wrong, but it is definitely not the sewing machine smooth of a CBRXX Blackbird or my buddy's ZZR 1400! On the other hand, there is plenty of good noise coming from the intake and exhaust. For the moment I will forgive. It starts easily (warm or warm-ish), so long as you do the trick of pushing a little past TDC on the maunal decomp, and then kicking. First time every time unless I forget to return the kill switch to "run" (oops!). All the same, the kickstarter sometimes skips a tooth and that has me a little worried that it'll get worse. The power is pretty good - but not mind blowing. The torque, on the other hand, is fun to play with. Again, I guess it depends where you are coming from and what you expect. This will likely improve as the break-in progresses and I increase the revs. The power/torque on this bike is apparently now much better than before as the clutch is giving signs of not being able to handle the brrrrraaaaps I'm giving it - even at the somewhat modest break-in revs. While it's not slipping in an obvious manner, I don't think it's Moses-style wheelspin like we see on the forum video. I wish it had an ignition key. Parking in town is a little disconcerting - even if this is not a place where things like this get stolen. I really stink at riding a dirt bike! I hope this is something that will also improve - but with out the "break" of break-in. As far as jetting is concerned, I think I might have some more work to do in order to perfect things (but it is not at all bad as-is). Acceleration is without hesitation throughout the rev range, but I get a fair amount of burbling and popping (not the classic backfires though) on the after-run, and on downhill stretches. It's a bit more than I think there should/could be. Although it sounds cool, I'm suspecting it's a sign of inefficiency. I have not fiddled with the mixture screw again with the bike running correctly, so the drill from the manual may have an impact on the above condition. I seem to have a momentary surge when shutting down from higher revs. It could be related to my impression of potential clutch slippage (meaning the clutch is just catching up to the rest of the bike), or it could be something that jetting will relieve. It's not major, so I'll probably live with it for a while while I learn the bike more. Whatever the case, I'm extremely happy to have it run properly for a full day. It was starting to get frustrating!! D.
-
Hi Moses, The "felt" picture is actually the one showing the bore of the throttle shaft. What you see is not corrosion - that's the felt. It rides in a little pressed-in copper insert. Take a look at it again and I'm sure you'll understand. Indeed, I'm running a 65(S) slow jet, a 170 main. Nothing special about the air filter - it's not OEM, but it fits fine and it's not over-oiled. We have no filter oil here, so I used 2-stroke. After installation last week, there is only a small collection of drips on the bottom lip of the airbox - not enough to make its way to the little drain nipple, and certainly not enough to make it past the spark screen into the airflow. For what it's worth, I had cleaned the spark screen with gasoline and dried it fully prior to installation. The spark plug was brand new in a Honda OEM box when I put the engine together. The gap was fine out of the box. I didn't pay much attention to the heat range, but I compared it to the old one and it is the same shape for the length and thickness of porcelain, protrusion of the electrode, etc. I cleaned it with carb cleaner before putting it back in yesterday. The float level (rechecked on Sunday), is between 16-17 mm. This makes the line of the seam in the float pretty much parallel with the carburetor bowl mating surface before compressing the little spring tip. There is no leakage, and checking with the clear plastic hose trick has confirmed the level is adequate. The float needle is not sticking - just to be sure I used another trick on the needle orifice: brass polish on a q-tip stuck into the end of a cordless drill. The inner wall looked pretty rough before, but now it's a mirror finish and the seat is super clean. There's no weeping or smells - except when I tilted the bike over to get the fuel in the other half of the tank - thinking I may have been running out of gas. The head work was done in a village in Bretagne at a race/customization/restoration shop. The place was a serious mess inside with basket cases of all kind lying around, there was even a semi-complete unrestored Indian from what I would imagine the early-mid 40s'. He had an impressive array of machine tools (that many looked to be about the same age as the Indian), and he seemed to be eminently knowledgeable. There was everything from chromed H-D customs to the super fat-tire GSXR street dragster. The work he did was to replace the exhaust valve guides, the intake valves (for both of these items I had provided him with the OEM parts), grind the exhaust valves, and grind the 4 seats (no new seats). I also gave him new seals. I was there in the shop when he was finishing the lapping in of the valves - the loss figures seemed impressively minimal but I can't remember the specifics. I don't know if it was a simple grind, a 3-angle or a 5-angle. I know it cost a lot! (I probably could have bought a new head in the US for the same price). Can never tell if the work was done to a good spec though. As far as the compression goes, I think it's ok (not based on checking - just my feeling). I was standing at least 12 feet behind the bike at idle (this morning when it actually idled) and the puffs from the pipe were enough to muss my hair! (not that it really matters when you've just removed your helmet ). And occasionally when the auto decompress doesn't kick in, the kick starter won't budge through TDC unless you use the lever. Anyway, I rechecked the valves this afternoon and can happily say that the 3 I had readjusted yesterday are all in spec. The right side exhaust however (which was in spec yesterday) is now tight. I've been turning and turning the motor over thinking that it's just the decompressor interfering, but so far I have not been able to find a spot on the revolution that puts it free again. This autodecompress thing is getting to me - I'm jealous of your decision to send it to the dustbin. I know that as a result, you're not so familiar with the thing, but correct me if I'm wrong: It ONLY works on the right side (clutch side) exhaust valve, and you hear it click (it's a pretty loud click) when it is disengaging. Mine clicks - not on every revolution, but relatively often when turning by hand from the magneto bolt or the rear wheel (or the kickstarter, but I don't use that for valve adjustment). Despite the clicks, the lack of lash for the right side exhaust valve doesn't seem to change. I'll turn it some more tomorrow to see if I can get the decomp loose again (if indeed it's stuck in an activated position). If not, I'll back the rocker completely off and spin a few times to see what happens. If the decompressor doesn't back off, the only choice I'll have is to reset the lash assuming that I did it wrong before (not likely by now). More to come!
-
Pfft... The saga is not over yet... I rode about 15 kilometers this morning, and sure enough, near the end of the ride it started to stall out at low revs again. No idle. Up until that point, it was running pretty crisp - no popping or anything. I will check valve clearances again, but I have a feeling this is related to the throttle shaft - don't know what else to target for now. When I had the carb apart on Sunday, I greased up the shaft real good before putting it back in. The objective was to make the maximum possible seal. I am suspecting that the grease warms up, gets soft, and is progressively sucked into the carb - which clears the way for air to get sucked in instead. All the same, I may be clutching at straws since the shaft didn't really seem to be loose in its bore... I have attached a photo of the only obvious wear. Back to the valves - if they're tight again, what could cause that? Is it possible the new valve work is a problem? Anyway, let me not get ahead of myself. I'll go check clearances now. A couple of observations relating to my post of the 20th: The felt ring I mentioned is not on the inboard side of the carb - it is outboard. I'll attach a photo My idea that a bad slide-to-bore seal would make a problem is unfounded as there are 4 holes in the bottom of the slide - equalizing the air pressure. This makes sense, because if there were none, the slide would have to compress the air above it in order to rise. I therefore don't think that a bad slide-to-bore seal will cause the problem I am having. For what it's worth, I have attached a couple of photos of the wear on the slide. If there's nothing to report on the valves, the next test will involve running the engine without the tank on (connected, but suspended from the ceiling) so that I can do the WD-40 spray trick to check for vacuum leaks. It will be interesting to see if spraying at the throttle shaft will tell me anything. By the way, there's no oil in the water or vice-versa. Feel free to chip in with ideas! David


-
So, a good part of my Sunday was spent in the basement in company of my BRP's carburetor. I went through it with a fine tooth comb (and - not joking - a magnifying glass), and I took a few close-ups of potentially suspect parts. In the end, however, I may have just been out-thinking myself. Before putting the carb back on, I pulled the spark plug to see what it looked like and was a bit surprised to see it all black and sooty. I hadn't expected that since I had assumed my problem was fuel starvation. By then I was all confused. So I started to check valve clearances again - not that I figured I'd find anything out of the ordinary having set them just a few days before. Well, dammit if both intakes as well as the left side exhaust were so tight I couldn't even get a shim under them! Is it possible that I set them using a TDC from a parallel universe? Thinking back to the initial valve adjustment, I had done those three and then run into a problem with the right side exhaust (because of the autodecompressor). That right exhaust valve was done the next day with a fresher mind (and apparently a real TDC as it appears to be the only one set correctly). Anyway, I readjusted the 3 out of spec, and buttoned everything up. It started easily and ran just perfectly from the get-go with a normal idle. I could almost hear the inventors of the autodecompressor laughing at me from Hamamatsu. All this theorizing... and it turns out (most likely) that the problem was of my own making. I won't start jumping up and down yet however. I will ride it up & down the hill tomorrow to see if indeed all is sorted. The (hopefully) definitive answer will come once I ride it. D.
-
Hey Moses, Did you ever notice that the parts fiche shows the mixture screw assembly order in reverse? Take a look... Any merit to that?


-
Hi Moses, I've not done the retorque yet. I'm trying some easier steps first. The initial step was to replace the fuel. That made it better but it could just be my imagination. Here's the video after I did that: http://youtu.be/OzyQ5Z0Qo9w What you might not notice from the video is that I forced the bike to run by turning up the idle stop screw. I'm kicking the bike with about 1/3 throttle from the grip. At this stage, kicking with no grip throttle will not start it (warm/hot). At one point while fiddling with the mixture screw, I overheated (I figured that might happen ), so I got a fan in front of the motor. Playing with the mixture screw had no noticeable impact on how the bike ran. Hard to tell though since it wasn't running good anyway. I also checked the float level/bowl fuel supply with a plastic hose. Attached is a photo - with the engine running. It might look a little low in the photo, but that's just because the bike is on the side stand. Whatever the case, the fuel supply was constant, so that's not the problem either. Now with the carb apart, I find not much to be suspicious of. I have yet to take the slide out again, but I can already tell from the last disassembly that the slide looks worn. Looks may not be the last word through since it moves up and down in the bore extremely nicely. But your mention of the throttle shaft gives me a new train of thought: Since I cleaned so much crud off the top of the carb - including the shaft assembly, I think that I may have opened up a source of outside air. In the carb body where the shaft goes in there is a felt ring of some kind (at least I think it's felt) that fits in a groove (just to the outside of the plastic washer) and surrounds the shaft. I suppose its purpose is to keep foreign bodies (and air) from getting into the carb via the throttle shaft. In aggressively cleaning, I may have damaged the felt. Furthermore, the Moose kit did not give a new o-ring to seal the top cover of the carb. My feeling is that if the top cover seal and the shaft seal are good, a worn bore wouldn't make much difference as there's no air supply above the slide to seep in. But in my case, with a worn slide-to-bore fit, bad shaft seal, and bad top cover seal, this may just be a logical avenue to attack. The question still remains though - why did the bike run good on the first day? A suspicion is that because I had sprayed the slide with WD-40 before putting it back together (ran out of carb cleaner), and I had greased the shaft, that helped seal things temporarily. Once the WD and the grease were progressively sucked away, air started to bleed through. Plausible? But I don't see this felt on the carb parts fiche! And even if I had a new one, to get it in without damage might be a challenge. Any thoughts as to how to seal this? I'm thinking (as a test at least) that I'll just schmatta it with silicone sealer (from the outside) in the hopes that it'll fill the gap without sending junk into the carb. Ditto for the carb top o-ring (though I might try to make a new o-ring from an extra valve cover o-ring I have - like I did for the thermostat housing). Maybe I could even make an o-ring for the shaft, but it wouldn't be good if it interfered with throttle action... So... back to the basement.

-
Hi Moses, Thanks for the feedback. I had already pulled the petcock, cleaned the filter screen (which, aside from being dirty, is in a pitiful state - goes on the list of more parts to order), checked the filler cap vent and hose, checked the petcock for flow, etc. Even though the screen is bad, fuel flows fine through the petcock. I did not disassemble the petcock. Anyway, if the bike runs at 3000 revs and upwards, you'd think that fuel delivery to the bowl is not the problem. I've run a coat hanger through all of the carb vent tubes (one was blocked), adjusted the float level (it was way off), pulled and re-pulled the slow speed jet, fuel screw, and sprayed carb cleaner all over the garage. I have a suspicion about the fuel screw though. Since the old one was apparently screwed into the stop hard enough to mangle the head (which, as you will remember, required an easy-out to remove), there may be some damage in the seat - but I can't see anything obvious. I'm just thinking back to when I got the bike... It actually ran no problem with the screw seemingly turned all the way in to the stop. This might mean there's something wrong with the seat?? The installation order of the fuel screw is O-ring, washer, spring and then screw, right? The only things I have not done (that I can think of) are to pop out the needle jet (though I did have the needle out previously), and take the air-stop diaphragm thingy apart. I'll do the visual check trick with the clear hose to be sure that the bowl is not running dry. If nothing to report there, I'll take it all apart again and have at it with my friend's air compressor. While it's apart, I'll probably take a look at exhaust valve clearances again - just to eliminate the autodecompressor from the list of suspects... Another thought is to remove the muffler to see if it'll run any different with it off. That will eliminate the possibility that a mouse or rat made a home in there in the middle of the welding job Another thing to do would be to replace the fuel. It's not likely, but it could have gone bad in the few months the bike has been apart. But if it did, then how to explain that the bike ran so well on the first start-up? Can fuel go bad overnight? Phooey. I wanted to be riding and not wrenching now. D.
-
So... the BRP (aka GCR) fired up so nicely, idled steadily and sounded so crisp on the first day, I was really excited to take it for a spin. In the end, it was just a warning for me not to be so smug and regale in my mechanical skills. Here's the deal: I wanted to start the break-in process today, but pulling out of the driveway (for the "first ride"), the bike stalled already once. And over the next 5 kms, it stalled again a number of times. It got so bad that I figured I should go home - by which point I couldn't even start it with the kick anymore. I had to rely on gravity - rolling starts. It seems to accept running at what I imagine to be about 3,000 RPM, but anything below that, it stalls. I wound in the idle stop screw to force it to run while I played with the fuel screw, but the adjustments seemed to make no difference. Eventually, I took off the carb and disassembled and cleaned everything again - and though I did find some suspect areas, the effort produced no result. Tomorrow I will have access to a friend's compressor to blow some air through the thing, but I'm not convinced it will have any impact. It's as if the engine is running out of gas. Such a contrast from yesterday . I've run through all the obvious culprits and have found things that might have had an impact, but the result is nix. Before the carb removal tomorrow, I'll do a test of the fuel supply (to the bowl) by hooking up a clear plastic hose to the drain to see if the level is a problem. If that's not an indicator, then the carb has got to come off again. I wasn't looking forward to that.... D.
-
Hi Moses, I guess indeed, I gotta do what I gotta do. I went to check out both versions. Even though I grew up (at least part of the time) with AM radio, the Johnny Rivers version didn't ring a bell. The Al Wilson cover however made me think of Tom Jones. I hope I'm not cheapening your memories! Not to change the subject; but the sound of my locally rewelded stock pipe with "Euro" tip, is a sweet and crisp song. Unfortunately it hasn't lasted. More detail on the engine rebuild thread. D.
-
Ok. It's done. ...nearly. What's important is; the engine has been started. Hurray! It surprised me a little that it started on the 1st kick after having been turned over a few times with no spark just to get some oil circulating. The idle immediately settled to a steady lope (no idea of exact RPM, but it's reasonable), and throttle blips gave instant reaction. What remains is to do the break-in, flush the cooling system, get the master link (non clip-type) of the new chain peened (if anyone has ideas of how to do this without tools, please chip in!), and then eventually readjust the valves and retorque the cylinder head. Retorque the head? Yes, I guess it'll have to be done, as I notice to my chagrin, some web sources are maybe not as reliable as others. I looked up the torque spec to be 44 N-m or something like that (and Moses, I think that's what your video says?). After having gotten my hands on a factory manual, I see the torque is supposed to be somewhere between 60 and 70 N-m... but by then, it was too late to do anything about it. Oh well. Anyway, the first ride should be interesting. The GCR lives! (by the way I just invented it - GCR = Grand Cochon Rouge) D.

-
Moses, you will note that indeed, a gas welding solution was found. It might not have been done in the "clean room" environment you would prefer, but I guess it'll have to do the trick. What I did was to go around the "technical" neighborhood asking welders if they could show me samples of their work. Having established that this guy actually had the necessary tools (rudimentary as they were), I settled on what would be considered locally as an exorbitant price (about $20) and he set to work re-assembling my muffler. The end result is not super beautiful and I'm tempted to take a grinder to some of the rough spots, but it's good enough. The worst of it is hidden by the side cover. In the end, a grinder might be counter-productive as the weld material looks extremely porous and any diminishing of the material volume might lead to leaks. I painted it with barbecue paint (800 F test - best I could get), and tomorrow it will be put to the test. Not sure if it's gonna hold up under the temps generated by this bike, but we'll see. Maybe I can try to "bake" it on in stages during the break-in. Back to the tools and materials side of things - you will note the "milk can" in the photos. This is the acetylene supply. What they do is to toss a lump of "carbonite" (which is essentially charcoal from Eastern Congo) into this vat. The only other thing in the vat is water. However, it somehow magically produces the acetylene. They took it seriously enough to set this vat away from any open flames! Fun! D.


-
Did the pipe yesterday. Quite an artisanal butchery, but I guess it's about as good as I can expect in this neck of the woods.
-
Having now figured out how to post a photo (thanks Moses), here are the innards of my pipe. It sounded like a frying pan, but it was really the kitchen sink! I've yet to check out the welding resources on the magazine site, but I will. Even though I won't be welding it back together myself, it'll give me a sense of knowledge for when i find someone who has the equipment and skills. D.

-
Sure enough, it was just too late at night for me to have the patience in getting the cam off the autodecompressor. Yesterday with a little more time on my hands, I rotated the crank a few more times (it actually took a whack at the kickstarter), and the decompressor clicked off, letting the right side exhaust valve lash go wide as expected. I've reset it now, and it would seem that all is good to go. Carb, vacuum and breather hoses, and new cables are the next step of reassembly. D.
-
On the plus side, I have found a place to get "good" oil. It's a South African outfit called Engen; and they sell synthetic 10W40 full-synth in half liter bottles for about $5 a pop. I hope it mixes well with the 1/10th liter of Lucas break-in oil that was mentioned as "de rigueur" by Moses. I suspect that the "with zinc" additive is more "break-in important" for cams (of which mine is not new - though it was for Moses) than for rings and pistons (which have indeed been changed in my case). In any event, this lube will only stay in there for the first few hundred kilometers of break-in before getting swapped out with 100% full-synth. I hope there's a market for the Lucas stuff among my buddies since I brought back 2 pints/liters and I only need about 1/10th of that for the XR! Whatever the case, having "good" lube of any kind will surely work wonders for this motor that has apparently been starved of TLC in its previous life. More later! D.
-
Pfffttt... Seems I have something strange going on with the autodecompressor despite my efforts to ensure that the moving parts were rotating the right way. I even removed the magneto cover to ensure counter-clockwise rotation and proper TDC-C (had not done this before as I felt comfortable with just looking at the mark through the peep hole). Despite all of this, the right side exhaust valve is asking for a huge amount of backing off the adjuster screw. I tried to include a photo, but the computer is not cooperating. And then when I turn the engine over, I notice that the right side valve has a distinct timing delay over the left for opening and a similar amount of timing advance for closing (though I think I understand the exhaust valves are supposed to open in concert). Time to do some more sleuthing. Unfortunately, the fridge is dry, so there's no more fuel to keep me going (I mean beer - and jetting is not critical in this matter), so the investigation will have to wait....
-
Hi Moses, I have the same exhaust as you and Greg, but mine has a frying pan rattling around inside. Must have been an option for those who really want to rattle the windows. I will cut the muffler apart downstream of the collector and see what I find in there. I'm 99% sure that it's the tack welds of an internal pipe that have failed. The easy part is opening it up. Then I'll need to find someone who can weld (or braze?) it back together again. And indeed, my bike has no restrictors or snorkel in the airbox (nor in the carb insulator). D.
-
Hi Moses, I reassembled the cylinder, piston and head last night - taking little "computer breaks" along the way to confirm what I was doing by looking at your video of the rebuild. What a great resource to have in this backwoods! (I mean the internet - but your video as well!) I still have work to do (valve adjustment among other tasks), but I'll give a few insights from my experience so far: For people sticking with the original cam: When reinstalling the retainer clip for the auto-decompress plunger, note that the clip can seem like it's properly installed, but in fact, it's possible that it is riding in the space below the groove provided. If so, this will prevent the plunger from rising to its intended height. It pays to double check with a good flashlight and your reading glasses. When reinstalling the camshaft (I suppose this applies no matter what version of cam you use), you should insert the 8x17.5 cam-end retainer dowel in the head before dropping the cam in. Once the cam is in and the sprocket on, the dowel can no longer be inserted (actually, it probably can, but it would involve some force that I hesitated to apply). As you can gather, I had to remove the freshly torqued cam sprocket bolts, slide the sprocket off the shoulder on the cam, move the cam, insert the dowel, put the cam back in place with the sprocket, re-time the sprocket (I marked it so at least it was easy), reinstall and retorque the sprocket bolts, risk dropping stuff in the engine because now you lost patience, bla bla.. You get the picture. I suspect that the long 6 mm bolts that go in the right side of the valve cover down into the cylinder are prone to stretching - I've not torqued one of them to full spec.as it feels a little "iffy." Overall, things have gone smooth as butter - in large part thanks to the video. Not only is it "directions" on how to do things, but it's also a photographic record. I found myself going back, not always to listen to you, but to find an angle showing where that little doohickey lying on the floor is supposed to go! I'm surprised by how much resistance there is to turning the engine now, but I don't suspect there's anything wrong. It's just that it seems there's way more compression now than before - yet I haven't even installed the spark plug!!! Now off to try to find some motor oil! That's another thing that we suffer here - no fancy selection of oils. D.
-
Hi Moses, Good info there for the tire mounting tool. The best thing I can see about it is that you drastically reduce the chance of pinching. It seems however that if you're going on the road, you would still need to take along your regular complement of irons to get the job done... (just playing devil's advocate ). Wish I had one of these the other night! Better yet, a Coates machine... For the speedo drive, I used the same epoxy as you, I even wire brushed the thing to give a better contact surface, and then I clamped it 24 hours. It should have been the perfect example of what a good glue can do when used properly... but nope. The plastic of the speedo drive may just be a different formulation. Or maybe it's just because I'm south of the equator and glue repels rather than adheres? For the bearing, I doubt I'll have much luck in finding it here. But I may have call to go to London in a month or so. I imagine I could find one there with no problem. In the meantime, I'll make do with what's in there. D.