


Moses Ludel
-
Posts
4,447 -
Joined
-
Last visited
Content Type
Profiles
Forums
Blogs
Store
Articles
Gallery
Posts posted by Moses Ludel
-
-
Well, it's officially become a "project"...
-
If there's 12V current to the ignition switch, the "ON" pole of the ignition switch feeds to the distributor. This system should have a ballast resistor between the ignition switch and coil, which will drop voltage down from the 12V. The ballast resistor feeds to the "+" terminal on the coil. The "-" terminal of the coil feeds to the distributor, i.e. the breaker points and condenser. The ignition circuit should be fused to prevent a short burning up wiring.
-
James jennings...You can message "Nictaux hicks" through your forum membership. Just hover your cursor over the name, you'll see the "message" prompt. Send an email directly...Trust that helps.
-
That should get by...If you want to make another attempt, Lowe's and other hardware stores or Fastenal, McMaster-Carr and MSC have nylon and bronze bushings. The concern with bronze is wearing into the lever or rod.
Keep an eye on your temporary fix. There are many aftermarket floor shifter options for spring. Summit Racing or Jegs are good sources.
-
Moving ahead...We're getting the first hint of fall here, likely at your neck of the woods, too. Glad you're making progress...
-
Sarahfarideh...The Code 11 is either the ignition pickup in the distributor or the CPS (crankshaft position sensor). I would look first at the CPS and its wiring. The CPS can get dirty from oil if the engine has a rear main seal leak. It is not uncommon for the wiring to the CPS to become damaged, especially by an exhaust header. The symptoms sound like a possible short or intermittent short to ground at the CPS wiring. The CPS could be defective, it does happen.
Check the wiring from the CPS (at the bellhousing, 11 o'clock above the flywheel) to the ECM. Remove the CPS and clean it to rule out the pickup being oily or dirty. The flywheel, unless loose on the crankshaft, is seldom the issue unless covered with oil. This is a simple hall-effect type sensor relationship, the flywheel is far less likely to play a role here than the CPS itself.
You can check the CPS wires with a volt-ohmmeter to see whether the CPS is defective. There is a resistance specification listed in the Mopar factory service manual (FSM).
If the CPS and all wiring check okay, there is the distributor sensor pickup signal. That pickup can also be checked with an ohmmeter, but look for a short or loose/damaged wire connection at the distributor first.
Should the distributor pickup sensor and CPS both check out okay, with all wiring okay, I would look to a fuel supply problem (not a Code 11). Check the fuel pressure at the fuel rail and also the volume of fuel coming out of the rail with the fuel pump cycled on. The rail pressure and expected fuel volume are each listed in the FSM for your 1991 Jeep Wrangler.
Let us know if this works...
Moses
-
Stout...Fully understand the price difference...You will likely be approaching the cusp with the 7000-pound GVWR trailer. Assuming the truck is a "3/4-ton", the load capacity in the bed or overhead on the chassis (a camper) should approach 1,500 pounds. At a GVWR of 6,300 pounds, the net weight of the truck should be in the neighborhood of 4,800-5,000 pounds with no additional weight like a cap, spare tire, tank(s) of fuel, a tool box, etc. You would likely squeeze by with the 7,000 pound GVWR trailer.
Of course, it would be best to run the 1210 over scales before getting the trailer. That would be decisive. If you're doing a one-way tow, renting the trailer at Colorado and driving to Illinois with a drop-off of the trailer at Illinois, you could arrange to run the truck over scales before confirming the trailer rental. In doing so, you could make an informed decision and solve the mystery.
It's a close call. There's a plus to getting the 10,000 pound GVWR trailer: better braking, better weight range tires and improved structure. You might justify getting the 10,000 pound GVWR trailer based on that safety margin. Tires and brakes are a concern. At an additional 700 pounds, the 10,000 GVWR trailer is obviously stouter. In either towing situation, make sure your hitch is up for the total weight package.
Moses
-
A divorced transfer case makes the engine conversion less modification to the truck. You can still have a 4x4 at the end of the day, regardless of the engine and transmission installed. That's more consistent with the truck's design and intent...Good! In your area, 4x4 is valuable and practical.
-
You have done a lot of work since you last checked in! Should be running soon...Wow, the attention to details is obvious!
The fan brackets on the core support are smart. Through-the-core plastic mounting ties tear up fins—even worse when the vehicle is twisting off-pavement. Making sure the Warn winch is in good working order is a safety measure...All this work will pay off when you get rolling...Thanks for sharing!
When you do your final toe-in setting for the front wheel alignment, make sure your uber-steering gear is at its over-center position with the front wheels pointed straight ahead. You should have good control with that equipment.
-
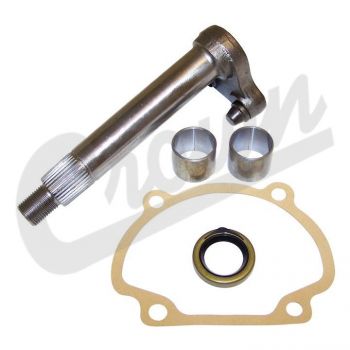
Sounds right if you have the #21 bushing that fits the #6 lever arm. #16 is a flat washer. #18 is a common hitch type clip.
#6 LEVER, on Trans., Shift J5363106 1982-86
16 J4001085 AR WASHER
17 J0120388 AR WASHER
18 J4005122 1 PIN, Hitch
19 PIN, Hitch J4004295 1982-86
20 J4004863 1 WASHER
21 BUSHING J3238418 1 1982-86 [Note that this is a different part number than the 1981 listing that I furnished above. If you can find this part anywhere, it would be correct for your 1983 CJ7.]
-
Kevin G...Very pleased that you use the FSM! What's missing is the Mopar parts view, which I furnish below. (You should have column shift linkage.) The grommet that fits the location (part #21) is Mopar part number: BUSHING J3217256. If this bushing is not available, you can likely find a facsimile.

-
Kevin G...Nice Jeep, worth the effort!
My earliest professional work was a fleet light- and medium-duty truck mechanic. I was personally responsible for the repair and maintenance of 22 vehicles. It's in my blood to "fix" problems before they become breakdowns. I learned to troubleshoot in ways that prevented vehicle failures in service.
As a budding pro, I took a course in automatic transmissions. The textbooks were by William Crouse. His professionalism had a large impact on me. I held California emissions licenses and certified at GM service training for dealership technicians. Eventually, I shared that knowledge and those work standards in my magazine journalism and books. With commitment, anyone can learn through courses, trade books and factory service manuals. I have FSMs that fill two bookcases. Each vehicle I have ever worked on or written about has its FSM on the shelf.
Your Jeep transmission issue intrigued me. You did the wise thing rebuilding the entire unit. The kickdown linkage is adjusted "perfectly" now...
Looking forward to your CJ questions. Keep us posted!
Moses
-
Mike...For safety, you need the wide to offset the high (center-of-gravity). There is still the short 80" wheelbase. I stick with a stock steering wheel diameter to avoid the "sprint car" steering feel of smaller aftermarket steering wheels. Grant made a wheel close to the stock Willys diameter if you decide to go aftermarket. Aesthetically, I like the OEM/stock steering wheel and horn button.
A stunning profile, there is nothing like the 3B! These 80" wheelbase 3Bs sold right alongside the 81" wheelbase CJ5 and 101" wheelbase CJ6 into the sixties. Anyone can see why—just look at your fine example!
Moses
-
Mike...Other motorists will rubberneck at the CJ3B...Like I've shared, the 3B is my favorite vintage CJ, flatfender or otherwise. A GoPro mounted for a through the windshield view would be a great first run video.
Moses
-
Pleased to see the progress, Mike...I can understand the temperature obstacle, we were in drought, record breaking heat and the NorCal fires all summer. The two major fires at finally 2/3rds contained, we had a lot of heavy smoke for a long, long time. 4,000 pairs of boots on the ground at the Lake Tahoe Area/Caldor Fire alone. Heroic effort on the part of firefighters.
I am getting a Cool Boss evap cooler for hot weather. It's currently on a slow boat from China (literally) and will be here by month's end. With current projections, the hot weather will persist later than usual, so I'll likely use the cooler in October. Next summer I'll be ready. Unfortunately, at your neck of the woods, humidity is too high for efficient evaporative cooling. We're arid and low humidity, the cooler will deliver a 15-26 degree F drop in temp depending upon ambient conditions.
So, you must be anxious to see that CJ on the road. It will all be worth it, such a thorough effort!
Moses
-
JohnnyCO...The V6 designated gear is the same sector/lever shaft as the military M38A1 unit. Each needed to be narrow to fit within the chassis. The M38A1 was an F-head four with military equipment under the hood. The CJ V6 needed clearance from the V-engine. There is a distinct housing width difference between F-head 134 gear cases and the V6 gear.
Also, the lever shaft bushings on the military/V6 gear are spaced close together unlike the standard TL gear (four-cylinder type). One sector bushing on the V6 gear is longer than the other to better support the sector with the short shaft. Note in the photo below that the two bushings are the same width. That's an F-134 gear.
If you want to scare the crap out of yourself, note the pin engagement with the worm as you show in your photo above: The lever is off-center position, and this where you experience backlash. Backlash is essentially from the pins not being fully enmeshed with the worm cam, which is normal. The only place to check the pin fit on the worm is in the straight ahead position or "over-center" middle of the steering lock-to-lock turns. There, you will not have backlash, and the pins will fit into the worm cam.
When driving, the force or road resistance keeps the lever shaft against the adjuster screw. The worm and pins are tapered and will push the lever toward the adjuster screw when wheel force is applied. In the off-center position, if you manually pull the pitman arm toward the engine, you can expect to increase the gap between the pitman arm and gear housing. This does not happen in normal driving.
Note: When you get your gear all set up, make certain the front wheels/tires point straight ahead when the lever pins are at the over-center position. Always align the steering wheel to the over-center position. If you need to center the steering wheel during a wheel alignment, do so at the tie rods and drag link adjustment. This will assure that the steering gear is on center with the front wheels pointed straight ahead.
You cannot fit a short/V6 sector into a standard TL gear case. Here is a photo of the F-134 or longer steering sector. You can get a "proportional" sense for its length. The V6/M38A1 sector is distinctly shorter:
It looks like you have the short sector. An F-134 steering gear would be the long sector for a wider steering gear case, which would interfere with your engine. I'd like to see an interior photo of your gear case with the bushings. The bushing spacing is the key. Note that snoopy2x rebuilds his CJ V6 gear in this topic at the forums...Compare your parts to his, scroll down through the photos:
There are some excellent photos, one of the bare housing (blasted) that shows the spacing between the bushings. Another photo shows the longer sector bushing with a notch on the end for the oil feed hole. Use the snoopy2x photos as a guide to an original, genuine V6 Ross gear. The gear housing at the pitman end of the sector has a distinctly shorter casting than a four-cylinder TL gear...Snoopy2x compares the lengths of the sectors, V6 versus four-cylinder types. I believe you will find answers at that set of photos.
Moses
-
Exciting effort, Mike...Will you be testing/driving the Jeep soon?
-
I'm optimistic that this vehicle has a divorced transfer case in place. If so, the 383 and automatic transmission were placed in front of the transfer case with a short shaft between the 727 Torqueflite and the transfer case. The two shift levers with resistance are promising. If there's room beneath the beast, some photos would answer a lot of questions about the powertrain.
-
JohnnyCO...As you note, the pitman arm will only fit so far onto the sector. That's a fixed distance. You also note that the previous owner had the cam and lever riding way off center...Was the mesh adjuster screw far out in the side cover? That would allow the sector to move inward with the pitman arm, closing the gap between the pitman arm and housing. If you loosened the adjuster and applied pressure to the unopened gear, the sector and pitman would move inward toward the housing.
You now have the gear on center when you adjust the lever pin engagement with the worm. The only thing that would take the lever shaft too far outward would be worn lever pins. Inspect the lever pins—a very common wear point on the TL gear. If they do not show significant wear, you should be okay. There should be no lever backlash over-center and distinct backlash when the worm-and-lever turn left or right away from the center.
Since you tried both pitman arms and experience the same space between the pitman and housing with each, there is not a spline cut issue. If only the new pitman spaced outward, that could be a sign of shallow cut splines on the pitman.
Does the lever shaft seal ride in the same position as it did originally? You should be able to see a faint trace of the seal rubbing point on the sector/lever shaft.
Here's an in-depth guest lecture I did at the Midwest Willys Reunion a decade ago. This covers questions that arise during a Ross TL rebuild:
https://www.4wdmechanix.com/Rebuilding-the-Ross-TL-Steering-Gear?r=1
Here is more Ross TL coverage at these forums, including rebuilding:
https://forums.4wdmechanix.com/search/?q=ross tl&quick=1
Moses
-
JohnnyCO...Yep, you do recall my earlier comments. Restoring heat risers has been my approach since growing up at Carson Valley, Nevada, cold starting engines in -20 degree F weather (before the climate shift). If you're intending to cold start in the winter and have a reasonable warm-up period for the intake manifold's crossover passage, I do recommend the use of a heat riser.
On that note, there are more modern heat riser approaches that the muffler shop could incorporate. Of course, you can find a generic heat riser with a coil spring and weighted valve arm. A little searching, maybe a type the muffler shop knows already, could easily be part of the exhaust work.
A quality muffler shop can certainly do a better job with the exhaust system than Kaiser did originally. The early V6 CJs had the strange topside cross pipe and other quirks. If you go with dual exhausts (not mandatory if the single exhaust pipe size is large enough), be certain to run the pipe(s) (single or dual exhaust) over the rear axle and out the rear end of the Jeep. I never run side exit pipes. Rear exit exhaust pipe(s) will help prevent fumes from asphyxiating you or passengers when crawling on a trail.
If you want to simply go with a spring loaded valve and weighted valve arm, here's one example. There are likely sizes to accommodate what the muffler shop has in mind for exhaust pipe sizing and routing. Make sure the weight is in the correct orientation to open the valve:
https://www.classicindustries.com/product/all-years/chevrolet/k5blazer/parts/3887023.html
Here are some additional choices, including Crown Automotive's 2-inch heat riser valve:
https://www.summitracing.com/parts/cwa-j3238998
There are also vacuum actuated heat risers that use a vacuum ported thermal sensor (coolant type) that serves as a thermal vacuum switch. These vacuum switches have a pipe thread and screw into a cooling port on the engine. They are preset to a specific temperature opening point, usually around 140 degrees F. Many manufacturers switched to these vacuum actuated heat risers in the seventies and eighties to meet emission standards. The vacuum (typically manifold vacuum sourced) applies when the thermal sensor switch opens the vacuum port to the heat riser.
All of this is about heat beneath the carburetor for complete combustion. The intake manifold has a heat transfer passage that warms the carburetor base quickly. The heat riser blocks exhaust at one bank of the V-engine and forces it across the intake manifold heat passage. Make certain the heat passage in the intake manifold is unrestricted. (This passageway is at the middle of the intake manifold, passing exhaust from one cylinder head to the other by way of the intake manifold.) The passage can clog with carbon over the years.
If the passage is not free, the heat riser valve would be useless and substantially restrict exhaust on one bank when cold. If the exhaust pressure becomes high enough to overcome the heat riser's spring pressure, it will force the heat riser valve open.
Another approach is a coolant spacer between the carburetor and manifold. (Clifford does this for its manifolds.) The only drawback here is response time. The coolant will heat up gradually and not offer a great amount of fuel vaporization improvement until the engine is nearly warmed up. By then the intake manifold has warmed.
Moses
-
Justin...I'm curious whether you have the original 10.5 gallon fuel tank under the driver's seat? The 16-gallon cross frame (rear mounted) tank came later than 1967. Where is your second fuel tank? Is this an auxiliary tank added on? Some details and even a few photos would help.
Moses
-
The "I-H" button should be the horn button. The seats are clearly added, there were no headrests built into seats when this truck was built. In fact, it may not have had seat belts originally. Did you find the I.D. Plate? It has a lot of useful information.
The plugs aren't that bad, a compression test would answer questions after you get the engine running and parts settle a bit. Yes, the valvetrain looks especially clean.
Are you forming an opinion about restoring the 4x4 system? The 383 and presumably 727 Torqueflite would require a divorced transfer case. (A divorced transfer case stands alone behind the transmission with its own mounts and a short driveshaft between the transmission and the transfer case.) The original transfer case may or may not have been divorced style. The wheelbase is long enough for a divorced transfer case.
-
Glad it passed, JP88YJ...If you need to pursue this further, try these:
1) Check the exhaust pressure/back pressure. Make sure the cat and muffler are unrestricted and that the cat is working normally. An infrared, non-contact temp gauge or FLIR test is very helpful with the cat.
2) Run a vacuum leak test ("smoke test" if possible). Check vacuum pull at the EGR.
3) If you haven't done so, clean and check the EGR valve for carbon and a sticky plunger. Make sure the diaphragm is not overstretched.
Moses
-
Sounds like a good life with plenty of fresh air and open space! Do you have a place to work on a vehicle(s) in the winter? What does that take in your climate?
A friend from Reno went to Inuvik on the Ice Road, during the last season before it closed. He prepared for months in advance for the extreme cold.

I-H 120 Series Crew Cab 4x4
in International-Harvester 4x4 Light Trucks, Scout and Scout II Forum
Posted
Well, someone's gotta do it! You're it...Keep us posted.