


Moses Ludel
-
Posts
4,449 -
Joined
-
Last visited
Content Type
Profiles
Forums
Blogs
Store
Articles
Gallery
Posts posted by Moses Ludel
-
-
Emphasis is on biggman100's suggestion that you splice and solder (rosin core only) and use heavy duty heat shrink tubing. For modern EFI systems with high amp alternators, avoid use of the yellow butt connectors shown on these universal "pigtail" cables. The pigtail is fine...
I like the molded or soldered cable ends shown; I'm not good with the yellow butt connector idea. There is risk of corrosion and unpredictable wire contact at the butt connector crimps. Cut off the butt connector and strip back copper wire for a thorough "weave" splice. Solder the woven wires together and use heat shrink shielding—make sure heat shrink tubing, when shrunk, exceeds the wire's original insulation thickness.
When RareCJ8 talked about crimping bigger cables, he meant the industrial strength crimping tool used by electrical shops on welding and high amperage cable ends.
Moses
-
Forum member JJ_Jeep valued the vacuum gauge idea and purchased a gauge. In the video (below) by JJ_Jeep, you can see his engine running with the vacuum gauge hooked up properly.
Note the idle readings (17-18 in/hg) and 2000 rpm read (21 in/hg). His 4.0L engine is in good condition according to the vacuum test, here is the download of the JJ_Jeep vacuum test:
 Jeep Vacuum.wmv 21.8MB. (You can either "Open" this .wmv file or "Save" it as a download. Opening allows viewing without the use of disc drive space.) This is a useful illustration of a vacuum gauge in service.
If you want to see JJ_Jeep's comments about the vacuum test, go to the Jeep 4.0L #1 Cylinder Misfire Code topic: http://www.4wdmechanix.com/forums/topic/73-40l-jeep-six-cylinder-1-misfire-trouble-code/.
Moses
-
Watched the video, JJ_Jeep, and this is great. (I'm linking from the vacuum gauge post to your .wmv here, it's a very useful and live illustration!) The plugs look quite good, and your vacuum readings for closed throttle and 2000 rpm are more than acceptable!
The needle fluctuation is well within the norms for a vacuum reading. Unseated or burned valves would have the needle swinging quite widely as it flutters. Your engine is in good condition for the mileage and begs the question: What kind of oil have you been running and which filters?
This engine likely has timing chain wear. I say this because the manifold vacuum actually picks up with engine speed, which can indicate spark or valve timing retard at an idle. I have a very quick test for timing chain wear if you're interested. This would separate ignition timing from valve timing issues. In any case, the indicated wear is likely not enough to bother changing the timing chain and sprockets—unless there is noise. Besides, you're not getting a camshaft DTC or MIL.
If the engine is running quietly (no timing chain noise) with good oil pressure and no significant oil consumption, assume you have miles left in this 4.0L six. Of course, a leakdown test would offer more insight, but you have valuable information already from the vacuum test, and it does look good!
As for the brake booster/vacuum response, this is normal. The booster reservoir drops vacuum with each brake pedal application, there's a void, and the engine vacuum must refill the booster, all very quickly, of course, but this is a vacuum drop. You don't feel this when driving, as the booster refills quickly. Normally, your foot is off the throttle as you apply the brakes, so manifold vacuum remains high.
Regarding the AX15 transmission, you have good instincts. Rebuilding the AX15 is not for the faint of heart. I like to put this level of how-to out for owners so you can make an informed decision about whether this is a job for your home shop. I'm very clear about the tools involved, including pullers and a press with fixtures, feeler gauges and hand tools. I do include tools you can improvise to avoid a large tool expenditure for a one-time job.
I like to call a transmission like the AX15 a "close-tolerance", close fit-up unit. Since I have been rebuilding both manual and automatic transmissions professionally for 44 years, I'm in a position to be straightforward about the skill level involved: The AX15 is a transmission benefitting from previous experience at transmission rebuilding. Having said that, I also know that many with moderate experience have followed my detailed steps and pulled off a thorough and proper rebuild.
If you find the rebuild idea daunting, there is a recommended alternative: Advance Adapters sells brand new Aisin AX15 transmissions that just happen to be direct fit for the Jeep TJ Wrangler applications like yours. I heartily recommend considering a new unit if you plan to keep the Jeep Wrangler for a long time (like the TJ's first go-around), especially if you're considering a power upgrade to the 4.6L stroker motor.
Moses
-
Sounds like fun, glad you got this into the summer agenda...
Moses
-
Just raises the suspense, biggman100! Looking forward to the whole story...
Moses
-
There must be a punch line...Right?
-
Have known John Glancy since the 1980s, this business is officially licensed by I-H and works diligently on behalf of the I-H truck and Scout community. I covered the Springfield, Ohio annual I-H light truck and Scout gathering for OFF-ROAD Magazine in the late '80s and have enjoyed lasting friendships from that event.
I-H truck and Scout owners are strongly supported through this parts outlet. "Thanks, biggman100!" for bringing this up. Anyone who owns an I-H truck or Scout will want to bookmark the Super Scout website as a reference, parts source and historical resource!
Moses
-
Tatman, welcome to the forum discussions, I'm excited to see the I-H participation! My cousin had a '73 1210 4x4 in the mid-'70s, what a terrific truck.
I replied at your wheel size inquiry (biggman100's posting on the Roadkill database). Now I have the bigger picture around your truck and am happy to elaborate...
As with any I-H, the Line Ticket sheet is gold. If you have that still, you can part your truck down to the assembly line build components. The VIN can also turn up information. Years back, you could get a duplicate Line Ticket by approaching International-Harvester with the VIN. (Worth a shot, even today.) As a point worth making, the I-H trucks were built with the best components available in the industry. 1973-up 3/4-ton trucks like yours are often a prize!
Some quick questions and points to narrow down the truck's equipment:
1) Is the front axle a closed-knuckle with drum brakes? Disc brakes and an open knuckle front axle were optioned prior to your model year, and your truck should be open knuckle with power disc front brakes.
2) Which GVWR rating (see the door sticker): 6300#, 7500# or 8200#? This will help you identify parts and the load capacity of the axles and springs.
3) If a regular cab with 8' bed, you're likely on the popular 131" wheelbase.
4) Your Dana 60 rear axle is likely 4.10 or 4.56 ratio, the 3.73 was typically for 3-speed automatic models.
5) Does the engine have a four-barrel (original equipment Holley with a stock air cleaner)? Does the manifold look "stock"?
6) You should have an I.D. plate on the transmission, should be an NP435 four-speed, there should be a round I.D. plate on the transmission.
This is a great powertrain, the NP435 typically has a 6.69:1 compound low gear ratio. Your iron case NP205 gear drive transfer case is an all-time benchmark for superior OEM quality. This is the ultimate, and coupled to a 345 or 392 V-8 in good condition, should last a very long time.
There is the one-off use of an AMC 401 V-8, designated "400" in I-H 1973-74 applications. (I've only seen these in Travelall models trying to meet emissions compliance.) Your 49-State 1210 truck should have the bulletproof, industrial strength V-345 or V-392 I-H engine. Provide me with the carburetor's "list number", begins with an "R", and if the original carburetor, we can narrow this engine down. There are subtle differences between the 345 and 392, 345s are typically 2-barrel unless retrofitted with a four-barrel manifold.
Regarding your chassis lift plans, you're somewhat in luck here. The front springs are leaf type and can be re-arched or modified by a quality spring shop. You can use other period 3/4-ton trucks with your spring arrangement as a prototype.
There are rear spring spacer blocks available in different widths and heights, also U-bolts and hardware. With some creative measuring and comparisons, you should be able to build your own "lift kit" from aftermarket products available for other 4x4 trucks of the leaf spring era. If you're really lucky, you will find front springs with similar width, length and eye diameters in an existing kit. Shock absorbers require proper length increase to match the spring and block heights...We can discuss this further.
As for wheels, if you chassis lift, you also want to widen the track width to maintain a safe center-of-gravity. In this case, the backspacing and rim width will be determined by the proper "scrub angle" for the tires. (See my discussion about front end alignment and caster angle at the topic Megatron posted.) Your wheel bolt circle and center hole are common for other 3/4-ton trucks of the era (U.S. measurements).
Ford and Dodge each used the Dana 60 rear axle with drum brakes, and a Dana 44 front axle was a Ford F250 approach—with two wheel hub center hole sizes, depending upon Ford's front axle load rating. (Ford F250 went to disc front brakes later than I-H, to I-H and G.M.'s credit.) You will likely discover a similar OEM backspacing on wheels built for Ford, Dodge or even G.M. trucks that use front wheel hubs close to the design of your 1210.
A local tire shop can confirm your 1210's wheel bolt circle, the stock wheel backspacing and any clearance issues. This will turn out common to other domestic 4x4 trucks of this chassis size with Dana axles and similar brakes...I'm glad to assist further with your search. Please share your findings, others will benefit!
When you lift, you will also need a dropped steering pitman arm. Since I-H sought out the best steering available, your truck has a Saginaw steering gear. You will find this used on Ford and GM trucks, and if you match your steering linkage design to the right truck, you will very likely discover a suitable, dropped pitman arm for that application that will work on your steering gear and with the 1210's draglink joint. You may need a different draglink joint that will fit the pitman arm and also your I-H draglink sleeve. We can discuss this further, too. Safety is primary! You'll likely want a decent steering stabilizer shock (universal mount) as well.
This is an exciting and durable truck to own and build for your purposes, tatman! Expect my assistance and data to be available, along with input from I-H and Scout owners. Welcome!
Moses
-
Hello, Moses!
I've got some questions for ya, i just bought a 1973 ih 1210 pickup. like you i was brought up around international harvester trucks scouts travelall etc. my step-dad worked as a mechanic at Grinnell implement in Grinnell Iowa. anyway my plans are to lift the 1210 but i cant seem to find any kits for that i would like to run 35 or 38 inch tires also it is real hard to find body parts for these old binders i'm looking for cab corners, rocker panels and maybe some floor panels. my binder "ol red" has a dana 44 in the front a Dana 60 in the rear a 205 t case but I'm having trouble finding out what engine and tranny it has in it i was told by the kid that i bought it from that it was a 392 the tranny is a 4 speed with what i call a great granny gear any help identifying these items would be greatly appreciated.
-
Please advise whether this is a Scout II or an I-H pickup. 4x4 or 2WD? Is this stock equipment that you're trying to replace/restore or are you doing wider wheels and tires and need to know the original backspacing and wheel bolt circle?
Share details, I'll furnish information from my reference library..."Binder" covers I-H models in general, we'll narrow it down. The I-H pickup, Scout II and Travelall were each alive and well in 1973. Would be great if they still were!
Thanks for drawing attention to the listings at Roadkill, I looked and confirmed your findings. Many others have dropped I-H details as well...Let's keep the 'Binders rolling! Please share the equipment that your '73 I-H has...
Moses
-
Fantastic close-up photos, JJ_Jeep, thanks for sharing! Looks like enough carbon and soot for an injector problem, and you are likely spot-on about the filter/screen or solenoid issue. Moot point, as there's plenty here to cause a misfire. Glad you could narrow this down and merely buy the injector.
As for what I see here, is the 4.0L using much engine oil? Looks like a possible ring blow-by or valve guide and seal issue, possibly oil or soot spitting back at the injector. Did the other injectors have this oily, soot look around the injector end? Does the #1 spark plug show carbon buildup or a sign of burnt oil at the tip or electrode?
Oil consumption would certainly be justified at 250,000 miles, along with a drop in compression. Try my simple vacuum test at an idle, I'd like to know the idle manifold vacuum and how steady the needle looks on the gauge. You may have carbon buildup around the valve seats and combustion chambers; this would not be surprising for the mileage. We'll keep in mind that we're simply trying to have this engine run well until you decide on either a stock or stroker motor rebuild. Normal wear for the mileage is expected.
For those interested, there are also rebuilt injectors available, one example is from GB Remanufacturing, a supplier to AutoZone, HESCO and others: For your engine application, JJ_Jeep, the part number is a GB 812-11128.
As for the lowest possible price on this injector (per injector, not the full set), I quickly found this at Amazon: http://www.amazon.com/dp/B002NF10SQ/ref=asc_df_B002NF10SQ2667297?smid=ATVPDKIKX0DER&tag=pg-93-01-20&linkCode=asn&creative=395097&creativeASIN=B002NF10SQ. $35.75 plus free shipping. This 812-11128 part number fits JJ_Jeep's 1998 TJ Wrangler 4.0L inline six-cylinder engine and other '97-up Jeep applications. Confirm the fit for your engine. New injectors are available from Mopar and a variety of other sources.
If you need more information on the 3rd gear synchro, see the AX15 discussion here at the forums and my step-by-step rebuild of an AX15 at the magazine. It's a two part how-to with 209 studio level photos...Kind of like your great pics of the injectors, JJ_Jeep!
Moses
-
Audio guys work a lot with unitized body cars. Their high-amp audio systems are within the body/interior. On a D.C. system, the shorter the cable or wire lead, the less resistance—whether the ground or hot side, as amperage load is the same on D.C. With high draw audio equipment and the need for "clean" circuits with the least amount of radio frequency interference, this may be why audio folks prefer to run the battery ground cable to the body and junction from there. The body junction is also away from the radio interference risk from the alternator and starter, which mount to the engine.
Your Jeep has a "drivable chassis" with the engine cradled in insulator mounts and a metal, ladder frame. On older vehicles like this, the ground goes to the frame rail with a strap to the body. Modern chassis have high output alternators and critical EFI components at the engine. It's deemed wiser to ground at the engine and strap to the body from the engine.
The best approach is a full size wire system of grounds that connect the body, frame and engine. We've talked about this, RareCJ8 in particular, and the routing can go first to the engine, engine to frame, and frame to body. Body ground is important for lights and audio systems, frame and engine for the alternator, starter motor (engine attached) and the EFI components.
The battery hot terminal leads for the system typically go to the heavy starter motor junction point and to the power distribution box (via the pigtail). Again, the goal is to reduce wire lengths and minimize resistance loss over distance. Cost of copper is another OEM consideration. Later models with CAN-bus have minimized the needed wiring.
Moses
-
There are many diagnostic tools now available, mostly electronic, often in the form of leading edge apps and electronic diagnostic tools or simulations. While this is great for electronic fuel-and-spark system or overall powertrain diagnostics, there is one inexpensive and time honored spot check for the engine long block's* condition—the simple engine testing vacuum gauge.
*Note: The long block is the engine block with all of the reciprocating parts plus the cylinder head installed. If the long block is in good operating condition with normal valve lift and valve timing, the rest of the engine's performance is about spark, fuel and exhaust tuning.
Years ago, when I began working as a truck mechanic, the vacuum gauge was a standard tune-up item alongside a compression gauge. The vacuum test was considered quite useful for determining engine compression loss, vacuum leaks and loss, needed spark timing advance, the engine's condition under load, leaking valves and more!
Hooking a vacuum gauge to your engine's intake manifold source (below the carburetor or EFI throttle body) can be very revealing. To begin, the vacuum should read steady. Depending upon the altitude at the shop, manifold vacuum should be in the 18-22 in/hg range at an engine idle under no engine load—with a stock or RV camshaft.
If low, don't panic yet, the engine's spark timing may be retarded. Base spark timing has an overall effect on manifold vacuum, and advancing the timing will raise manifold vacuum. Of course, there's a limit to the amount, as the engine will begin to ping or detonate if spark timing is too far advanced for the fuel's octane rating. On modern EFI engines, timing is often fixed by the crankshaft position sensor (CPS) and the PCM/ECU/ECM software programming. The computer will instantaneously and continuously adjust spark timing. For tuning purposes, it's assumed that timing is adequately advanced unless the engine is in limp-home mode.
Vacuum gauge troubleshooting and readings can include a wavering or fluctuating gauge needle. This is the sign of a valve that is not sealing or seating properly. If you see this on the gauge at an idle with the throttle closed and no load on the engine, suspect an unseated valve.
Causes of an unseated valve(s) are burned valves, bad valve seats or valves adjusted too tightly. On an AMC/Jeep engine that has non-adjustable rocker arms, there are several causes for a fluttering vacuum gauge needle: pushrods too long, a surfaced block deck and/or cylinder head with the original pushrods, high valve stem heights, or a thin head gasket. Each can cause a valve(s) to remain open when they should be seated. Driven in this condition for any length of time will either burn a valve(s) or cause carbon buildup on the valve face and seat.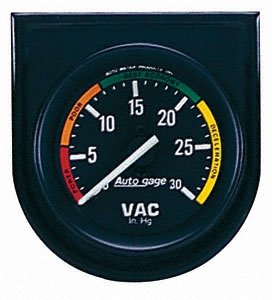
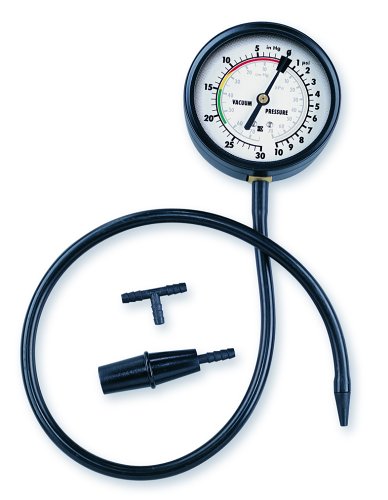
Manifold vacuum is important enough to be part of the gauge cluster on race cars and other performance engine applications. The Auto Meter 2337 gauge (left) is dash mounted for continually monitoring a performance engine while operating the vehicle. At right is an inexpensive Equus 3620 Vacuum Gauge test kit. Maximum fuel efficiency depends upon the highest tolerable manifold vacuum—including spark timing advanced to just below the point of spark knock or detonation (ping)! Note the efficiency zones built into the readings for each of these gauges.
Not a sophisticated tool but surely an important tool in your tuning equipment, the vacuum gauge says a lot about an engine's running compression and cylinder pressures. The gauge can help identify poor valve lift from worn camshaft lobes and lifters, unseated valves, low compression, retarded valve timing from a worn timing chain, retarded spark timing, vacuum leaks and losses, plus the overall engine condition and tune. Unlike both a compression gauge test and a cylinder leakdown test, the vacuum gauge is a real time, running engine test!
EFI sensors that parallel a simple vacuum gauge test would be the MAP and idle air control signals. MAP factors for barometric pressure and altitude changes, important for onboard PCM/ECU/ECM tuning of an EFI fuel and spark management system.
Moses -
I talk a lot about using a cylinder leakdown tester for pinpoint engine diagnosis. When you want to understand an engine's internal condition, the degree of wear or actual cylinder seal, this is the tool. You can narrow your findings to a bad intake or exhaust valve, worn piston rings, excess cylinder taper, a blown head gasket or an engine casting crack—even more findings if you're creative!
For some, the cost of a leakdown tester is not justified. Maybe the tool will not be used beyond a one-time test of your vehicle's current engine. Maybe you're strapped for cash and simply cannot afford the least expensive tester. Regardless, I will share a very inexpensive alternative if you have access to an oxy-acetylene brazing torch, some air line fittings and an air compressor.
The homemade tool consists of an old spark plug and an air hose fitting. Here are the steps:
1) Remove the ground strap from the spark plug end; grind away and wire brush any remaining, rough material.
2) Knock the insulator/electrode out of the plug, wearing eye protection—porcelain is like glass!
3) Use an air coupler fitting with male NPT threads that will roughly screw into the empty steel body of the old spark plug.
4) Carefully and thoroughly braze the fitting to the spark plug shell; make this a strong, air-tight seal. Remove any flux or rough surfaces to prevent blowing debris into the engine's cylinders.


The homemade tool shown here is a special extension/adapter for leak testing at the hard-to-reach spark plug threads of the magazine's Honda XR350R, XR500R and other four-valve motorcycle engines. The principle is the same for making an inexpensive, homemade cylinder leak tester.
The tool I'm describing works with your air compressor. Set the line pressure first to 60 PSI, which simulates low compression seal, then boost line pressure to 100-120 PSI. This higher PSI will create enough pressure to expand the piston rings and force the compression ring(s) outward against the cylinder wall. This is more like actual engine operation pressures.
Here's how to do the check:
1) Before inserting the spark plug thread air adapter, disable the ignition system and remove the spark plugs for #1 cylinder and its opposite firing cylinder.
2) Make sure the #1 piston is at TDC on its firing stroke (verify with the distributor rotor position if necessary). Note that for #1 and its opposite firing cylinder, the crankshaft timing mark for TDC will enable quickly bringing the piston to top-dead-center for the test.
3) With the piston at TDC on its firing stroke, install the homemade spark plug thread adapter. Seat the plug adapter carefully. (Use the plug's original gasket to protect the head, especially if aluminum.)
4) Apply compressed air at the lower pressure first. You will follow up with the higher pressure.
5) Listen for leaks at the crankcase (oil filler cap removed); the tailpipe; and the engine's air intake.
Caution: If you suspect a blown head gasket, remove the radiator cap before applying compressed air to cylinders! Otherwise, you can blow off a radiator hose or cause severe damage to the radiator at these test pressures...This also applies when testing with a ready-made cylinder leakdown tool.
When through with #1 cylinder, you can rotate the crankshaft carefully (ignition disabled!), one rotation of the crank pulley. This will bring the cylinder opposite #1 to the TDC position for testing. The reason for using these two cylinders for a quick, general engine condition test is that each of these two cylinders can use the crankshaft pulley's TDC mark for locating exact TDC for that piston. Repeat the air pressure tests at the second cylinder.
Finding the opposite cylinder to #1 is simple. Note the engine's spark firing order. On a Jeep inline six, this would be 1-5-3-6-2-4. The cylinder opposite #1 is #6, both pistons rise and set in sync. When #1 is at TDC, #6 is also at TDC, one is at its firing position, the other at the top of the exhaust stroke...For a popular GM or Chrysler V-8 with a firing order of 1-8-4-3-6-5-7-2, the two paired cylinders are #1 and #6. A Jeep four is 1-3-4-2. #1 and #4 pistons rise and set simultaneously. This follows suit for other engines, note your engine's firing order.
This test is for rough results only, as you are not actually measuring the percentage of leak, rather you are trying to find a substantial leak. In cases where the rings are shot, a valve or valve seat has a burned notch on its edge, or a head gasket is severely blown between cylinders, or into the cooling port(s), this test can be a quick, accurate likeness to what you get from a leakdown test.
The homemade tool can also be used as an air hold for changing valve springs with the engine's cylinder head in place. With the rocker arms loose and valves closed, regardless of piston position in the cylinder, you can keep the valves in position while you carefully remove the valve springs with an overhead spring compressor. Do not allow the valve to unseat, and keep air pressure applied. As a precaution, raise the piston to TDC for this procedure; that way, the valve cannot drop far into the cylinder.
If you do any volume of engine work, an inexpensive cylinder leakdown tester like the OTC 5609 tool is cost effective. I just pulled up this "best buy" on line at $58 plus shipping:
For that price, you may prefer buying the leakdown tool. A few engine tests, and you will more than pay for the tool in pinpoint diagnostic value.

This is my Snap-On leakdown tester, which has paid for itself many, many times over since 1981. I have quickly diagnosed major engine problems and internal engine issues without engine or cylinder head removal. See my additional discussion about this tool in the engine diagnostics tool forum.
Moses
-
JJ_Jeep, this is good news! If the MIL stays out, you have a single-part cure here! OBD-II, in this case, has narrowed your diagnostics and proven cost-effective. That was the original aim of the Federal mandate for OBD-II, which opened up dealership, proprietary engine diagnostics to independent shops and, eventually, hands-on consumers.
The simplicity and standardization of tester plugs, with common DTCs (diagnostic trouble codes), makes even a $30 aftermarket code reader or $100 real-time scan tool a place to start. Today, the "real time" functionality of inexpensive scan tools makes powertrain device troubleshooting much easier and places diagnostics in the hands of consumers and smaller shops—often short of the need for a $6,000 tool.
Sure, there are limits to the code readers and basic scan tools, but in your case, the trouble was specific and identifiable with just a reader. To the point, a "#1 Cylinder Misfire" was the code read, and not surprisingly, you wound up with a defective injector. The reader narrowed the field to either a wiring issue or as you apparently have found, the likely trouble: a misfiring injector.
So, if this is the cure, OBD-II did its job. Sometimes, the DTC (diagnostic trouble code) is a generalized reference to the trouble, but in the case of a #1 Cylinder Misfire, the read is more explicit. Still, it paid to do some checks and tests before replacing any parts, and that's true mechanics, and not just being a "parts replacer". Thanks for going along with the process, JJ_Jeep!
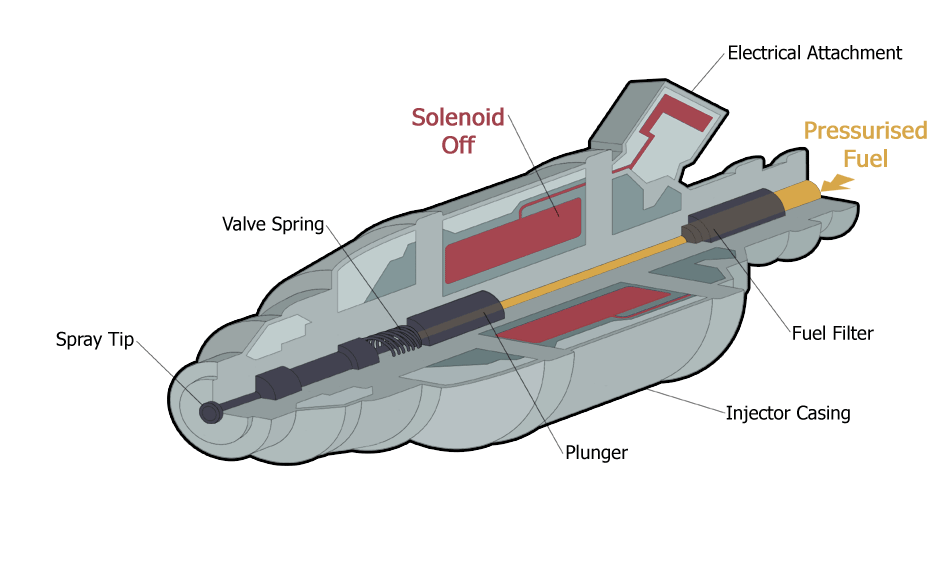
You asked if there is a filter or screen in the injector, and yes, there is one. Here is a generic injector illustration from Wiki that helps explain the injector firing process. You'll find the animated illustration helpful:
http://upload.wikimedia.org/wikipedia/commons/2/29/Injector3.gif
As for assessing the overall engine condition, the OTC leakdown tester would be a good investment. Your volume of usage for the tool may not justify buying one, though. For that reason, I'm posting a topic on how to make a very inexpensive home use tool, and I'll explain its usage. Again, we're after affordable solutions, and this is one I'll post at the "How-to Tips" forum category. I'll also post comments on the use of a vacuum gauge as a simple, overall engine tester.
Keep us posted on your MIL/check light and the engine's performance. On that note, is the 4.0L engine running "better"? If the engine runs noticeably better, please share with us the actual difference and how a #1 Cylinder Misfire impacted performance. What was the "before and after" effect of replacing that #1 injector?
As a footnote, it's great to fix an engine and extend its service life a bit. Every day you drive the TJ prior to rebuilding the high mileage engine is money in your pocket. As long as the vehicle is safe, reliable, reasonably fuel-efficient and there's no risk of damaging the engine in a way that would prevent rebuilding it (like, say, running the engine with bad crankshaft bearings and chucking a connecting rod through the side of the block!), you're ahead of the game—and without a $500 a month payment for a new vehicle. $70 for a single injector? If this is the cure, it sounds like a bargain!
Moses
-
With Nevada's now enforceable OHV registration and permitting process, many dirt motorcycle owners are at a crossroad in the Silver State. Nevada law now requires registration of a dirt bike, ATV and other OHVs for use off-highway. There is an annual renewal of the use permit, similar to a "Green Sticker" at California and other states.
Owners of dirt motorcycles built since 1976 must register the motorcycle and have the option of purchasing a title. Until recent years, Nevada did not require mandatory title issuance on the sale or resale of an off-highway motorcycle. As a result, most cycles require a VIN inspection and acceptable proof of ownership or purchase. See the details at the Nevada OHV Commission's registration website page: http://nvohv.com/registration/. You will find additional links there.
There is another option, no longer available in some states but currently still a prospect at Nevada: The conversion of a dirt bike for street use with a street-use title, registration, a motorcycle license plate and mandatory insurance. Until recently, dual-sport conversions were popular at adjacent California; however, the conversion of off-highway "dirt" motorcycles (deemed "off-road use" by the cycle manufacturer, DOT and EPA) has not been allowed within the Golden State since February 1, 2004. There are two exceptions: 1) motorcycles built prior to 1978, and 2) 1978-up cycles with less than 50cc displacement.
Note: According to the current regulations, California dual-sport conversions were acceptable on motorcycles built through model year 2002 if the conversion was completed and paperwork submitted to the DMV prior to February 1, 2004. From January 1, 2004 forward, the DMV has required "verification" or proof that the motorcycle came with an EPA and/or California emissions label for on-highway use. This ruling about "verification" went into effect on January 1, 2004, with a one-month "grace period" during that month....If there was a street title issued within these timeframes and the cycle has current registration and street use insurance, the cycle is still legal for highway or dual-purpose use.
The internet is rife with rumors, anecdotal stories and speculation about the fate of California plated dual-sport motorcycles converted after January 31, 2004. According to a statement that reflects the actual California DMV regulations, some have good reason to fear: statement of the rulings. If you're puzzled, contemplating a dual-sport conversion or considering a cycle purchase intended for California registration, read the statement and at least know where you stand. Check with the DMV about whether "grandfathering" applies when an earlier dual-sport conversion goes through a title/ownership change.
Nevada is clear and sensible on the dual-sport (on- and off-highway) motorcycle conversion topic. Assuming you have a motorcycle operator's endorsement, you can ride a converted, licensed and properly insured dirt motorcycle on a public highway or any off-pavement public access roads. You will pay for a street use motorcycle title, annual registration fees and required insurance.
In states allowing conversions, an acceptable dirt motorcycle must meet the legal requirements for a street motorcycle. This includes a mirror(s), a brake light activated by brake application, turn signals, a headlight (hi-low beams with a switch may be mandatory), D.O.T. approved tires, a horn, speedometer/odometer (in most states) and an acceptable exhaust tone.
Some states want a license plate light of a specific brightness, and other conversion items may need to meet D.O.T. standards, like the directional signals and headlight. At Nevada and most other states, not exceeding the exhaust noise limit is just common sense, since a ticket can be issued for excessive noise.
So, to ride a strictly dirt motorcycle (non-dual sport) on public land at Nevada, anywhere in the backcountry or off the paved roads, you must register and permit the cycle through the Nevada OHV Commission guidelines...There is reciprocity with other states if you're already permitted and visiting Nevada, so you may not need a Nevada permit for short-term riding at Nevada. Check the Nevada OHV Commission website for the permits honored.
If you choose to convert your cycle to dual-purpose (dual-sport) use with a street use license plate, make sure you know the equipment involved. At Nevada and other states that allow conversions, you will wind up with a road-use title, annual registration renewal notification, and you must maintain proof of insurance (road use type) for both registering and riding the motorcycle.
Warning: If you plan to cancel the insurance on any street legal vehicle at Nevada, make sure you surrender the license plate to the Nevada DMV first! Otherwise, expect a large fine.
If you are interested in doing a dirt bike dual-sport conversion, while the opportunity still exists at Nevada and other states where reason prevails, check your state's regulations and explore the conversion kits and components available from sources like Baja Designs. Kits fit a variety of popular dirt motorcycles.
Much to Nevada's credit, click here for a clear FAQ about the OHV permitting policy and the various exemptions from the OHV permit requirement—exemptions include any motorcycle licensed for use on a public highway, whether a "street" bike, factory "dual-sport" or a "dirt off-road" motorcycle converted properly (meeting State of Nevada and DOT regulations, street equipped, insured and license plated). See the FAQ for clarification—Nevada shares the details.
Moses
-
I almost suggested that you change the #1 injector rather than do the job twice. However, I was reluctant to spend your money. At the engine's mileage, the original set of injectors has been thoroughly worked. Your description of the task involved builds a good case for simply replacing the #1 injector.
This is a valuable "how-to" for those needing to change an injector, JJ_Jeep. Thanks much for taking time to share in detail. Looking forward to this weekend's test driving and results, an update on whether this ends the misfire code. If so, credit to Chrysler/Jeep and OBDII for an accurate DTC (Diagnostic Trouble Code) reading!
Was there anything "suspicious" about the look of the old #1 injector when compared to the others? Did you see anything unusual at the nozzle end? If so, could you please attach a photo of that injector's nozzle?
There are many followers of your topic, and it's been a good opportunity to air the issues around injector codes and defects. Thanks, JJ_Jeep!
Moses
-
Whether you're headed to Sand Mountain or Desert Creek, Wilson Canyon or Mason Valley, the Black Rock Desert or High Rock Canyon, keep in mind that the moratorium is up on Nevada's introduction of an OHV permit program. Effective July 1, 2012, Nevada became one more Western state to require an OHV permit for all non-highway vehicles that ply the back country or public lands.
July 1, 2013 ended the moratorium, and the law is now under enforcement. Before you find yourself with a nice hole in your wallet (paid to the State of Nevada OHV Commission and not courtesy of the gaming industry), please be aware of the Silver State's OHV registration and permit program.
Tom Willis and I discuss this in Tom's OHV columns at the magazine. For more details, click this link: http://nvohv.com/. Learn about Nevada's mandatory OHV registration process here...For non-residents and those with "stickers" from out-of-state, become familiar with the Nevada OHV Commission's regulations.
Moses
-
This is very valuable to members, biggman100, whether they are novice trailer users or veterans wanting to compare their technique with accepted industry practices. Thanks for seeking out these links and sharing them with the members—that's community!
Moses
-
Megatron, you're a valued member and make a major contribution at the forums. You deserved a thorough answer to your questions! Glad you'll have some time now to digest this material...
Moses
-
Fantastic accounts, biggman100! You make this a "must do" item for anyone traveling in the area...Thanks much for sharing Upstate NY, which sounds like an undiscovered destination treasure!
For anyone traveling the Mojave Desert and Highway 395 between Lone Pine and Bishop, CA, take the time to visit the National Park Service site at Manzanar. Manzanar was a Japanese-American internment camp during WWII, and it was depicted in an Ansel Adams photo series. He also made towering Mount Whitney, rising west above the camp, a popular photographic subject. We have stopped at Manzanar on many trips by the facility and taken time to walk the grounds, visiting the Soul Consoling Tower, a Buddhist monument at the west end. The Park Service has done a great job of preserving the remains of the camp and presenting this piece of history.
President Reagan signed a reparations act in 1988 to repay the surviving 1st, 2nd and 3rd generation citizens affected by the internment. Here is more information, including links to the National Parks Service site. The facility at Manzanar has an insightful museum and theater, a great means for educating families, interested citizens and tourists.
-
This is the trend nationwide, no in-school driver's training. Many states require first time drivers to go through private courses or an online course and testing...It's all about cost, funding and the liability of driver training programs at the schools.
Moses
-
Haven't researched this and really can't comment...One thought, though, is that the Suburban would not have its traditional tow capacity with this engine. For perspective, this engine was originally slated for the Jeep Grand Cherokee. The torque is quite respectable, but horsepower is nowhere near the G.M. Duramax V-8, which seems far better suited for a Suburban.
Let's get more information on this one. The 3.0L VM Motori strikes me as small for Suburban material. Better a scaled down version (try 4.8L or 5.3L traditional GM configurations) of the Duramax V-8 diesel that would comply with the light-duty emissions standard in California, permitting GM to offer superior power in a diesel light-duty 1/2-ton pickup, SUV or even a 1/2-ton 1500 Suburban. Scaled and detuned, the smaller Duramax would not require the heavy-duty axles and transmissions found in 2500 and 3500 GM trucks.
Moses
-
As I've shared in other posts, the 2007-up Jeep JK Wrangler Unlimited changed the "rules" about Rubicon Trail wheelbase requirements. In four-door Rubicon Edition form, this Jeep has a 116" wheelbase and is "capable" of doing the Rubicon Trail. "Capable" and "optimal" are two different things, and this wheelbase is "optimal" only with 37" or larger diameter tires.
When you use oversized tires, today essential for any vehicle attempting the Rubicon Trail, you need to widen the vehicle's track width to compensate for the lift required to install the oversized tires. For that reason, the typical hardcore trail running vehicle now has wider axles and/or wheels to get the center-of-gravity back into shape and help prevent an instant rollover on side slopes and off-camber terrain.
So, can I take the '05 3500 Ram Quad-Cab 4x4 at 140.5" wheelbase through the Rubicon? It would possibly make it through in one piece and still have a life left if I went to 40"-44" tires, lifted the truck and widened the track width accordingly for C.G., and found a way around the tighter corners without ripping the body apart on the granite boulders. This last point must be taken seriously, as the Rubicon Trail is not a road in many places, it is a pile of jagged granite rocks. Tight and twisty areas are simply impossible for a long wheelbase vehicle to negotiate without sheet metal damage. This is the reason for hundreds of pounds of "body armor" and rocker sill protection on trail vehicles equipped for the Rubicon Trail.
A Jeep CJ, YJ, TJ or JK, the Land Cruiser FJ40, Scout and Scout II, Suzuki Samurai, Toyota mini-4x4 pickup and the Land Rover Discovery have each been considered "Rubicon material" with various degrees of modification. Today, however, there are many purpose built rock buggies with ground clearance, suspension wheel travel, track width and wheelbase length specifically designed for trails like the Rubicon. When traveling these routes, the rock crawlers and buggies now dominate the landscape. Even some semi-stock appearing vehicles are, underneath it all, actually in this rock buggy category.
RareCJ8 has a representative CJ8 Scrambler that frequents the Rubicon Trail and similar challenges. This vehicle has massive 3/4-ton truck axles with a wide wheel track, a fresh 4.6L stroker inline six and major gear train and axle traction upgrades. See the HD videos for details!
Your Dakota, if in the neighborhood of 130" wheelbase, would need a lift to accommodate at least 37" tires and wide-track wheels in order to attempt this trail. The IFS front drive system would likely get tossed in favor of a custom link-and-coil suspension with a beam axle or leaf springs and a beam axle replacement, minimum Dana 44. The rear axle would wind up a wider Dana 44 or more likely a wide 60 with suitable springs and shocks all around. RareCJ8's Jeep Scrambler provides some idea of the modifications needed.
A lot of body armor and skid protection would be added. The AX15 might be dropped for an NV4500 truck box, and the transfer case would change to an Atlas II from Advance Adapters. With all the added weight and massive axles and tires, a 5.2L or 5.9L V-8 would make better sense, too.
I could go on and on, but the point is that the Rubicon Trail is not a road in many places, it's a mosaic of large granite rocks. The bypasses make travel a bit easier for the lesser equipped vehicles. Road conditions and obstacles can change abruptly. Those who do the Rubicon Trail must have a very good reason to do so...For a glimpse of the trail and the variety of vehicles on that route, see my 2010, 2011 and 2012 Wheelers for the Wounded Rubicon Super Event coverage in HD videos. All three years of trail footage get the point across...
Moses


Battery Terminals and Cables
in Jeep® YJ Wrangler, TJ Wrangler and LJ Wrangler
Posted
I use the traditional baking soda approach for cleaning battery terminals. Wearing eye protection, remove the ground terminal, then the hot terminal cable end. With a mixture of baking soda and warm water in a tin can or a jar, I submerge the terminal end into the solution, wiggle in around without splashing on paint or body parts, and if necessary, I use a retired tooth brush to scrub up the terminal. Protect your hands with nitrile shop gloves, and avoid splashing solution on your clothing or skin!
If you dip deep enough, corrosion under the cable insulation will foam out, too. Clean thoroughly, then rinse with clean water, repeat several times if necessary. Install cables with the hot lead terminal first, then attach the ground terminal.
You can also clean the battery case and posts with baking soda in solution, but avoid getting any solution inside the battery fill cover openings! Baking soda neutralizes and will damage the internal battery...Always rinse away debris thoroughly and assume that the terminal buildup is both corrosive and harmful.
Often, I will simply take a trip to the car wash, and with the engine cooled down, spray clean the engine and bay, including the battery or batteries. This is quick and efficient, the terminals' external debris comes off readily...Note that I said "cooled down engine". We've all heard stories of engine blocks, manifolds and heads cracking when an unwitting owner sprays cold car wash water on a hot engine!
Moses