
Search the Community
Showing results for tags 'jeep wrangler'.
-
 Hi, Just joined but have been using these forums for a while for information. SO I have an 88 YJ with the TBI. My issue all started when I went to get it smogged last year. Short story it failed 3 times for high NOX @ 35mph. By the third failure I had replaced every sensor I could replace, including the EGR. The cataliytic converter only has about 1000 miles. I do have the snap-on diagnostic tester, just looking for some direction to narrow my troubleshooting. Currently the jeep wont idle on its own and I can smell that it is running very rich and it seems to run a bit rough. Thanks!
 -
 Moses, your website has been extremely useful for me while working on my 1989 Jeep YJ Wrangler 2.5L TBI engine. I have used it for testing just about everything on my jeep. I have replaced several items because of extremely high emissions. Today was the 4th pass through the test, and I finally passed my emissions test. I have replaced the ignition coil, ignition control module, spark plugs, cap and rotor and set the base timing, map sensor (because it did not hold vacuum), coolant temp sensor and my fuel injector. With all of that, my emissions finally were within spec. I am still having a loss of power issue with my jeep, and the only thing that helps is when I run Seafoam through the vacuum lines. It helps for about 2 days and then the same issue. Any ideas would be extremely helpful. One possible clue: The wide open throttle switch is in-op (cannot locate the part), and my throttle position sensor does not put out a signal if this helps any. Stinger87 (Josh)
 -
 My 1988 YJ with TBI has given me hell over the past few years. She's never failed on me but causes me headaches everyday trying to make it run perfectly. My issues include high idle (1100 rpm) for the past few years, recently have noticed a good amount of blow-by and oil leaks. It gets 120psi on all cylinders during a compression test. I will list all work I have done to it to try and fix these problems. Please let me know if im missing anything. I have followed the diagnostic tree on the FSM to the tee and nothing has really fixed it. - Metal valve cover from newer jeep YJ - New Head gasket, Head valves reseated, new rockers and push rods -New valve cover, PCV and CCV cleaned, -New exhaust/intake manifold gasket -New Injector -New ISA -Full rebuild on intake manifold (all gaskets replaced, and all sensors are within what the FSM states they should be, Cleaned inside and out) -New EGR valve -Timing checked (was off by 2 degrees but made no difference when corrected) -TPS and ISA readjusted -New cat -New Exhaust manifold -New Cap, Plugs, and wires Oil is now coming out of where the distributor meets the block - I just replaced the gasket and am still experiencing the leak. Please note I am a novice mechanic, I know I have fired the parts cannon a few times but it was all for good reasons. Please let me know what you think my issue may be or If I am missing a part of the diagnostic process.\ BTW - I love this thing, the diagnostic process is half the fun...
 -
 On the passenger side engine compartment on my 89 yj 2.5 liter there is some diagnostic plug in connectors. which one is the connector for the isa motor control? Which one is D-1 and D-2? How are each individual holes in connectors numbered ( 1-2-3-4-5-6 etc>)?

-
 The owner of a 1998 Jeep Wrangler had several questions about the use of a CompCams 252H grind camshaft in a Jeep 4.6L stroker inline six engine build. His engine core is a 1998 Jeep TJ Wrangler 4.0L...Here is our exchange. My comments are in red: Keith M.: I’ve seen some posts, including on Comp Cams’ site, that say the head on the ’98 has different size valve stems than other years and that cams that will work on other years won’t work on this one. I’m pretty confused by what seems to be conflicting and unreliable information. Moses: I’m not clear why there is so much confusion. CompCams should know parts interchangeability and sizing. 4.0L valve stems are available in both standard size and oversize for a given engine, which may account for the confusion. Parts interchangeability spans many years. Exhaust or intake valve head diameters may change while stem diameters remain common. Federal-Mogul is a well-known reman engine industry parts supplier. We’ll use F-M as a reference source: https://www.fme-cat.com/overlays/part-detail.aspx?brand=SP&PartNumber=V-2527&pt=Intake%20Valve&lu=1998%20JEEP%20WRANGLER&vin= [Intake valves] https://www.fme-cat.com/overlays/part-detail.aspx?brand=SP&PartNumber=V-4554&pt=Exhaust%20Valve&lu=1998%20JEEP%20WRANGLER&vin= [Exhaust valves] https://www.fme-cat.com/Application.aspx?year=1998&make=JEEP&model=WRANGLER&cat=Engine&engbase=4.0L%20L6%20242cid&ga=Y&back=true [Overview of intake and exhaust valves] https://www.fme-cat.com/overlays/part-detail.aspx?brand=SP&PartNumber=VK-216&pt=Valve%20Spring%20Retainer%20Keeper&lu=1998%20JEEP%20WRANGLER&vin= [Valve retainer keepers] https://www.fme-cat.com/overlays/part-detail.aspx?brand=SP&PartNumber=HT-2011&pt=Valve%20Lifter&lu=1998%20JEEP%20WRANGLER&vin= [Lifters are the same over all inline Jeep/AMC sixes] A concern with camshaft installations would be the rocker arm ratio. See the rocker arm interchangeability in this listing. AMC/Jeep inline six rocker arms are essentially the same with the same ratio: https://www.fme-cat.com/overlays/part-detail.aspx?brand=SP&PartNumber=R-905A&pt=Rocker%20Arm&lu=1998%20JEEP%20WRANGLER&vin= Pushrods for 4.0L engines fit the full range of 4.0L years. They are available in different lengths because the rocker arms are non-adjustable. I have discussed this at length in the forums and magazine; see https://forums.4wdmechanix.com/topic/1155-42l-re-build-77-cj-7-project/ and my reply comments from December 25, 2018 and forward. Read the details on fitting the right length pushrods. Here is the F-M parts listing for 4.0L pushrods in a standard (OEM baseline) length. There is selective fit application coverage to compensate for engine block and cylinder head deck height changes, head gasket thickness and so forth: https://www.fme-cat.com/overlays/part-detail.aspx?brand=SP&PartNumber=RP-3275&pt=Push%20Rod&lu=1998%20JEEP%20WRANGLER&vin= Keith M.: I want to use the 252 cam you recommend in your video but I haven’t been able to find a video with specific part numbers. Some of the information I’ve seen indicates that I need to change the valve springs if I go to that cam, other places I don’t see that. I need a timing set but have new lifters so I’m trying to get a package if I can but don’t want un-needed parts. I’m also unsure of which cam works with fuel injection as I have been told this makes a difference. Moses: Sounds like you just need the 252H camshaft if your new lifter set is compatible. If the lifters are OEM replacement, ask CompCams tech if OEM lifters will work with the 252H camshaft. Typically, the camshaft kit includes the cam and lifters, but if CompCam simply uses an OEM replacement type lifter, you could save some here. The 1998 4.0L upper valve train (valves, retainers, keepers, rocker arms and such) should be readily compatible with your 252H camshaft choice. You do need to use the correct length pushrods to attain the right lifter preload as described at the forum exchange and magazine articles. If lifters are the same, you can see whether CompCams is willing to sell the camshaft by itself. They may not warrant the camshaft if you don’t use their lifters…Always use engine break-in lube additive (Lucas, CompCams, etc.) with ZDDP to assure proper seating of the lifters with the camshaft lobes. You still need a timing set from whatever source plus correct length pushrods if the OEM pushrods are not the correct length. As for the PCM compatibility, there is the issue of Coil-On-Plug engines requiring a different camshaft than the 252H. Your engine is not C-O-P, it has a distributor and earlier PCM programming. I’ve not heard of anyone getting an engine code from a 252H camshaft installed in a pre-C-O-P engine like yours. If I were to build my 4.0L 1999 XJ Cherokee distributor type engine into a stroker, I would use the 252H grind camshaft rather than use a stock OEM replacement. I have used the 252H grind with EFI truck engines as far back as a Ford 300 inline six MPI engine (1987). The 252H grind has also been tested repeatedly by Tony Hewes on pre-C-O-P EFI/MPI 4.6L stroker builds. Keith M.: This package would be fine, under specifications it says it works on years 1964-1998. But I can’t be sure that’s correct really, because of the fuel injection and possible valve stem issue: https://www.compcams.com/high-energy-206-206-hydraulic-flat-cam-sk-kit-for-amc-199-258-4-0l.html If I had to replace valve springs I’d use this kit: https://www.compcams.com/high-energy-206-206-hydraulic-flat-cam-k-kit-for-amc-199-258-4-0l.html In specifications it says 1964-1998, but under Installation Notes it states ‘K-Kits will only work in 1964-88 models due to different valve stem diameters” Moses: Valve springs and retainer sizes are governed by the valve stem diameter. This appears to be the reference here. Logically, you do need to match valve springs and retainers to the valve stems and cylinder head spring seats. For your purposes, you only need to use the right diameter 4.0L valves, matching springs and retainers for your cylinder head casting and model year choice. Approach the valvetrain like you’re rebuilding a stock 4.0L engine. Choose replacement parts for the cylinder head casting and block casting involved. Keith M.: And somewhere in here there’s a review for a kit where the reviewer states the kit won’t work specifically on the 1998 engine. That’s strange to me and seems incorrect- I have two heads, one is a 7120 of an earlier (1991-1995 I think) and then there’s the 0630 casting that came off my 1998. Both have 5/16 valve stem diameters by my measurement so I don’t believe there’s a difference. I’m assuming the whole problem with valve stem diameter is the earlier years are a different size so the later heads won’t work with the keepers and other valve spring parts that come in the kit. Moses: My assumption, too. We’re in accord here… Keith M.: I’m just trying to avoid getting the wrong cam and having it fitted to the bearings and then having to get another one. I don’t want to reuse the stock cam really, but I don’t know enough to say a different cam is worth it. This Jeep needs to idle and drive well on the street, I can’t have it be stumbly or rough idling as I will be selling it at some point soon. I do want to learn how to do these builds well as I restore IH Scouts- the 4.2 was an available engine that I think is much better in many ways than the IH engines and if I could find a way to build an excellent and reliable stroker with a 4.0 block and the 4.2 crank I’d do these regularly. Moses: Understood, Keith…I’m a Scout buff, too. If fuel efficiency is an aim and vehicle weight not excessive, a 4.6L build from a 1991-99 (pre-C-O-P) 4.0L block and head could make sense as an alternative to the 304 or 345 I-H V-8. I-H was wise to outsource AMC 4.2L/258 engines, they offered a high-torque design that tolerated emission controls better than competitors. Keith M: Thanks for your help Moses, I’ve done my best to sift through all the info out there and I just can’t come to the right conclusion without your advice...Respectfully, Keith M. Moses: No problem…You want to build a safe and reliable engine. My recommendation for the 252H grind has always been simple: This grind offers increased lift with moderate duration. More lift without increased duration means a “bottom-end” camshaft that actually enhances the idle, tip-in response and mid-range power. This cam is much different than the 260H grind. Since the 1980s, I have recommended the CompCams 252H for fuel efficiency, quicker torque rise (more diesel-like), superior idle and rock crawling tip-in stability. This camshaft raises idle vacuum and maintains higher manifold vacuum from idle to mid-range rpm. This is simply a trailer pulling, rock crawling, high manifold vacuum camshaft for optimal power at low speeds, midrange and to a realistic 4500-5000 rpm maximum shift point. It will make power to 5,500 rpm in a pinch. In your 1998-based pre-C-O-P PCM engine, you should experience no problems. The lift is not extreme and will not create valve spring “coil bind” with stock ratio rocker arms. (Valve springs must be new or in good condition and provide the proper spring rates at specified valve spring heights.) With a stroker crankshaft, the 252H makes even more “stump-pulling” sense. The gearing of your Jeep should target a 4500-5000 rpm maximum engine speed. Your single rail EFI/MPI, the 1998 PCM, MAP sensor and camshaft sensor will find this camshaft compatible. The 302 Ford V-8 injectors described in my articles will make sense. C-O-P engine builders should consider the newer grind from CompCams to avoid engine check light issues. The C-O-P PCM and camshaft position sensor monitors the OEM camshaft valve opening/closing events (lobe valve timing). The CompCams 252H valve opening/closing events can trigger an engine check light on a C-O-P engine with its PCM programming. A roller chain (Cloyes or similar) timing set is always an improvement, though the 252H camshaft will work with a stock/OEM replacement set as well. Your focus should be selecting the correct length pushrods and setting the valve timing to factory marks. This is optimal valve timing for the performance gains I have described…Make sure you install the distributor correctly, which will properly index the camshaft position sensor and ignition rotor in the process. There is nothing exotic about the 252H grind. I have installed this camshaft as an OEM replacement. The valve/lobe timing creates an issue with the C-O-P engines because the later PCM is looking for specific valve opening and closing events in relationship to the crankshaft. Let us know how your 4.6L build turns out and your impressions of the 252H camshaft performance... Regards, Moses
 -
 I bought my first Jeep about 3 months ago, a 2000 TJ 4.0 automatic. I’ve had no issues with it until a recent off-road trip when the transmission decided to stop shifting out of 2nd gear. I know very little about working on transmissions so I hope someone here can help. I’m not completely certain at what point the trans stopped shifting correctly but I do know it was after hitting a fairly deep mud hole which o got hung up in so I decided I would try to “rock” it out by shifting from drive to reverse and back several times. The Jeep did fine after that, from what I could tell, but we also were traveling at low speeds. When I got back out on to paved roads I noticed that when pulling out from a stop it wasn’t shifting down into 1st and when getting up to speed it wasn’t shifting into 3rd gear. I didn’t mess with it for a few days after because of frigid temps and busy with work and kids etc. A couple weeks later I was gonna take to a friends garage and drain the trans because it looked like there was water in the fluid. When I went to pull out from my house I noticed it went into 1st and getting up to speed it shifted into 3rd just fine as well but not even 3 mins into my drive and it was back to being stuck in 2nd gear again. At this point I don’t even know where to start. It’s not show any codes when checked with a scanner. Please someone help!
 -
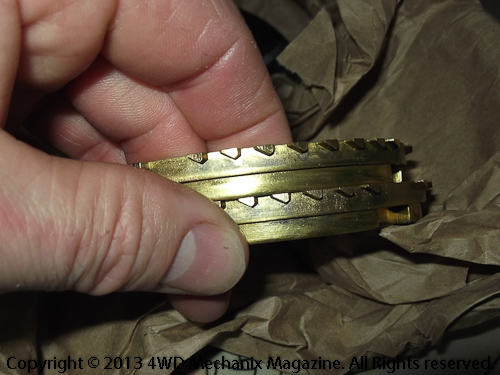
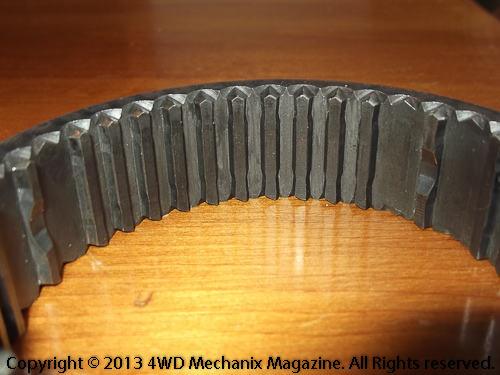
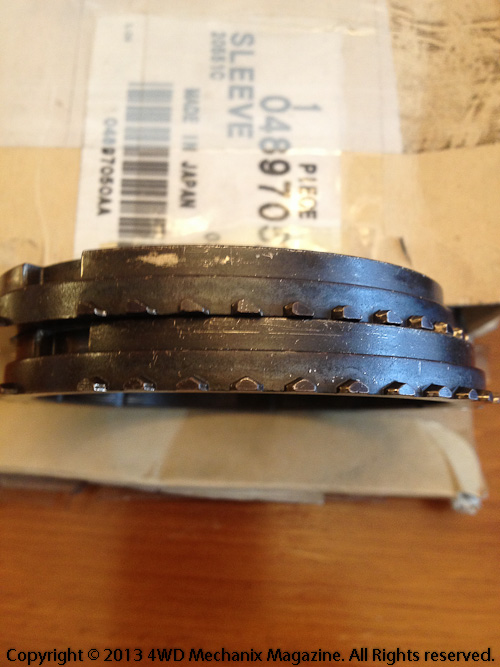
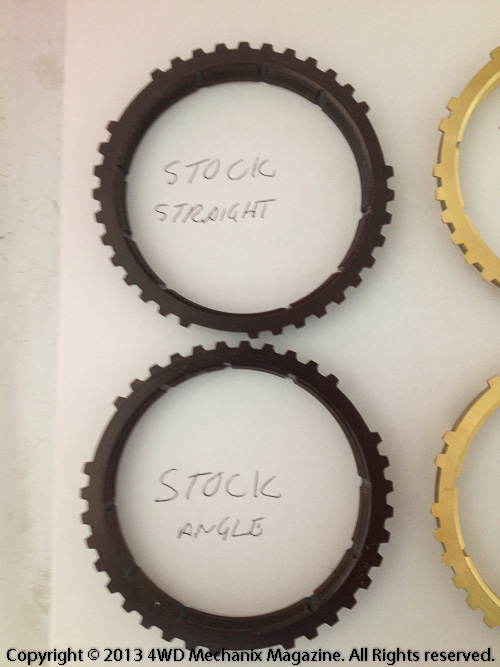
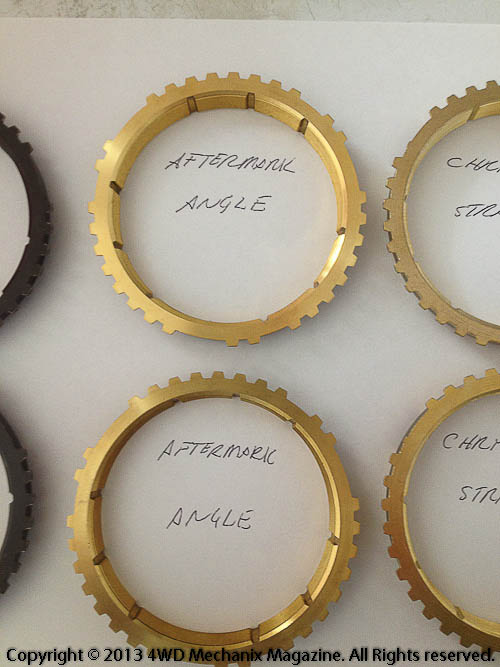
There has been a long thread of exchanges at Timmy960's topic on harsh shifting after rebuilding an AX15 transmission. The problem around 3rd/4th gear shift issues has a basis in the redesign of the synchronizer sleeve, bronze blocking rings and the third gear cog teeth for the sleeve engagement. Jason Logan and I had an exchange about this issue when he rebuilt his '99 TJ Wrangler unit. That exchange was just prior to the launch of the forums. For the benefit of all AX15 rebuilders, I am starting a new topic around this issue, beginning with the in-depth Q&A exchange that Jason Logan and I had...Since this exchange, Jason, Gary, Tim and I have been using the new forums to disseminate AX15 transmission rebuilding details...Here is the original exchange with Jason. I have highlighted important facts: Jason: Hello Moses! I have recently taken advantage of your detailed instruction on how to rebuild an AX15 manual transmission. I am currently working on an AX15 manual transmission from a 1999 jeep tj 4.0L that has never been rebuilt. I have a question regarding the stock 3rd and 4th synchro ring and the corresponding slider [sleeve]! The stock slider has an angle cut on one side and a straight cut on the other side. Also, the stock 3rd gear synchronizer is angle cut and the 4th synchronizer is straight cut. (I may have these backwards). Why is it that the dealer and aftermarket only show that both 3rd and 4th synchronizers are identical (either both are an angle cut or both are a straight cut). I ordered a 3rd and 4th synchronizer from Chrysler and they are identical (straight cut), and when I ordered a set from the aftermarket, the 3rd and 4th were also identical but with an angle cut! Should I use the Chrysler synchronizers (both straight cut), the aftermarket (both angle cut) or should I use one of each to replicate the stock setup as described above? I have put this rebuild on hold for weeks now trying to get some answers from many sources but nothing has been rock solid. I was hoping you could help me and give me some clarification on what is the best set up and why? Why does the slider [sleeve] have different cuts? Why do the replacement synchros have different cuts, different part numbers and configuration of teeth? Thanks for any information you can give me. Jason Logan These photos courtesy of Jason Logan ("JayDLogan"), forum member...Note the 3rd/4th gear sleeve and cog design for his 1999 TJ Wrangler AX15 transmission. Click on each photo to enlarge image. Moses: Jason, I would match synchronizers precisely to the originals and in their original locations. Measure the diameters of the rings, their angles and, most importantly, their fit against the synchronizer hubs in their correct positions. Make sure you face the synchronizer sleeve in the correct direction. Start with the original rings in correct relationship to the synchro hubs and sleeves. Note the overall “width” of the synchronizer assemblies, and then compare this with the aftermarket (new) synchros from both generic and Chrysler sources. The goal is to have synchro rings that will behave and fit just like the originals. Wear on the OEM rings is typically slight, perhaps a few thousandths, so you will know immediately if the parts are either wrong or in the wrong locations. AX15 synchro rings are not the same diameter, and the difference is slight, often confusing the assembly. My article provides details on the kind of “fit” and end plays you should achieve during assembly. Take your time, Jason, you’re already ahead of the game by questioning the parts to make sure of their fit and placement. The OEM layout and fit is your template. Match this and you will “restore” that AX15! Trust this helps…I’ll be at Moab through Thursday and out of communication. Let me know your findings in an Email. I will answer next Friday…Best of luck, I know you will do the right thing here… Moses Jason: Thank you very much for all of your information and help - my dilemma is - when I have ordered the synchro rings from Chrysler (they sent me 2 identical 'straight cut' synchro rings) and when i ordered from the aftermarket (they have sent me 2 identical 'angle cut' rings) but my original synchro rings have 'one of each' cut (one ring is a straight cut and the other ring is an angle cut). Although all synchro rings ordered are the same diameter, angles and fitment as my originals, I'm not sure if I should be using what Chrysler sent me (the 2 straight cut rings) or what the Aftermarket sent me (2 angle cut rings) - or should I be using one of each cut to match identically up to the original set up? I would have thought Chrysler would have sent me one of each (angle and straight cut synchro ring) based on the fact that my original rings are 'one of each' cut. And my second dilemma is - the number of teeth and location of the teeth on each ring ordered are not set up identically to my original configuration of teeth on my original rings - does that matter? I'm extremely grateful for your reply and value your expertise. Jason Logan Jason added these parts details: I found some other information, Moses! If you look at earlier years of the Jeep Wrangler 1997-1998 they have used part number 4897051AA (for both 3 & 4 synchro) or 4897052AA (for both 3&4) depending on the month the jeep was made. Part number 4897051AA is a synchro ring that has teeth that are angle cut and part number 4897052AA has teeth that are straight cut (shaped like a house). The jeep I am working on is a 1999 that calls for part number 4897052AA for both 3 and 4. It looks like at the factory, they have put part number 4897052AA for synchro 4 (near the input shaft) and 4897051AA for synchro 3 (near third gear). Very confusing! I also found, like I noted before in my second email, that the teeth of part number 4897052AA and 4897051AA are in a different configuration around the ring slightly than the originals as you can see in the pictures. I have purchased many 3 and 4 synchro rings but none of the teeth patterns match up! I had no problems matching up 1,2 and 5 synchros. I hope this helps you understand what I am up against! Thanks again! Jason Logan P.S I purchased part number 4897051AA today from Chrysler to clarify if it was angle cut and indeed it was! Moses: Hi, Jason, I’m just back from Moab, UT Jeep Safari…You sent great photos, this is all very interesting! Since the gear/ring in question is really 3rd gear, my belief is that Chrysler/Aisin discovered downshifting to 3rd problems and implemented a remedy. The angle cut would engage the shift sleeve differently, apparently allowing easier engagement on the downshift from 4th to 3rd. It would seem like either ring would work, as they each engage the sleeve troughs accurately (taking a straight-on view). The difference is that the angled ring would engage the sleeve with a different pressure and slight rotation of the ring. Just a guess, but this seems the only identifiable issue. Think about the third gear engagement: Shifting up, there is the lag in the shifter’s neutral gate and a “slower” engagement of 3rd gear. Shifting down, however, would be a direct, quick movement of the shift level and fork. Consequently, the sleeve would want to quickly rush over the brass ring teeth—without providing smooth or effective braking action at the gear hub. This would cause harsher gear engagement. Apparently, the slight angle makes the downshift to 3rd gear smoother, with better braking action and less risk of gear clash. Probably, either design would work if all drivers shifted up and down smoothly and without taxing the synchros. However, American drivers (and others with Jeep vehicles) want to affect a quick downshift to 3rd gear. The concern here, though, is to match the bronze rings with the updated synchronizer sleeve design. Does this make sense, considering the parts layout? The tooth spacing and offset on the rings has more to do with keeping the ring as close to square as it moves onto the gear hub. If nothing else, this is a testimonial to the precision design of Aisin transmissions, more like Euro types than U.S. gear products. The aim with a wedge ramp instead of arrow teeth is the shift “timing”, and that’s a precise consideration. This reflects the rest of the AX15 design quality and fitment. These are more complex units for a reason. I’m sure your build will be stellar, Jason! Let me know how this turns out. Regards, Moses Jason: Makes perfect sense Moses! Would it make sense to you to use the angle cut synchros for both sides of the slider even though the slider on one side is straight cut and the other is angle cut? I am still unsure if I should use both angle cut synchros, both straight cut synchros, or use one of each. The rebuild kit I purchased had two angle cut synchros, I am wondering if this is the upgrade? To me it is like rolling the dice on this decision! Thanks for all your input. Very much appreciated. Regards, Jason Photos courtesy of forum member Jason Logan...Note the OEM synchronizer design for this late version of the AX15—Mopar parts. Moses: I would follow the OEM approach if you’re sure the transmission is original, never before apart (which you believed from the start). The model year is late enough in the game for the synchro "solutions" to be in place…I would match the bronze rings and synchro sleeve carefully to the OEM layout. If this transmission shifted well for all of those miles, I would take this approach! As a final check, place the new synchro rings against the gear hubs to be sure the fit is aligned. You can put a light film of grease on the ring contact surface to read the fit. Wipe the grease away before assembly and coat the ring with a thin film of gear lube. Let me know how this all turns out, Jason… Best, Moses Jason: Thanks again Moses! I hope you had a successful trip to Moab, UT Jeep Safari. I have wanted to go for many years. Wish me luck on the AX15! Regards Jason Moses: Hi, Jason…Moab is breathtaking scenery, with contrast ranging from sandstone/slick rock to alpine peaks capped with snow this time of year, the Colorado River, arches and formations, all of it! I trust you’ll make it at some point, and if so, let me know. I do make the Moab Jeep Safari each year…Like Canada, we live at a “winter zone”, 4400 feet elevation near Reno. We look forward to winter’s end, and Moab Jeep Safari has become our annual end of winter/early spring gathering! You’re going to do a great job on this AX15! Follow the assembly steps faithfully, there are no shortcuts. When completed, you’ll have a smooth-shifting unit, as new, and that will be very gratifying! Let me know the outcome… I launched a message board today with a large number of forums at www.4WDmechanix.com/forums. It would be great to see your involvement if you have the time. Tech forums need detail-oriented members! It’s new, and I’d value your feedback about the forums you find interesting, the sign-up procedure, member validation and use. Best, Moses Note...Jason and I moved this conversation to the new forums at this point...When rebuilding an AX15 that has never been rebuilt before, lay out the parts as you take the unit apart, identify the synchronizer design for 3rd/4th gear, and match parts to the original design. There is a distinct difference between "earlier" AX15 and "late" AX15. The rebuild core in my magazine article and the A150 (Toyota version of the AX15) depicted at the Weber State University YouTube video (click for post topic threads containing the embedded video) are 1990-92 "early" AX15 design. Later model Jeep vehicles with the AX15 use a redesigned 3rd/4th synchronizer assembly...Rebuild accordingly, matching and using the right parts! Jason has added charts from an Aisin direct dealer that show the synchronizer applications for 1998-99 AX15 transmissions. Make sure you check your synchronizer rings and the synchro sleeve design for 3rd/4th gear. Install matching rings for your transmission. Be certain to install the synchro sleeve in the correct direction! ("House" or arrow shaped points match the 4th gear ring with house or arrow point teeth.) Here is an approximate application list with Aisin part numbers (not Jeep/Mopar): Click on image to enlarge...Thanks to Jason Logan for the chart!


-
 I recently bought a 1990 Jeep YJ with 4 cyl 2.5 TBI engine. The jeep runs great except during warm-up. It starts fine and runs and idles well initially. As soon as the temperature gauge begins to climb off the 100 degree mark, the engine begins hunting and surging and usually stalls. If I push down on the accelerator and run it to 1000+ rpm, I can get the engine to heat up to operating temperature. At that point (~160-170F) the idle becomes stable again. So far I haven't done a lot of troubleshooting but have checked the EGR valve, changed rotor/cap, air filter, and fuel filter with no success. I'm wondering if it might be a bad O2 sensor that's slow to heat up which will be the next thing I check/replace. Any ideas or help is much appreciated!
 -
 So this is a wierd one, I've looked and looked on the Internet and can't figure it out. My jeep wrangler runs and drives just fine but there is no cel on start up. I know there should be code because I have no 02 sensors hooked up. I want to know if there is more though. Any help would be appreciated
 -
 I have purchased an 87 yj tbi 2.5. With help from this site I have been tinkering with this thing trying to get it to run as its suppose to especially in this cold weather. I was looking at my egr valve while I was replacing the vacuum lines and noticed it was unhooked and the line feeding it is plugged. I did notice that the vacuum port on the egr was facing the front of the jeep, that seems to be the wrong direction to me.
 -
 There is some play in steering wheel (precisely in steering gear box) and I have power steering. Its saginaw unit, and I've found that it has some adjusting screw on top of it and that by adjusting that screw I can reduce play. On the other hand, I've read that this should be done only after rebuilding complete unit and that adjusting it without rebuild could make elements inside bind and damage the unit. Can it be done or I need to rebuild it first? It has some 180.000 miles on it and no visible leaks on it nor on ps pump.
 -
 Hi Guys! I've scoured these pages the last couple days, but can't find anything that matches my specific dilemma. I have a 1990 Wrangler w/ 150k miles on it, recent acquisition by my future son-in-law. It was running relatively fine, but it quit suddenly on a recent trip. It started cutting out when hitting bumps, then finally quit altogether. After dragging it home, hitting the forums, swapping a few parts, following all the sensor tests and wrapping my head around this TBI setup, I am afraid I have a partially dead ECU. -All ignition parts replaced- Ignition Module, Coil, Wires, Cap and Rotor, Plugs. -The truck will crank the engine just fine, but has NO spark at coil or plugs, and NO gas at the injector. The fuel pump comes on with ignition switch for 1-2 sec, there is fuel in the line at the throttle body, I have not checked fuel pressure yet. -A new CPS was installed, I checked the CPS, 217 Ohms (slightly low), 0.54 VAC while cranking the engine. - All other sensors checked out nominal. There is 5 VDC to the TPS and MAP sensors, so the ECU is not entirely fried. -While tracing the sensor wiring, I found a wire broken internally between the CPS sensor and the ECU (red-white wire tied to pin 28), I'm guessing that was the root cause of the failure. I'm afraid the ECU board may have been damaged in the process of the wire failing while driving. -I am looking for information about what I should be seeing for the output signals for the Ignition Module and Fuel Injector from the ECU. I expect they will be low voltage AC pulses, grounding the DC power supplied to the Ignition Module and the Injector. I have not found any specifications for the AC voltage or pulse duration for either the Ignition at pin 27 or Injector at pin 21 of the ECU. I measured both of these signals while cranking the engine, I got ~0.1 VAC at the injector, and basically zero (0.004 VAC) at the ignition module output. These numbers lead me to believe that the output drivers for these functions are damaged or dead, although I can see no signs of physical damage, no burnt smell, melted traces, cracks, or corrosion anywhere in the ecu components. Is there any function programmed in the ECU which would completely shut down the spark- and injector-outputs based on some combination of other inputs for some safety reason ? Any info on the specific layout of components relating to the Ignition and Injector Drivers in the 1987-1990 ECU would be greatly appreciated! And Thank You to all who have gone before me here, the info trail has been invaluable!!
 -
.thumb.jpg.e6286a7eaf071db8bbff7087dec0deae.jpg) If you read this Moses, many thanks for your Dana 30 rebuild article, it's the only one I've found that helped me. Here is my problem in a rather large nutshell. 1995 YJ, 2.5 5spd. I had an axle seal leaking and bad lower ball joints so I figured it would be a great time to upgrade to 4:88 gears and 4340 axles since I am rolling 33-12.50's. I opened up the diff to find a recent but very poorly installed 4:56. The caps were on upside down and it had about .100" backlash so I am essentially starting from zero. The carrier bearings appear to be original so I am fairly sure the shims are close but I am making a set of test bearings for all positions. There were no shims behind the forward pinion race and only the slinger behind the bearing, probably the culprit of the massive backlash. The pre-load shims are another issue. It appears the installer used all the shims he had and all that were on it originally. The original shims (determined by some discoloration) stacked to .057", He or she added another .041" to stack out at .098". I can do all the setup and the new gears have the pinion depth marked so I know what to shoot for, my question is what ballpark the pre-load shim pack should be in to start the setup? If I read correctly, the torque for the pinion nut is 160-200 ft/lbs so I know if it gets too tight before I hit 160 there are too many shims and if it hits 200 and doesn't have enough pre-load, not enough shims. I would just like a good spot to start. I am using a Motive gear set if that makes any difference. Thanks in advance to whomever might be able to help. I'm sure the Dana 35 in the back is in similar condition so any help will be greatly appreciated. I would also like to mention how awesome it is to find a forum that is just simple and to the point without all the smells and bells to stagger my poor old Dell to a standstill!
If you read this Moses, many thanks for your Dana 30 rebuild article, it's the only one I've found that helped me. Here is my problem in a rather large nutshell. 1995 YJ, 2.5 5spd. I had an axle seal leaking and bad lower ball joints so I figured it would be a great time to upgrade to 4:88 gears and 4340 axles since I am rolling 33-12.50's. I opened up the diff to find a recent but very poorly installed 4:56. The caps were on upside down and it had about .100" backlash so I am essentially starting from zero. The carrier bearings appear to be original so I am fairly sure the shims are close but I am making a set of test bearings for all positions. There were no shims behind the forward pinion race and only the slinger behind the bearing, probably the culprit of the massive backlash. The pre-load shims are another issue. It appears the installer used all the shims he had and all that were on it originally. The original shims (determined by some discoloration) stacked to .057", He or she added another .041" to stack out at .098". I can do all the setup and the new gears have the pinion depth marked so I know what to shoot for, my question is what ballpark the pre-load shim pack should be in to start the setup? If I read correctly, the torque for the pinion nut is 160-200 ft/lbs so I know if it gets too tight before I hit 160 there are too many shims and if it hits 200 and doesn't have enough pre-load, not enough shims. I would just like a good spot to start. I am using a Motive gear set if that makes any difference. Thanks in advance to whomever might be able to help. I'm sure the Dana 35 in the back is in similar condition so any help will be greatly appreciated. I would also like to mention how awesome it is to find a forum that is just simple and to the point without all the smells and bells to stagger my poor old Dell to a standstill! -
 I have a 1988 YJ 2.5L and am I right to assume that it has the AX5 tranny? If so, is there a kit available to convert from the internal clutch slave cylinder to an external? Is this something I should do? I believe the slave is working properly but the bearing is definitely making noise. I have less that 800 miles on the new (slave/throw-out) that was purchased at a local box store (oreilly's) and it's already making noises. Any suggestions or opinions are greatly appreciated. Steve
 -
 T-shooting an intermittent starting problem. About 80% of start-ups are perfect. When failing to start, it will turn over and over, but won't fire up. Sometimes starter fluid will cause it to fire up and then it runs fine, but that's only 50% effective. The rest of the time, only push-starting will work, but push-starting does work every time. Most obvious assumption is fuel problem, but fuel system checks out fine (replaced almost everything over time anyway). Ignition/electrical is fine. Also, the problem seems to be completely independent of outside and engine temperature. I started reading about ECU inputs, and discovered that during startup, an engaged WOT switch causes ECU to cut off fuel because ECU thinks it will flood the engine. The WOT switch is worn, but shouldn't prevent starting if disconnected. Would any other ECU inputs prevent fuel flow during start-up if their signals are outside normal limits? Service manual says during "Ignition On", CTS, MAT and MAP sensors begin providing input to ECU, but doesn't list MAT or MAP sensors during actual start-up. See attached page. So which sensors matter to ECU for start-up fuel supply calculations or decisions? Also, during push-starts, the ignition (key switch) is in the Run position, and not the Start position, which changes the ECU inputs, too. My shop has a DRB II diagnostics reader, but unless they hook it up when it happens to be misbehaving, shouldn't everything check out ok? Unfortunately, I've never been able to get it to fail at the shop. I also tried replacing the fuel relay. I also noticed that it is no longer cycling the ISA motor when it fails to start. It used to, but I can't figure out why it did that anyway. What are my next moves? Might be trying to oversimplify this, but what kind of intermittent problem would occasionally prevent a normal startup, but NEVER prevent a push-start from succeeding?
-
 Well my power steering is on its last leg and screaming at me literally to be changed. I ordered a NEW pump and a serp belt and also the puller tool for the pulley. My main concern is to flush the system so I have all new fluid in there. whats the easiest way to go about this?
 -
.thumb.jpg.50417926e689c26e805cb7dab128a22c.jpg) Hi All, I've started this new topic as a result of my last nightmare, I mean, topic. Due to budget limits I have purchased a used Differential for the dana 35 and am going back to my regular size tires. You can see in the link below why this all came about. I've never done this repair but I have done a lot of DIY on my Jeep with good success. I'm looking into youtube and the forum for suggestions plus Moses is here with professional advice. I plan on starting tomorrow, just waiting on other parts. Feel free to add suggestions. Thanks.
Hi All, I've started this new topic as a result of my last nightmare, I mean, topic. Due to budget limits I have purchased a used Differential for the dana 35 and am going back to my regular size tires. You can see in the link below why this all came about. I've never done this repair but I have done a lot of DIY on my Jeep with good success. I'm looking into youtube and the forum for suggestions plus Moses is here with professional advice. I plan on starting tomorrow, just waiting on other parts. Feel free to add suggestions. Thanks. -
 Hi, I have a 1988 Jeep Yj 2.5 with the renix computer. My last stop before I drive this thing off a cliff is here. I should have come here first. I hope one of you can help me. I love my Jeep but am so frustrated with it right now. Problem: Jeep is running super rich. I do not think it is ever coming out of closed loop. Points to know: - O2 sensor is recognizing that the jeep is rich. Volts sit between .94V and .99V JEEP RUNS AWESOME. No loss of power. No hesitation. Idles between 900 and 750 - Fuel smell coming from the tailpipe Emissions high on HC and CO Things I have tried: -Replaced o2 sensor -replaced fuel pressure regulator -replaced CTS replaced ISA replaced ECU replaced MAP Replaced MAT checked return fuel line for blockage. Had Head rebuilt. Vacuum was fluctuating and needed new valve guides. Was hoping this was impacting the MAP sensor. Nope I have gone through entire FSM diagnostic tree. The only thing that failed was the MAT sensor resistance never got down to 150ohms. Always stayed above 300. I even paid a mechanic $600 to try and uncover the problem. He confirmed it was not coming out of closed loop. Recommended changing the ECU. Which I did. I hope someone can help. Thank you all in advance. Carlos
 -
Moses, thanks so much for responding. I’ve actually been following many of your posts and articles regarding tuning up the 2.5 TBI. I will check these posts you’ve listed and see where to go from there and provide feedback to this post. Regarding the 2nd issue (Loud sound) I’m really hoping that it’s what you say such as the driveshafts/splines and NOT my renewed motor or Tranny. The motor still goes on and sounds very smooth and the transmission changes gears smooth also. It makes sense that it is a driveshaft sound and how it Rocks the Jeep. For the first time in 27 years while driving it “kicked” and made a loud metallic sound and I felt as if I ran over some huge hole or rock. I could not tell if the sound came from the motor or transmission. But it jerked enough that my radio popped out of place. I stopped to check but there was no hole or rock. Everything under the Jeep was OK – no leaks, dents or missing axles. I really thought something fell off. But the Jeep kept going and the transmission changed fine and 4 minutes later it did again. Background – the motor was recently rebuilt because there was noise from bad piston rods and a bad blow-by problem. The rebuild was pretty good and the motor goes on nicely and idles at about 950RPM. I would really like to cure issue 1 while issue 2 scares the heck out of me. Here are more details on my setup: All driveshafts are original and there is no lift kit. But my tires are huge! I got them cheap and used along with the rims from a fellow worker. I thought they would look great but I also read that it takes a lot more work for the 2.5 Jeep to move them so I can’t go 5th gear unless it’s a pretty leveled highway. Up hill its mostly 3rd or 2nd gear now. Tire specs are 33 x 12.50 R15 (even though using a tape measure I get under 31” high). I lifted by adding 1.25” shackles and a mechanic who is good at bending leaf springs added 2” by bending the factory leaf springs. Only the rear springs. The rear drive-line length is 18.25” from transfer case to U-bolt and the Angle is about 23°. Is that clear info or do I need to measure differently? Other than that, there are no other modifications to chassis or driveshafts. I don’t think the front driveshaft may have made the noise since I wasn’t in 4x4. Is it still possible? Other things I will be checking are transfer and Axle fluids. I did have a front passenger side fluid leak. I’ve attached a picture of the tire. Thanks for your help.

-
Hello I have a 1990 Jeep Wrangler 2.5l and I'm having a problem keeping it going it will start and I have to keep my foot in it to keep it going once I let off it will die does not idle then it will not start again what's my problem thanks?
-
Hello, Once again I have this issue for like 3 years. Trans would not shift from 2nd to 3rd on slow speed by default, it would go into neutral and after I give some more throttle it would downshift to 2nd. If I get to 40 mph or similar, once I release throttle pedal it would shift to 3rd and after that everything works fine - no problem at any speed. So my guesses are that something is stuck in valve body or governor. Until now filter has been replaced, fluid flushed (was red even before flush), TV cable adjusted, bands adjusted. The reasons why I suspect on governor valve is that this seems to be related to vehicle speed. Why I suspect about it sticking is that once (or twice) times the trans gets into 3rd after driving at greater speeds, it will work fine until i turn of vehicle and leave it for 3-4 hours, sometimes less sometimes more. I also remember that once I got stuck in some pond and engine turned off because of hydrolock, so trans spent some time in water. After that the problem was gone, and it reappeared after two months. I immediately flushed trans that time but there was no water in it however. Could it be that there is some crud that block weights in governor and make it stuck sometimes? Am I missing something or the problem is probably governor? I've also noticed that when the car is cold (like if i leave it overnight) the trans shifts from 1st to 2nd at later rpm on same throttle applied (like shifts occur on 2100rpm when cold and bit below 2000 rpm when warm)
-
I have a 1997 Jeep TJ Wrangler 4.0 with 171K miles on the clock. This mechanic at work is making me very nervous telling me that the oil pump on the 4.0L takes a dump between 150 and 200 thou miles and I should be aware of this..Im a worrier and he's got me going now. Anybody have any input on this and what I should do? the engine runs great. When I start it cold it has 50 lbs oil pressure. when its warmed up its 40 while driving and 20 sitting at a light. Sounds normal to me but have any of you had issues with the oil pump? He says when it goes its too late..New motor time..
-
So I did a trans service on my 1997 TJ. Filter new oil etc. I noticed a leak in one of the lines going to the radiator. I bought a kit on ebay. Hosses, lines and hardware, im really not looking forward to messing with the lines on the trans. The leak is further teard the rad along the frame. So my thinking is to cut the lines up to the bad part and put the new lines via brass fittings. That would be so much easier. My delema? I dont know and cant find anywhere the size of the lined so I can buy fittings beforehand. Can anyone help me with this or has anyone ever changed the lines on the trans without having to waste a whole day!? After the second service in 3 mos. and a adj on bands the trans is shifting very well hopefully it will last. Any help on the line size or what im getting into if I bother with lines on tran would be very helpfull. Thx guys... bigwheel53
-
This is driving me nuts..The display on my radio does not light up. A couple of times it came on but now its been off for good I think. The orange wire is the illumination wire and it has no power to it. All the buttons and backlighting work with the dimmer switch..even the radio works but no display because this orange wire..I don't want to start cutting the harness up to find out where the source is. Does anyone know where this orange wire comes from? The light switch ? the ignition switch? All the fuses are good. Could it be a ground wire somewhere? I just want everything to work normally..Im not a big radio fan,just want to hear the news etc. but I don't know what station im on lol
-
I bought this 1997 TJ a couple of months ago with 168 thou on it and am trying to get it up to snuff. Needed a fuel pump { hard to start } now it starts great. So I figured lets do a trans service. I dropped the pan and just what I suspected it hasn't been serviced in a Looooonnnng time. It had some friction material in pan,the oil was like mud and the magnet looked like a hairy spider.It also slipped from second to third pretty bad. I put a new filter and a deep sump pan that holds two more qts of fluid. I also adjusted the bands. Shifted pretty good but with a slight slip from 2-3rd. I changed the oil 3 more times, pretty expensive and now its red all the time but a rebuild is in the back of my mind. Im going in again and change the filter and re adjust the bands. I saw a video about changing the accumulator spring. the teck made it look easy just drop the plate and change the spring to help any shifting problems. Say it should be part of tranny maint. Has anyone had any experience doing this and what the result was?? Im really trying to keep this trans alive before I drop 1800 for a complete rebuild. I think the jeep is worth it.. No rust at all on frame or the body. im the third owner and the first two knew each other and the jeep was garage kept all its life...The frame and bod are in awesome shape..Any input on this spring thing would help. I would like to change it while I have the pan down if I can..thx..bigwheel53


.thumb.jpg.e6286a7eaf071db8bbff7087dec0deae.jpg)

.thumb.jpg.50417926e689c26e805cb7dab128a22c.jpg)

