


Stuart_Snow
-
Posts
31 -
Joined
-
Last visited
Content Type
Profiles
Forums
Blogs
Store
Articles
Gallery
Everything posted by Stuart_Snow
-
 Life has been busy and I have finally had a chance to go on a few shakedown runs. There are some BLM areas west of Phoenix that I can access via back roads without getting on the interstate. The jeep wants to move on out when I roll it down the highway with the 3:56 gears. I have had it up to 60 @ 2500 rpm. The steering box is worn and needs adjusting or rebuilding. Also with only the old lap belt I'm ready for a shoulder harness for better safety. I'm really impressed with how it pulls when accelerating from low rpm. Driving on the road requires all your attention and there is some body lean in corners. Did later models come with stabilizers? Off road I really like the option of a low first gear with the T-18 without shifting into low. Shifting the t-case to 4 low or 4 high required some strength. Maybe a twin stick conversion will help this. The trails are mostly old mining roads and decomposed granite which can make hill climbs a challenge. I pushed it up a steep climb for a test. It finally got steep enough that I ran out of traction with the open diffs and at the same time the carb reached its critical angle of attack and the engine began to buck and snort so I had to abort the climb. I was amazed at the torque the engine makes even at very low rpm. Maybe Howell fuel injection and some lockers are in my future. I'm researching the aftermarket parts to beef up the common fail points on these jeeps. For now I'm having fun getting to know this jeep after working so hard on it. I have had it out on a few long trips and made it back with no mechanical issues. Im getting some data on fuel burn which can run from high 12's to 14 mpg. I'm most excited that there are NO LEAKS. This make me very happy and I feel lucky to have this jeep to enjoy. The dog likes it too!
.thumb.jpg.3b4d46fe8c4d62d51d238891f0c4ecba.jpg)
.thumb.JPG.2cc7b4d595347c7e6c156cf70c84c671.JPG)
-
Well its been a long and difficult road to being street legal but I finally made it. Arizona Emissions testing took 4 tries but It is running just like it rolled off the assembly line in 1977. The first thing that surprised me is the inspectors totally ignored all my OEM correct emissions gear and just marked n/a or not tested for everything including my evap canister. They only were concerned with the levels coming out of the tail pipe at idle and loaded which is a dyno run at about 35mph. Gasses tested were HC Hydrocarbons and CO Carbon Monoxide. NOX was not tested. I assume because my jeep is a non-catalyst model with air injection and EGR only. I passed HC every time with no trouble which told me at least I was getting ignition on all cylinders. CO carbon Monoxide was my problem which is the result of incomplete combustion. My limits I had to beat were 1.5 percent for loaded and 2.0 percent for idle. I failed bad the first try with 3.8 loaded and 6.0 idle. I began to worry I the standard was too high for my carburated jeep. I installed a beautifully rebuild carb with new bushings from Carburetor Exchange in El monte, CA. I also verified my EGR and air injection were working. This improved my CO numbers a little but I still failed and in fact the HC number got worse but still passed. At this point I was wondering if Howell fuel injection was in my future. Back to the books I went for more study. I read in a trade article that platinum or iridium plugs can give a slight advantage when trying to pass the CO carbon monoxide test. Out came my nice Denso copper plugs and in went a platinum set. Then I adjusted the idle mixture per my shop manual.Next I backed the timing off even more than the OEM specified 3 degrees. Acceleration is pretty bad like this but I passed idle with almost no reading at all and just missed loaded by a small fraction of a percent. Since this was still failing I took it to the professional emissions guy down the street who was able to tune the final little bit out and get her to pass. I know he bumped the advance back up because my power is back but he did not divulge his secrets. I hind sight it may have been smart to start with the Pro shop who can check his tuning with his gear and then go for a guaranteed pass. I was just happy to know that this carburated engine can meet the standard. It has been rewarding to take this engine from a basket case back to original running condition. I also avoided all the wives tale advice I got from people about pouring alcohol or moth balls in my fuel tank. I'm ready to take her out to the trail and see how she does. It sure rides better then my CJ-3b. I also found some rust free doors at F/N jeep in Colorado springs. I now need to adjust my steering gear to take the scare factor out of driving this thing.
.jpg.7da89271150041eec81b03fa0973783c.jpg)
-
It runs! I had the distributor setup one gear too late so it was not lined up with the plug terminal exactly. All I was getting was the warm afterglow which was causing my spitting problem. It fires right up now. Turns out indeed my accelerator pump port was also clogged. Carb spray did not clear it so I used one of the welding tip cleaning wires to clear the obstruction. It idles very smooth. I ran it at about 1600 rpm for about 20 minutes to mate the cam with the lifters. My break in oil is Rotella 15-45 and I used the Lucas break-in additive with ZDDP. It looks good after the break in run and nothing leaking out of the bottom. I have a slight exhaust leak to deal with at the manifold. It sounds like a beast. At least now I can work on fine tuning things. Thank you Moses for getting me to start thinking and looking at it closer. I'll keep you posted on my break in progress.

-
After doing a long and careful re-build on my 77 CJ7 4.2 engine I expected it to spring to life. So far I'm only getting spitting and coughing through the carb but it did fire once for a second which gives me hope. I'll quickly run through the vitals here: Fuel system: New gas tank and lines. I have verified that it is pumping fuel to the carb. The carb is a re-build Carter YF 1 barrel. It was dirty and needed a new accelerator pump but in good shape otherwise. I used a kit from Mikes Carbs and did it my self which was pretty straight forward. I have spent a fair amount of time messing with the carb on my CJ-3b so I was familiar with it. It does appear that fuel is making down the intake but when I pump the throttle I'm not seeing anything from the accelerator pump so its coming back off to diagnose that. Ignition: Its a DUI HEI unit, I installed it per instructions and set it up to fire the #1 cylinder at TDC. I verified it is working with my timing light. Using my remote starter switch I can see the timing mark and I'm able to run it up and down the the advance markings by rotating the distributor while I crank from 0 degress to 12 or more all it does is spit out the carb. DUI recommends 12 degrees static as a starting point for racing or off road which may be a bit much for me until I get past emissions. I currently have it at 6 but have tried the whole range. My factory settings only call for 3 degrees +/-2 @500 Rpm . I'm guessing this is due to smog regulations of the day. Anyway I've demonstrated that the ignition is working and I can set the advance up and down with no results. Valve train: I spent a lot of setting this engine up and do not anticipate valve-train problems unless the springs are tired or something is sticking. I ran through all cylinders in firing order with a cheap press on gauge and got 100 psi or more on all. I do have an aircraft style differential compression tester which I intend to use once I modify it to fit auto plug threads. I did a thorough priming of this engine and verified the lifters were pumped up and oil was making it to all the rockers. So I have a flame throwing ignition system and an anemic carb. I understand that spitting can be a symptom of a lean condition but I assumed that was for an engine that is already running. I'll report back when I trouble shoot the carb and verify my compression is good when and where its supposed to be. No back firing but lots of spitting and coughing up the carb. I have kept the air cleaner on to keep flames out of my face.


-
4.2L Re-build 77 CJ-7 Project
Stuart_Snow replied to Stuart_Snow's topic in 1972-86 AMC/Jeep® CJ and Jeepster Models
I'm Calling this done. Well I guess you're never really done. I was able to bring all the emissions gear back to original condition with the exception of adding the DUI HEI distributor. This 77 jeep came standard with the EGR/Air-guard package per the sticker on the top of the grill, and no catalytic converter. I can still read the "non-catalyst" sticker on the dash. I re-built the one barrel Carter which is the low altitude type. As I understand it only the high altitude carbs and California jeeps came with a converter for this year. This engine uses a thermostatically controlled air cleaner system which diverts warm air from the manifold during cold startups. The only part I cannot find for this is the heat shroud which attaches to the exhaust manifold. I cant even find a good picture of one. Its not important now because its 110 degrees but it does get cold here on winter mornings. I had to do a little scrounging to find some of the banjo bolts for the air-pump manifold and did a little repair welding on a few of the fittings. I'm going to start a new thread now to get it running. I expected this engine to spring to life and its not exactly springing yet.


-
Borg Warner T-18 rebuild
Stuart_Snow replied to Stuart_Snow's topic in 1972-86 AMC/Jeep® CJ and Jeepster Models
Wow! I can relate to your story about the compressor. If I do any more of this restoration work I'm moving in next door. 🙂I need to finish this jeep so I can get back to my airplane project. -
Borg Warner T-18 rebuild
Stuart_Snow replied to Stuart_Snow's topic in 1972-86 AMC/Jeep® CJ and Jeepster Models
Moses, The Pro Chem Ferrous Soak came in Powder form and is high in alkaline content. I filled a 20 gallon metal wash basin from the garden section and added the prescribed amount of powder. Then I heated it with a propane burner since it is meant to be a hot process. I think 160 degrees to 200 degrees is recommended. I attached wires to everything I dipped since this stuff is highly caustic it makes getting the parts out easier. You don't want this stuff on your hands. It really goes to work immediately on the grime. I scraped off the big chunks first. It was especially useful when I dipped my intake and exhaust manifolds as it really eats up old rust and all the years of black soot carbon. When done I sprayed each item with a pressure washer. The downside as I said is the messy tub of goo afterwards and no its not reusable but it is bio degradable and environmentally friendly they say. I had gotten this solution from and old engine shop guy who retired and was getting rid of everything. I think this product has been discontinued as I cant find it on the prochem website but they do have several other products similar. It sure did a great job and beat scrubbing for hours.
-
I was fortunate enough to find a project jeep with the T-18 transmission and coveted low first gear. I decided to go for the complete rebuild since it was out and needed cleaning. Again I opted for the Novack kit. I probably should have done this as a step by step blog with more pictures but hopefully these will help someone. #1 rule take pictures of everything you take apart before hand. #2 get a professional grade set of snap ring pliers. My CJ re-builders manual and shop manual were invaluable. With these and the Novack instructions I made it through with very few tears. I had done the t-98 on my CJ3-B several years ago so decided to dive in. When I opened the case I found things to be in pretty good shape but several years of sitting allowed condensation to spot some things with minor surface rust. My first big challenge was pulling the front bearing which didn't come easy. I about gave up but finally got a very large clam-shell style puller. The snap rings on this transmission are serious business. Safety glasses and a careful approach are required. Once I had the main shaft out I knew I was past the point of no return. I was amazed at how heavy this shaft is along with the counter shaft. This requires strong arms to hold steady during re-assembly. I really appreciated the PTO cover being off as it allowed me to hold things in place during re-assembly. Once I had everything dissembled I boiled the case in Pro Chem Ferrous Soak. For the aluminum bell housing I used the milder Citrus Soak. I finally found a use for this after doing my Corvair engine. The needle bearing installation looks intimidating but really is not thanks to sticky grease and the keystone effect holding them in place. By far the most difficult step was working on the 1rst/2nd clutch hub. It has three large ball bearings compressed against strong springs while the sleeve is slipped over. Definitely get some extra helping hands here. Don't be stubborn like me and try to do it alone. The springs will shoot the ball bearings into every dark recess of your shop trust me. My shop manual describes using the 3rd/4th hub as spacer jig on the bench to hold the assembly just right while you simultaneously press all three bearings into place and slip the sleeve over. After about 20 tries and searches for lost ball bearings I was successful. There has got to be a better way. I'll bet they had a slick jig at the factory for this. Sorry no good pictures of this. My hands were full but here is my 3rd /4th assembly and the 1rst /2nd assembly . Syncros and gears were in great shape. I was happy to get the fresh bearings so I don't regret the time and expense. I invested in a shop press since I needed it for some of the assembly. This transmission is a heavy monster. Get help moving into the press. Seeing the finished work is rewarding. I'm glad I didn't chicken out because I came real close. To finish up I needed to mate it back up to the Dana 20. I was worried about how to do this and not wreck the gasket since things are so heavy. I wound up putting to transfer case on the front of the jeep. Since the grill is off this made a nice bench. I used the hoist to lift the t-18 into place and line things up perfectly. It worked great. Everything got a coat of black pain before going back under the jeep. Final lessens learned. #1 The transfer case shift assembly will not go back on with the bell housing in place. I left it off to make it easier to get under the jeep or so I thought. Don't forget the little spring that connects to the throw-out bearing. It wont go on if the bell housing is on since it hooks internally to the housing. #2 My CJ-7 belly pan has several sets of holes for mounting to various jeep power train configurations. I failed to take note of which ones were used and had a hard time when wrestling with the tranny jack and trying to figure out which ones to use. I got so confused at one point that I was convinced I had the belly pan on backwards. I finally figured it out but should have taken pictures or notes.


-
I recently rebuilt my Dana/Spicer 20 transfer case from my 77 CJ-7. After 100,00 plus miles it turned out to be in remarkable shape internally, but outside it was a greasy mess. I decided to use the Novack rebuild kit. I just happened to have a 5 gallon bucket of Pro Chem ferrous soak which took all the hard work out of cleaning the case. This stuff really works! I used a large steel tub and a propane burner for heat. Gloves and safety glasses are required as this is a highly caustic solution. It eats away rust, scale, paint and grease in short order. The downside is you will have a tub of black smelly water to deal with afterwards. The rebuild was straight forward thanks to my CJ rebuild guide and my 1977 shop manual. Trial fitting and walking through each procedure mentally helped eliminate mistakes. There is a certain sequence to follow which I stuck to for the most part. Setting up the front output shaft end play was a critical step which takes time and patience. A magnetic dial run out gauge really helped here. I think Novack makes a billet unit to replace the shims and help eliminate leaks. I used lots of sealer on the shims. The one place I ran into trouble was installing the new Novack super hard intermediate shaft. "super hard" describes the installation process as no amount of persuasion from my dead-blow hammer could force it all the way into the bore on the front of the case. I finally found a socket that fit this bore size and gently lapped the bore with some super fine lapping compound. I did just enough to get the shaft to go in all the way. I did not have a shop press at this point but got one later when I did the t-18 rebuild. I was disappointed with my Novack instructions as they did not mention rebuilding the tail shaft assembly at all other than final assembly where it just says to reattach it. I spent a lot of time on this step setting up the pre-load with the various shims. A lot of trial and error was required here but getting it right is critical so i stuck with it until I was happy. I used Permatex ultra-gray on both sides of all gaskets and sealer on any bolts that are exposed to the inside of the case. I'm hoping for no leaks. I'm happy with the results as the unit turns freely and has proper pre-load on both outputs plus its nice and shiny now to boot.


-
4.2L Re-build 77 CJ-7 Project
Stuart_Snow replied to Stuart_Snow's topic in 1972-86 AMC/Jeep® CJ and Jeepster Models
I have a question about spacing between my fan and radiator. The old radiator was not salvageable and had a thin cross section and the fan used a 1 inch spacer. The new replacement is an aluminum replacement and much thicker. I plan to keep my original fan and using the spacer is not an option. There is now 1-3/16" clearance between the fan and radiator. I don't know what is optimal. If this jeep had a shroud I don't have it. I guess I can make one or find an aftermarket one. -
4.2L Re-build 77 CJ-7 Project
Stuart_Snow replied to Stuart_Snow's topic in 1972-86 AMC/Jeep® CJ and Jeepster Models
I have made some more progress. The engine is finally in and I'm slowly going thru the checklist of making sure everything is done. I decided to take time out to rebuild the T-18 transmission and Model 20 transfer case since it was all out and needed cleaning. I will try to make a separate post about that as it all turned out good. I had the clutch rebuilt and resurfaced the flywheel and added a new pilot bushing. Everything was torqued to specs and threadlocker was used. I had a little trouble getting her in and had to use a load leveler and extended hoist but its in. I still need to rebuild the carter carb. In the meantime I'm getting ready to prime it and study my DUI ignition instructions. I used the ARP thread sealer on the #11 head bolt. Just taking my time to make sure I don't forget something like putting the oil in.

-
4.2L Re-build 77 CJ-7 Project
Stuart_Snow replied to Stuart_Snow's topic in 1972-86 AMC/Jeep® CJ and Jeepster Models
Moses, My replacements are the MPR-333 9.622. I re-measured everything and assuming I use these new push-rods this is what my pre-load would be. 1 - .042/.042 2- .042/.052 3- .042/.052 4-.032/.032 5- .042/.032 6-.052/.042 My block deck and head were resurfaced. The reworked head came with this project and I'm not 100% certain if seats were replaced or ground. I'm glad you had me check this as I was not aware the lifters had limits on pre-load. Stuart -
4.2L Re-build 77 CJ-7 Project
Stuart_Snow replied to Stuart_Snow's topic in 1972-86 AMC/Jeep® CJ and Jeepster Models
My comp cams tool arrived in short order. It's nice having a Summit warehouse nearby in Nevada. I went to work on the #1 cylinder which I already had setup at TDC. I adjusted the tool for "zero lash" finger tight only carefully making sure the lifter plungers were not depressed. Using my new Melling push rods as a reference I found the the exhaust valve measurement was .040 shorter and the intake valve measurement was .050 shorter than my new Melling pushrods. If I understand you correctly this lifter pre-load of .040 and.050 on these two valves is with-in tolerance but slightly on the high side. I will check the rest and see what I get.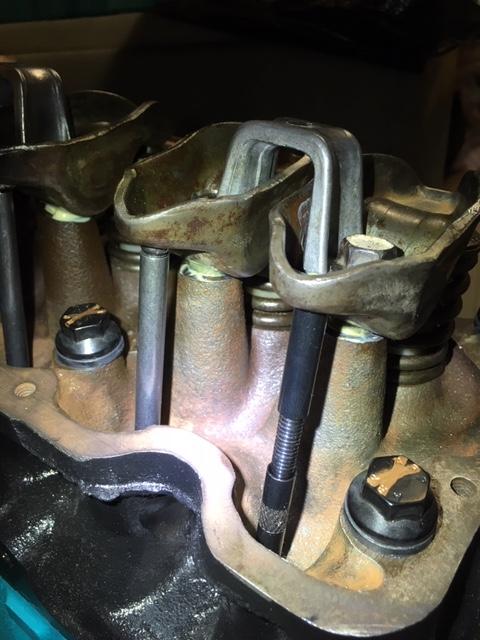


-
4.2L Re-build 77 CJ-7 Project
Stuart_Snow replied to Stuart_Snow's topic in 1972-86 AMC/Jeep® CJ and Jeepster Models
Moses, Thank you. Your Vlog on push rod measurements is timely. Since my seats and valves were re-ground and not replaced and my head and block surfaces were cleaned up I should look at this measurement before proceeding. I'll look at getting the Comp Cam measurement tool since I have time. The lifters are still dry, I'm glad I waited to prime this thing. Have a Happy New Year! Stuart -
4.2L Re-build 77 CJ-7 Project
Stuart_Snow replied to Stuart_Snow's topic in 1972-86 AMC/Jeep® CJ and Jeepster Models
I checked with ARP tech support on my experience with reduced force midway through the pull up to 100 Lbs on the head bolts. They did not have any concerns as long as I got up to 100 lbs and went slowly which I did. One of the other parts missing from this project were the push rods. I was able to source some from Melling which were specific to my particular engine configuration. The rockers needed a lot of cleanup work but appear to be in good condition otherwise. This engine uses the aluminum rocker bridges. I was skeptical of their use but they have worked for the last 40 years and 118,000 miles. After verifying my push rods were properly seated down in the lifters I torqued these down very slowly and evenly to the specified 21ft lbs. Items like the fuel pump, Spark/EGR vacuum cto switches, thermostat and housing have been sourced through NAPA-online which I've had good luck with.

-
4.2L Re-build 77 CJ-7 Project
Stuart_Snow replied to Stuart_Snow's topic in 1972-86 AMC/Jeep® CJ and Jeepster Models
#11 is the only one that goes in the water jacket from what I can tell. It will need sealer. I don't think the Ultra Torque will suffice as ARP advertises a separate thread sealer. -
4.2L Re-build 77 CJ-7 Project
Stuart_Snow replied to Stuart_Snow's topic in 1972-86 AMC/Jeep® CJ and Jeepster Models
I have made a little more progress in that I have the head and water pump on the engine. One of the things missing from this project was the head bolts. I was able to find a set of ARP bolts at JEGs that were reasonably priced. The Felpro gasket was put on dry per its instructions. The old Jeep shop manual says to use "perfect seal" sealer which I believe predates modern gaskets. When in doubt follow the instructions from the manufacturer. I followed ARP's instructions for use or their Ultra Torque assembly lube. My shop manual specifies 105 ft lbs. ARP specifies moving up in three equal steps to 100 ft lbs following the shop manual circular tightening sequence. I marked each bolt with a witness mark for the last two steps and didn't see any anomalies in turn radius between bolts. About midway through each pull up to 100 ft lbs I felt a decrease in the amount of force needed to turn the bolts. This caught me off guard and I'm guessing it is the Ultra-torque lube doing its thing to the pre-load. Let me know if this sounds strange. The old Prestolite distributor is getting replaced with a DUI HEI unit from Performance Distributors provided by Summit along with a set of their wires. Im looking forward to what this will do for me. The old BID unit has an electronic module that dates itself with the "Made in Hong Kong" label. I remember seeing that a lot on things as a kid growing up in the 70's but not since the British gave up control I think. This beast of an engine is getting pretty heavy on the stand and reminds me of the tractor engines I grew up around in the Midwest. I'm anxious to get it back in the jeep but need to go through the T-18 and spicer 20 first. I recently verified that the T-18 on this 77 jeep has the 6.32:1 first gear which will suit my needs. The CJ-3B in these pictures gets used as a work table too often due to its fenders and hood. I know its a terrible way to treat a jeep. Its engine is the one from the re-build guide at https://www.cj3b.info/Engine/Rebuild.html but that is another story. I'll have to start a thread for this jeep in the vintage section.


-
4.2L Re-build 77 CJ-7 Project
Stuart_Snow replied to Stuart_Snow's topic in 1972-86 AMC/Jeep® CJ and Jeepster Models
This is all I can figure. My vertical alignment is good. I'm glad I test fit the cover or I wouldn't have noticed this problem. Yes and I remembered to use sealer on the back where it mates against the oil slinger. My CJ re-builders guide helped me head off trouble here. I used a longer bolt to pull the ballancer on and the extra threads saved me when the forces got too hard. Lucky thing I decided to back off and figure out what was wrong. -
4.2L Re-build 77 CJ-7 Project
Stuart_Snow replied to Stuart_Snow's topic in 1972-86 AMC/Jeep® CJ and Jeepster Models
The long hot summer is over and I'm finally able to get some things done and update progress. The new by-bass valve retainer has been installed. Thank You Moses! Pistons tapped int place with no trouble. I had some trouble with the front timing cover spacing clearing the cam gear retainer bolt. My solution was to glue two timing cover gaskets together which gave me the clearance need to to keep the cam gear retainer bolt from grinding against to timing cover. The replacement harmonic balancer did not want go on without ridiculous amounts of force so I backed it off several times and finally had to remove and lightly polish the mating surfaces. It went on normally after that. I used the 4 piece oil pan gasket and spent a lot of time making sure I had potential leak area well sealed. The oil pan is now on so we will see how that works. At some point I realized that my water pump pulley was missing from this project. I thought this was no problem until I learned how hard they are to find for a two groove early 4.2 engine. Mine is a 77. I brought one home from our local AMC jeep salvage yard which turned out to be from an 87 YJ. This is a problem since apparently the later 4.2 engines used a pulley and water pump combination with a shallower offset which causes the belt to not align properly on my 77 engine. I briefly considered using a later model water pump that doesn't stick out so far but didn't know what other problems that would introduce. I finally found a salvage one on E-bay from Southwest off road in New Mexico. This part seem to be the right fit from a 76-86 4.2 engine so I am back in business.


-
4.2L Re-build 77 CJ-7 Project
Stuart_Snow replied to Stuart_Snow's topic in 1972-86 AMC/Jeep® CJ and Jeepster Models
Thank You! I replied with my address. Stuart -
4.2L Re-build 77 CJ-7 Project
Stuart_Snow replied to Stuart_Snow's topic in 1972-86 AMC/Jeep® CJ and Jeepster Models
Moses, No regrind. Just a polish. I cant afford to get too carried away, hopefully I'll be ok. My 77 jeep factory shop manual showed up today, lots of good info in there. I got the timing chain on today. I fumbled around with that quite a bit but got it clocked correctly. I have wondered if Mopar has a stock of the older jeep parts like the valve retainer. Ill have to check. Stuart -
4.2L Re-build 77 CJ-7 Project
Stuart_Snow posted a topic in 1972-86 AMC/Jeep® CJ and Jeepster Models
I have begun the rebuilding of the 4.2 engine from my 77 CJ-7 barn find project. My local NAPA store in Buckeye, AZ has a reputable engine shop attached and run by an family friend of my wife. Its good to have friends with years of experience to help. I opted for NAPA's deluxe master rebuild kit which is a good value when you get it all at once. I was pleased with how clean the hot tank process got my dirty block and sheet metal. I had given up on scrubbing and even the pressure washer didn't work well. After taking measurements it was decided to go with the .030 re-bore. My sharp eyed engine man noticed that the oil bypass valve retainer had damage to the shoulder that fits into the block for alignment. I think I understand how this valve works and felt this damage would compromise the integrity of the valve. I am not sure how the damage occurred other than forces applied during removal or installation. Luckily there is a good bit of info about the valve in my Jeep CJ re-builders manual by Moses Ludel. A trip to my local AMC junk yard did not yield one. I'm not sure if this part is still stocked anywhere. I decided to see what I could do with my MIG welder and I think I succeed but I would still use a new or salvage one if I can find it. Next I installed the nice brass plugs that come with the kit and the oil passage plugs. The new cam is standard OEM grind and fit nicely into the new bearings installed by my shop. I'm not sure exactly what holds the cam in place on this 77 vintage engine. Chain? Lifters? Distributor? All three? My engine does not have the spring and Pin thing on the timing cover that Ive heard about on later engines. My jeep project had signs of good regular care by one owner. My crankshaft was still within specs for a polish only and standard bearings. The crankshaft is now installed after verifying still in specs on oil clearance with plasti-gauge.


-
Corvair Aircraft Engine Conversion
Stuart_Snow replied to Stuart_Snow's topic in Off-Topic and General Discussion
I haven't had time to figure out what the transmission is but It has an overdrive. I'm not familiar with the Getrag but my I was able to get 200K of service from the 46RE on my 97 Dodge Ram with a few tweaks. I've completed a full service on the 93 and have discovered a rear main seal leak which I'm not surprised considering its age and lack of regular driving. I'll try to make a thread in the Cummins forum. No they are not. Mine are old medium duty hand-me-downs. Its time for me to invest in some good modern 2 stage units. Good News! I ordered the latest version of Finch's book. Its already arrived an I love it. This is really going to help improve my welding. A lot of good data in here and I've already found some things I'm doing wrong like running my Oxygen pressures too high. -
Corvair Aircraft Engine Conversion
Stuart_Snow replied to Stuart_Snow's topic in Off-Topic and General Discussion
Moses, May was a busy Month with a daughters wedding and a trip to the Kaibab National Forest on the North Side of the Grand canyon. Both events were a delight. I was able to tow the CJ-3B on the trip with a new addition to my Mopar fleet. A 93 Dodge Ram 250 club cab 5.9 Cummins. It has the poor mans dually conversion and has 50,000 miles. It belonged to my Father -in law and wasn't driven often. I'll have to read through the Cummins forum to get up to speed on this early generation of the 5.9. Exploring the Kaibab with the CJ-3B has been a dream for many years. Conditions were dusty but I saw some great country and wildlife and the Jeep comes alive going down old narrow trails. I share your enthusiasm for the Merlin v-12 and P-51. Nothing sounds better than a Mustang on a high speed pass. Corvair powered planes have the unique growling sound of a 6 cylinder boxer engine but not quite as impressive as the mustang. I've always wanted to go to Reno but have not made it yet. This will be my first year for going to OshKosh in August. Work on my Corvair powered aircraft continues. I have been working on the Elevator bell-crank assembly and was doing some welding today. I struggled a little as I was trying to weld dissimilar size material. I think I need better regulators as I'm constantly adjusting my flame setting. I will look for Richard Finches book and also check out the Cleveland tools site. Some more good news is my 4.2 block from my 77 CJ7 project is back from the machine shop and all the new parts. I cant wait to start working on that. I started flying back in 96 and most of it has been in Cessna's. The open cockpit Pietenpol will be a real throwback to the old days of flying. She is a good honest flying ship with no surprises but it is a tail dragger and its a light weight and high drag machine which bears watching in the energy management department. Stuart -
Corvair Aircraft Engine Conversion
Stuart_Snow replied to Stuart_Snow's topic in Off-Topic and General Discussion
I'll keep an eye out for this when I start running my rebuilt 4.2 by making sure my EGR is working properly for one thing and use good cooling and proper fuel and carb setup. No magnetos that I'm aware of for the corvair but the Model A conversion for the Pietenpol uses a novel system that runs off the crankshaft front (now rear). Model A' conversions are still popular back East with Pietenpol purists. Lots of low end torque and a lovely sound. I needed a little more horsepower for my warm western climate and altitudes which the corvair delivers. The biggest hang-up with using the distributor and primary/secondary ignition has not been reliability but getting builders to understand that they need to set their timing with a light for the full 32 degrees before flight. This is done in steps with the engine not running for safety as the adjustments get made then started and rechecked. Initial run-in on the test stand is normally done with just the initial 8 degrees of static timing at about 1/3 power. Each distributor is custom curved by Mr Wynne on his Allen machine to have the full advance come in much earlier than was the case for the car version. One of the nice advantages of this type of ignition is starts are easy especially hot starts compared to some fussy aircraft engines. These could be considered vintage carbs as they were found on most aircraft right before and after WWII and were used for years on 200 C.I. and smaller sized motors. They do get re-jetted to match the Corvair. Their is at least one certified aviation carb shop that specializes in rebuilding and re-jetting these. They can Also be bought directly from SPA. There seem to be a good supply since they were used for so many years. I will be using a Marvel Schebler MA3-SPA. This will require carb heat and a mixture control. The tubing comes in condition N (normalized). I have been working with very thin material so far .032-.035 on the tubing and about .090 on some of the other stock. Later I will get into heavier thickness on the landing gear. A normal weld starts with slowly bringing the piece up to temperature. Setup can be important so as not to sink off needed heat. I'm using RG-45 and RG-60 filler rods. Weld process is normal working the puddle and watching for oxidation. I normally run a very slightly carburated flame. The critical part is to slowly work the flame over the finished weld and not allow any cooling breezes to shock the metal causing cracks. Complex cluster welds can build up stresses which can be relived by bringing the weld back up to a dull cherry glow and them letting it slowly cool. No other heat treating is required other than relieving stresses. Over the years a lot of amateurs have built very strong airframes as the chrome-moly materiel seems to be very forgiving if it is allowed to cool slowly. I am amazed at how strong and light the tubing and welds are. I think the process for race chassis must be more complex than this. Strength and ductility are the goals we want in aircraft also. The repair you did on the Ford gear is amazing. The Weld-mold product looks interesting and I'll have to learn more about it. Subaru conversions have been around a long time in experimental aviation but haven't seen the kind of success or following that the corvair has. I'm not sure why since there are other engines that are water cooled as well like the 4 stroke versions of the Rotax which are very popular now. The Honda Fit engine has seen some success as well if you like an engine that cruises at 5000 RPM which its very happy to do with no problem. My corvair will operate in the 2800 to 3300 range.


.jpg.95202754b5ed35f8dbc3fd14935cd461.jpg)
.JPG.9133846c2fae03d2d547221c70aee07b.JPG)
.jpg.7da89271150041eec81b03fa0973783c.jpg)


