Rinky Dink
-
Posts
34 -
Joined
-
Last visited
-
CJ headlight upgrade questions
Rinky Dink replied to MomoJeep's topic in 1972-86 AMC/Jeep® CJ and Jeepster Models
I have found there are two problems with the CJ5. I would imagine the CJ7 is the same. 1st problem; The hi/lo floor switch. Being on the floor in a vehicle that is not exactly the most dust or water proof, the switch and the bare connectors will corrode and in doing so, will build up resistance, This will reduce the available voltage to the bulbs. They may be designed as 12 volt but you may be delivering as little as 6 volts to the bulb. You could install a relay, wired direct from the battery and switched via the floor dimmer switch. This would give you full voltage to the bulb. Locating the relay under the hood protects it from water and dirt. Just be sure to fuse any modifications you make. 2nd problem; The factory wire feeding the headlights is under sized. Replacing it with something more stout will ensure all available voltage is delivered to the bulb. This is an easy fix to increase the wire gauge while you install the above mentioned relay. -
Jeep CJ 304 V-8 Carburetion Issue
Rinky Dink replied to Rinky Dink's topic in 1972-86 AMC/Jeep® CJ and Jeepster Models
Hello Moses, It has been awhile and I need to post an up date on the carb issue. After talking about the problem to a mechanic that I know he directed me to a local one man carb shop. One of the things I have learned (per the Calif State smog ref), is that the MC 2150 never came on the 304. Now when I was looking for a carb I saw the bore difference, the 2100 with 1.08" and the 2150 with 1.21" so of course I went with the bigger carb. Little did I know. This little carb shop uses an exhaust sniffer to jet the carb to suit the engine. He pinched shut off the air injection thereby disabling the cat in order to see the true exhaust chemistry. What gasses came out the exhaust port is what came out the tailpipe. It turns out the rebuilt carb I bought was jetted for a 360. It was way over jetted. Like 6 or 7 main sizes too rich. $100 later I have an old jeep that easily passes smog, with emissions way below the allowed average. Starts easy, will idle all day and meters without a hiccup off road. That was money well spent. -
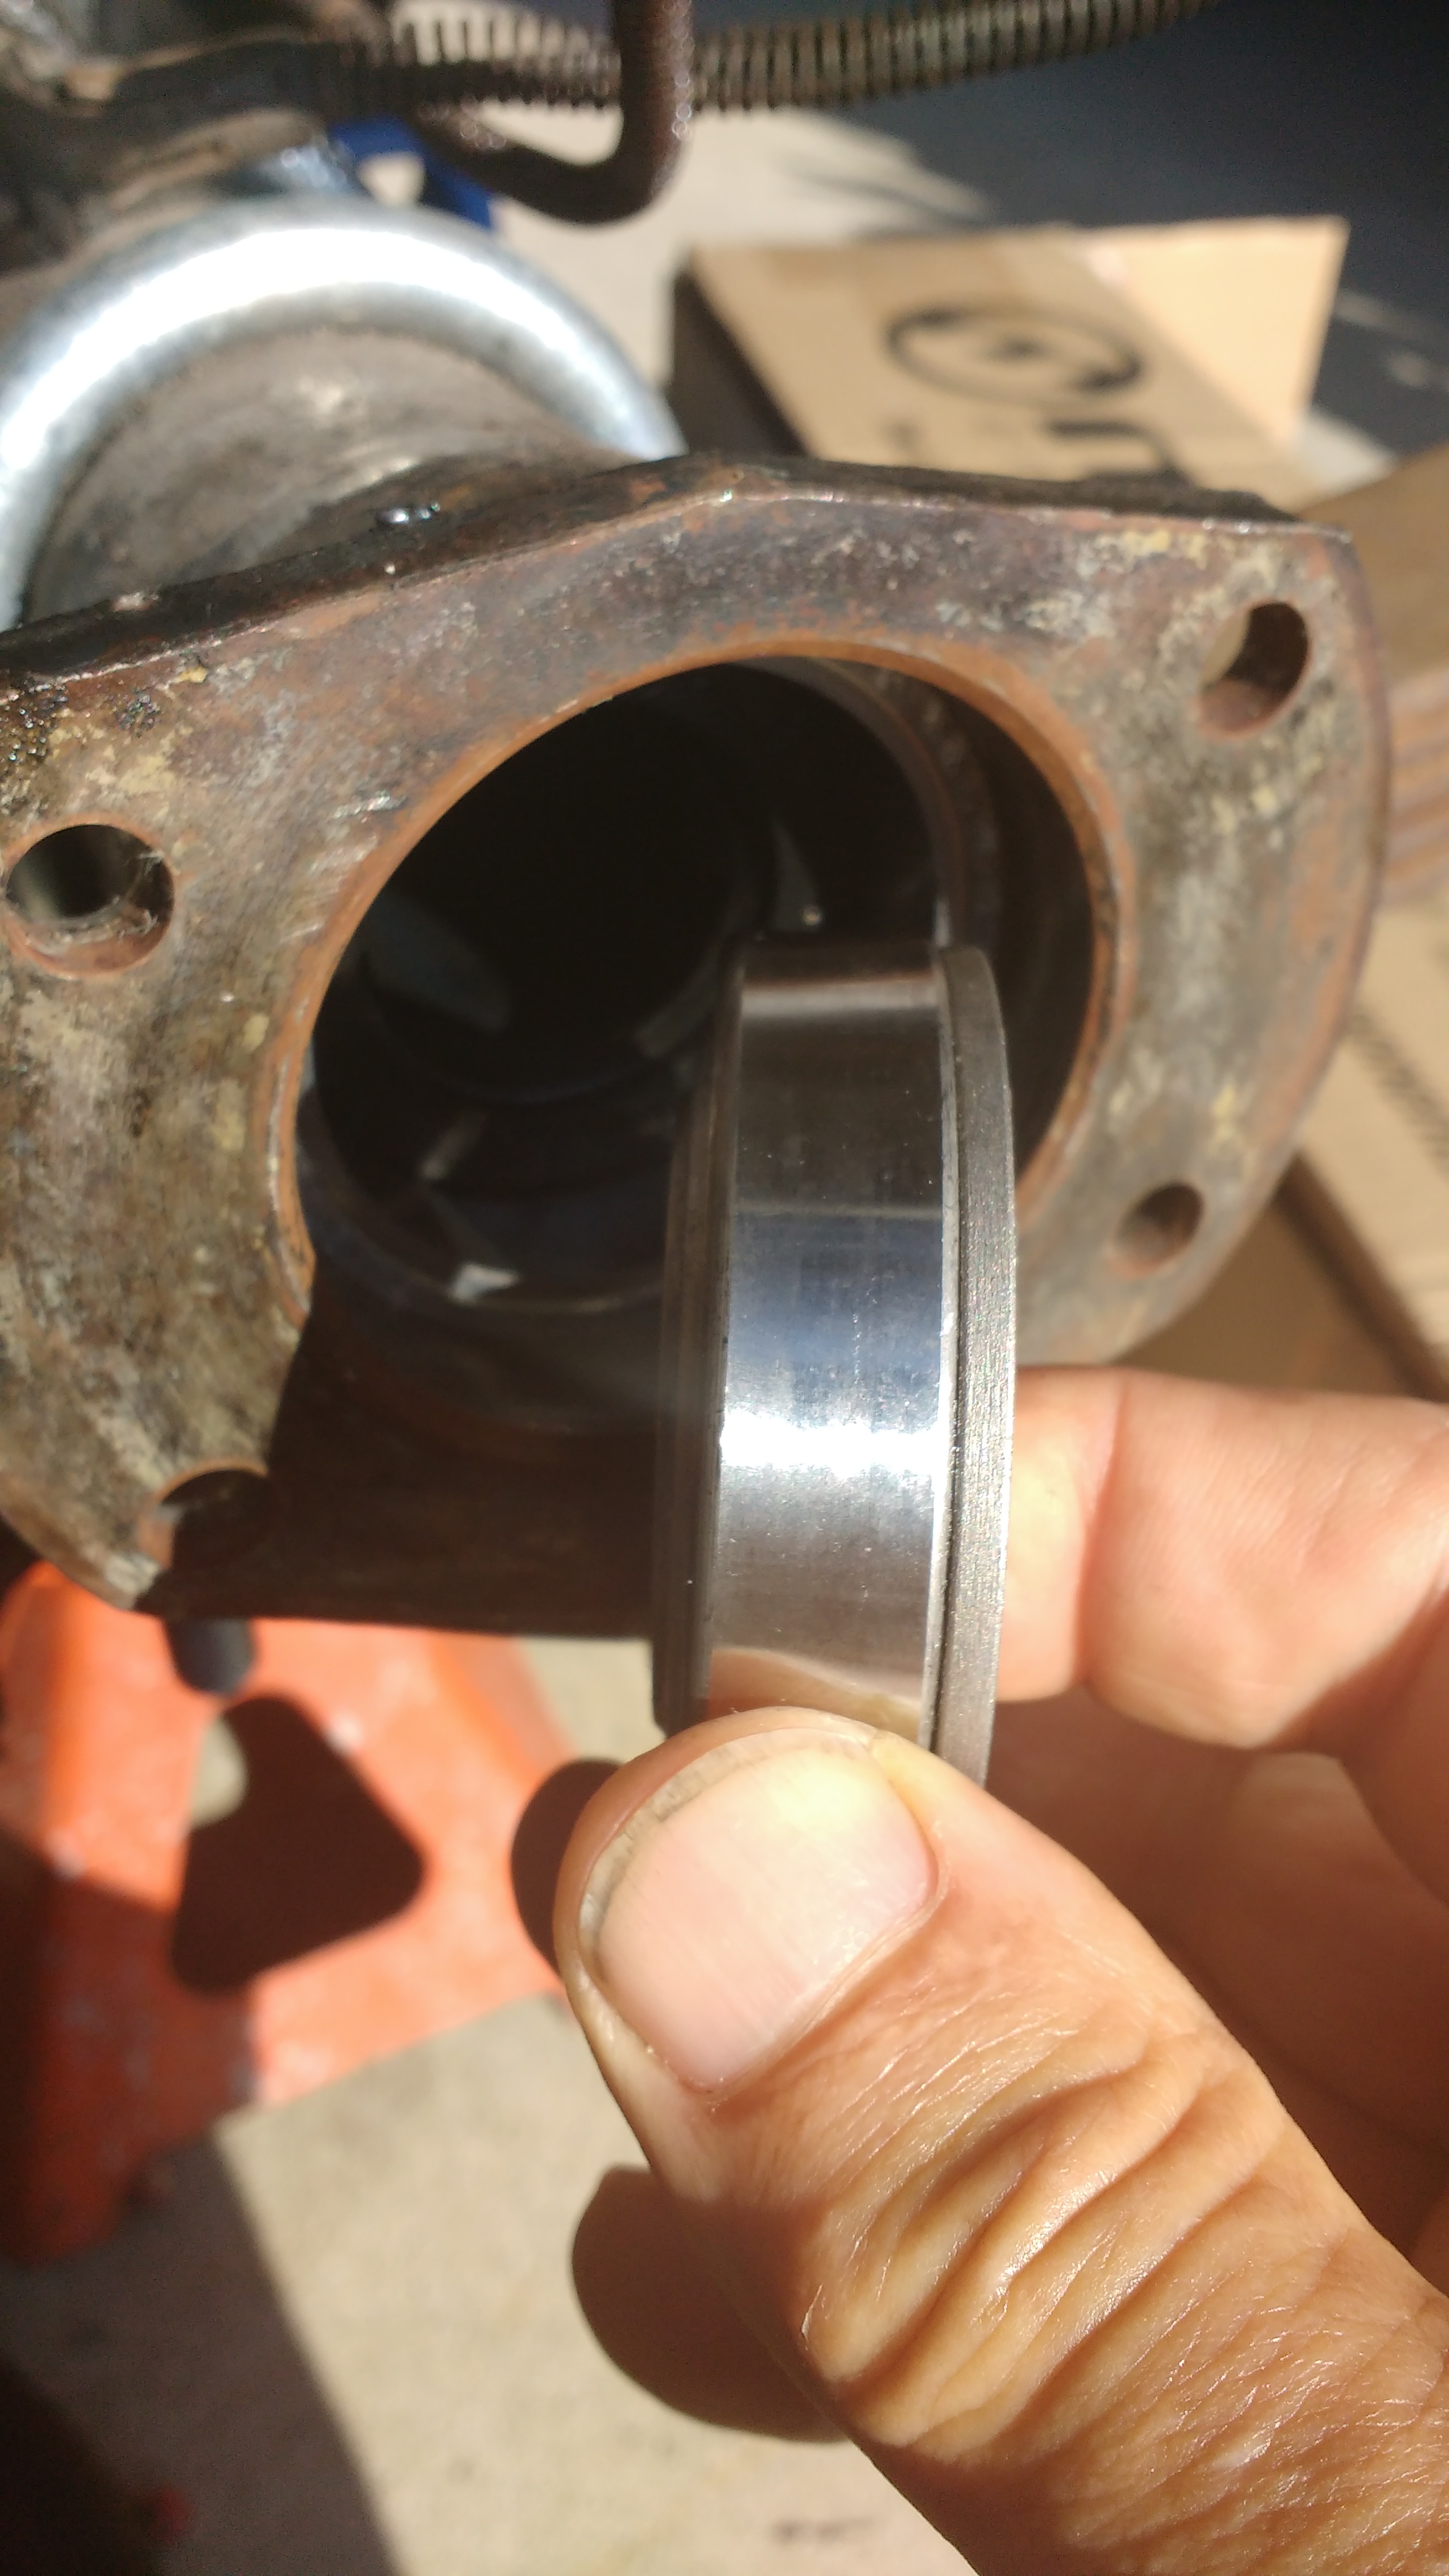
My major issue with this setup prescribed by Moser is there is nothing to keep the axle from just sliding out of the housing. The outer race, being held by the backing plate, has it's taper pointing outward. In this position, nothing but the seal is holding the axle in place. For this to work as it should, the bearing needs to be turned 180. I had read all of the AMC / Moser forums and found nothing that actually discussed my concern. Last night I found a Moser axle thread on a Jeep forum. It described a series of immediate bearing failures that was resolved by having a mechanic friend assist on the 3rd try. I have to assume the mechanic did the install his way. Reading this convinced me I was correct. I stopped by my SKF dealer this morning and asked his opinion. He said that the way it is shown in their assembly diagram is wrong, or at least the bearing wouldn't perform correctly. He also agreed the 0.080" preload was grossly excessive. (Bending of the backing plate was also in one of the forum threads) So, I'm going to do it the way I think it should be done. Flip the bearing and use the factory shims to give it 0.015" preload. Put a few miles on it and recheck.
-
In speaking with Moser, per their instruction, the 0.020 - 0.080" stickout and the resulting preload imparted by the brake backing plate is intentional. I have plenty of experience with tapered bearings and I know how preload is supposed to work. This ring preloads the roller cage and the outer race. As I read their install sheet the thicker side of the inner race (roller taper) should be pointing toward the center of the axle. This seems counter intuitive to preloading the bearing. It should have opposing force directed through both races. The roller cage should never have any loading. Guess I'll just do what they tell me. I'll need to find a replacement SKF BR9 as I broke the first one.


-
After pondering the situation I came to the conclusion that the instructions left out the need to use OE shims between the axle housing and the backing plate, to take up the spec'ed .02 - .08 bearing stick out. Removing the odd ring from the bearing will result in the bearing cage getting hung up on the backing plate. Couldn't see that last night. I need to stop going this stuff in the dark. Quite obviously whoever wrote the instructions didn't know that OE setup does not use shims on the right side of the axle. Looks like I need to redo the right side and replace that bearing..
-
After re-reading what I wrote, without knowing what I was describing, it sounds a bit like gibberish. A pdf of their instructions. http://www.moserengineering.com/moser/wp-content/uploads/2010/04/JeepInstructions.pdf Apparently the second hub also spun. It is so trashed that mu little press wouldn't budge the hub. I had to torch the axle to retrieve the brake backing plate. I believe the new axle install problem is tight splines. The only locker Moser warns of is the factory locker as it uses a different carrier. I have a Spartan which fit in the standard carrier. I would assume that it should not be a problem. I test fit the second axle and it too is tight in the locker spline engagement. The axle splines are not tapered so again assume just snug. I'll be carefully checking the bearing, housing and backing plate interface. I really suspect that the ring on the bearing is meant to be removed, even though their instructions don't say to do so. This time i'll silicon the seal end plate and lightly bolt it to the backing plate before pressing the bearing on the axle. Went and did some measuring. OD of the axle bearing is 2.535, ID of that odd ring on the bearing is 2.25. ID of the brake backing plate is 2.255, so there you go. I would assume the ring should be removed before pressing. Removing it will leave a step in the bearing to act as a retaining feature.
-
Ok, Beat on the axle with the dead blow a bit more. Got it in to the point where I could fit the 4 retaining bolts. Snugged them up and the axle locks up. Tried whacking it some more and nothing loosened. Backed off the bolt tension and the axle loosened up again. Whacked it some more and re-tightened the bolts. Could tell the bearing was moving. Finally got all the bolts tightened, gave it a few more whacks on the axle and it turns free with no end play. Certainly doesn't seem like the right way to do this.
-
Hello Moses, After doing the rebuild on my M-20, I managed to spin a hub while driving it around on the street. I never liked 2 piece axles so this was a good reason to go single piece. Based on their reputation, I bought a set of the Moser Engineering axles. Figured it would be a straight forward swap. All I can say is their instructions leave a whole lot to be desired. Looking at their instruction page, #4, this axle bearing stuck out 0.120." Their instruction says to grind the spacer ring to get the desired protrusion. They don't state where to grind to get this correct stick out. The AMC housing I.D. has a series of steps. Perhaps I was over thinking the concept but I decided to try making a taper on the O.D. of the seal end of the spacer ring. That didn't have much effect so I took some off the seal end. Not much change. Ended up taking it off the bearing end and got the bearing seating @0.08 so it was within spec. Seems like a lame way to do something. Were AMC axle housings made that inaccurately? On to the next adventure.. Pressing the bearing on the axle. Installed the retainer, backing plates, bearing and press ring using a manual 12 T press. Pushed the bearing and ring until I felt a increase in the resistance. Slide the axle into the housing and it is obvious the bearing is not seated as the axle is sitting way too far out of the housing. The SKF 331579B bearing ID is 1.3775, the axle has a stepped bearing surface 1.378 / 1.380. I repressed it until the bearing was obviously stopped. On installing the axle, I discovered that the bearing OD is greater than the backing plate's ID. The bearing has an odd "retention ring" on it that seems to hold the bearing race halves together. Without removing this ring, the backing plate would sit proud of the housing by 0.80." That can't be correct. Without pressing off the bearing, I managed to flex this ring to the point where it broke and the backing plate would now sit flush with the axle housing. This leaves you with very little room to apply the sealer but it can be done. At this point I have to assume the bearing is located correctly on the axle. I believe I am having issues with the axle seating in the locker splines. It feels quite tight and the bearing is still 3/8 - 1/2" away from seating in the housing. I have given the axle some whacks with the dead blow and that seems to have made it tighter in the splines, to the point when I may need a puller to remove it. I wonder if the new locker splines got damaged by the old axle or if it is just a tight fit. Called Moser for direction but they are closed for the weekend. Seems nothing is ever easy.
-
Jeep AMC M-20 Pinion Removal
Rinky Dink replied to Rinky Dink's topic in 1972-86 AMC/Jeep® CJ and Jeepster Models
I ended up removing the axles (& bearing races) in order to pull the locker and install the axle spacer block. I was able to do this without pulling the carrier. The axles had to clear splined plates of the locker. Had to remove the entire locker in order to fit the spacer block within it. A few hours later I have it all buttoned up. Axle end play set to .005." So far the axle has about 10 miles on it. Nice & quiet. Really no sound at all. Locker is very evident, clacking quite loudly in tight radius turns, the inner wheel chirps & scrubs coming out of corners on the throttle. Went and jacked the axle off the ground and checked the shimming. As I expected, it feels to have loosened a bit so I'll be revisiting the left hub soon just to tighten it a bit. Thanks for the feedback on this project. Next up: Dana 300 & T-176 Rebuild. Let the fun begin! -
Dana 300 Finally Done
Rinky Dink replied to simple man's topic in 1972-86 AMC/Jeep® CJ and Jeepster Models
Next on my list of "Things to do" is rebuild my Dana 300. What kit did you use? -
Jeep AMC M-20 Pinion Removal
Rinky Dink replied to Rinky Dink's topic in 1972-86 AMC/Jeep® CJ and Jeepster Models
I had read on some on-line commentary that the spartan instructions left something to be desired. I'll be sure to send them a note on the matter. The locker kit came with a new cross pin. -
Jeep AMC M-20 Pinion Removal
Rinky Dink replied to Rinky Dink's topic in 1972-86 AMC/Jeep® CJ and Jeepster Models
The pinion & carrier is installed. Carrier preloaded @ .008. This was set after setting the backlash. Reconfirmed backlash @ .008 ' after final setup. The pattern looks good, the backlash is in spec. The torque spec on the ring bolts is 105 ft/lb. I set them at 90-95 ft/lb along with red locktite. Ring gear run-out is .001 - .0015 so within spec. The axle side movement is the current issue.I am hoping that spacer block is the solution. -
Jeep AMC M-20 Pinion Removal
Rinky Dink replied to Rinky Dink's topic in 1972-86 AMC/Jeep® CJ and Jeepster Models
Ok, got the dif all back together. The right axle is in and retainer plate torqued to spec. Interestingly the axle has about a 1/4" end play. I figured that might go away with the left side installed. Left side bearing and seal in and it also has about a 1/4" end play. Both bearing races are flush with the axle flanges. It now has the Spartan locker replacing the spider & side gears. Their instructions did not call for the OE axle spacer block to be reinstalled. I am thinking perhaps it should be, assuming there is enough space to do so. Time to take it back apart. -
In my experience with oil seals, the lip spring should always be on the side where you want to retain oil or grease. In this case, spring should be closest to the bearing.
-
Jeep AMC M-20 Pinion Removal
Rinky Dink replied to Rinky Dink's topic in 1972-86 AMC/Jeep® CJ and Jeepster Models
Ordered a Motive Gear Master rebuild kit along with a Spartan Locker. Ran into two problems, one my fault, one not. Turns out I ordered the locker for a Dana 30 rather than the AMC M-20. So I now have a locker to fit the front. Reordered the correct one for the rear so I'll have both axles locked. That'll be a first for me. What I did was replace the pinion bearings and used the original shim thickness as a starting depth using new shims. The AMC axle carrier has a minimum/starting shim of 0.080" per side. Both of the fat carrier shims in this axle were toast. It turns out the shim set in the Motive Gear kit was insufficient to actually shim it from scratch. I called them up to tell them of this. They were completely cooperative on getting me an additional shim set but I needed to order it through a dealer. Called Summit Racing. No problem. Had it in two days at no cost. Anyway, Carrier is installed with saddles bolted tight. Haven't done the carrier preload yet but it looks pretty good. 0.007-.008 backlash. I think the pattern is ok, showing centered on coast side and a bias toward the toe on the drive. From what I have read that is normal for a used gear set. What do you think? Time to set the carrier shim preload and If everything look good it'll be back together this weekend, just in time for the 4th. Very happy with these vendors; Fast shipping and good communication from both of them. Summit Racing - Motive Gears Master kit Completeoffroad.com - Spartan Lockers